Jak stworzyć relacje w Entity Framework Core 5

Relacje w kontekście bazy danych definiują, w jaki sposób dwie encje są ze sobą powiązane. Entity Framework Core naprawdę błyszczy w sposobie w jaki wspiera relacje. Oferuje konfigurację opartą na konwencji, która skonfiguruje relacje w oparciu o dostarczony model. W bardziej zaawansowanych przypadkach możemy skorzystać z solidnych możliwości Fluent API, które zapewnia większą elastyczność.

Muszę przyznać, że praca z relacjami w Entity Framework Core 5 jest dla programisty bardzo naturalna i być może to właśnie jest jego najważniejsza cecha.

Typy relacji

Relacje w bazie danych będą oznaczać, że dwie encje są ze sobą powiązane. Są logicznie połączone. Spójrzmy na przykład model hotelu:

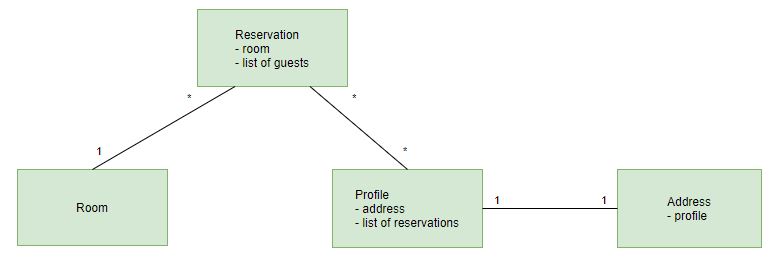
Mamy rezerwację, która dotyczy jednego pokoju i zawiera listę gości. Do pokoju można przypisać wiele rezerwacji. Profil również można przypisać do wielu rezerwacji, ale jest powiązany tylko z jednym adresem. Mamy tu zdefiniowane 3 różne typy relacji:

  • jeden-do-wielu – pokój do rezerwacji
  • wiele-do-wielu – rezerwacja i profil
  • jeden-do-jednego – profil i adres

Te typy są dobrze obsługiwane przez Entity Framework Core, więc przyjrzyjmy się modelowi, który odpowiada temu schematowi. Oto Reservation:

    public class Reservation
    {
        public int Id { get; set; }

        public int RoomId { get; set; }

        public Room Room { get; set; }

        public List<Profile> Profiles { get; set; }

        public DateTime Created { get; set; }

        public DateTime From { get; set; }

        public DateTime To { get; set; }
    }

Oraz Room:

    public class Room
    {
        public int Id { get; set; }

        public int Number { get; set; }

        public string Description { get; set; }

        public DateTime LastBooked { get; set; }

        public int Level { get; set; }

        public RoomType RoomType { get; set; }

        public bool WithBathroom { get; set; }

        public int NumberOfPlacesToSleep { get; set; }
    }

    public enum RoomType
    {
        Standard,
        Suite
    }

Oraz Profile:

    public class Profile
    {
        public int Id { get; set; }

        public string Ref { get; set; }

        public string Salutation { get; set; }

        public string Forename { get; set; }

        public string Surname { get; set; }

        public string TelNo { get; set; }

        public string Email { get; set; }

        public string Country { get; set; }

        public DateTime? DateOfBirth { get; set; }

        public Address Address { get; set; }

        public List<Reservation> Reservations { get; set; }
    }

I w końcu Address:

    public class Address
    {
        public int Id { get; set; }

        public string Street { get; set; }

        public string HouseNumber { get; set; }

        public string City { get; set; }

        public string PostCode { get; set; }

        public int ProfileId { get; set; }

        public Profile Profile { get; set; }
    }

I wisienka na torcie, czyli PrimeDbContext

    public class PrimeDbContext : DbContext
    {
        public PrimeDbContext(DbContextOptions<PrimeDbContext> options)
            : base(options)
        {
        }

        public virtual DbSet<Room> Rooms { get; set; }

        public virtual DbSet<Profile> Profiles { get; set; }

        public virtual DbSet<Reservation> Reservations { get; set; }

        public virtual DbSet<Address> Address { get; set; }

        protected override void OnModelCreating(ModelBuilder modelBuilder)
        {
        }
    }

Proszę zwróć uwagę na bardzo ważną rzecz, dzięki konfiguracji opartej na konwencji nie jest wymagana dodatkowa konfiguracja w klasach modelu i klasie PrimeDbContext.

Konfiguracja jest prosta

Czy zauważyłeś, jak łatwo jest skonfigurować relacje w Entity Framework Core 5? Jeśli masz właściwości poprawnie nazwane, EF Core samodzielnie rozpozna twoje relacje. Relacja jest definiowana przez właściwość nawigacyjne, czyli encję wewnątrz innej encji. Spójrz na rezerwację. Istnieje Room, czyli właściwość nawigacyjna, oraz RoomId, który będzie traktowany jako klucz obcy w celu zdefiniowania powiązania.

Istnieją 3 sposoby konfigurowania modelu i relacji:

  • oparta na konwencji – z odpowiednio nazwanymi właściwościami EF Core rozlizna jak jednostki są powiązane
  • data annotations – przydatne atrybuty, które można umieścić we nad właściwością encji
  • Fluent API – w pełni funkcjonalne API do konfigurowania relacji i encji według własnego uznania

Oto przykład data annotations, aby ustawić niestandardowo nazwany klucz obcy:

public class Post
{
    public int PostId { get; set; }
    public string Title { get; set; }
    public string Content { get; set; }

    public int BlogForeignKey { get; set; }

    [ForeignKey("BlogForeignKey")]
    public Blog Blog { get; set; }
}

Jeśli klucz obcy miałby nazwę BlogId, to zostałby skonfigurowany automatycznie, ale nazwa niestandardowa musi być obsłużona ręcznie.

Nawet w przypadku relacji wiele-do-wielu nie ma potrzeby definiowania tabeli łączącej i pisania dodatkowej konfiguracji. Jest to nowa funkcja dostępna od wersji RC1, więc dokumentacja dostępna na oficjalnej stronie Microsoft może wprowadzać w błąd. Miejmy nadzieję, że wkrótce zostanie zaktualizowana.

Na szczęście w większości przypadków nie musisz ręcznie pisać dużej części konfiguracji, ponieważ jest to konieczne głównie podczas radzenia sobie z zaawansowanymi scenariuszami i niestandardowymi mapowaniami.

Podejście Model First

Podejście Model First umożliwia definiowanie modelu i relacji oraz używanie Entity Framework Core do generowania kodu SQL. Wszystko, co musisz zrobić, to stworzyć modele, które chcesz, a kiedy skończysz, po prostu utwórz migrację bazy danych. Przy założeniu, że masz już migracje EF Core.

Wspomniane podejście działa również w przypadku aktualizowania modelu, gdy trzeba dodać powiązaną encję, migracje EF Core poradzą sobie z tym zaskakująco dobrze.

Powiedzmy, że mam encję Profile i chcemy dodać encję Address w relacji jeden-do-jednego. Możesz spojrzeć na kod obu tych klas powyżej. Po dodaniu nowej migracji za pomocą dotnet CLI otrzymuję nową migrację, już wygenerowaną, na podstawie zmian mojego modelu.

    public partial class AddAddress : Migration
    {
        protected override void Up(MigrationBuilder migrationBuilder)
        {
            migrationBuilder.CreateTable(
                name: "Address",
                columns: table => new
                {
                    Id = table.Column<int>(type: "int", nullable: false)
                        .Annotation("SqlServer:Identity", "1, 1"),
                    Street = table.Column<string>(type: "nvarchar(max)", nullable: true),
                    HouseNumber = table.Column<string>(type: "nvarchar(max)", nullable: true),
                    City = table.Column<string>(type: "nvarchar(max)", nullable: true),
                    PostCode = table.Column<string>(type: "nvarchar(max)", nullable: true),
                    ProfileId = table.Column<int>(type: "int", nullable: false)
                },
                constraints: table =>
                {
                    table.PrimaryKey("PK_Address", x => x.Id);
                    table.ForeignKey(
                        name: "FK_Address_Profiles_ProfileId",
                        column: x => x.ProfileId,
                        principalTable: "Profiles",
                        principalColumn: "Id",
                        onDelete: ReferentialAction.Cascade);
                });

            migrationBuilder.CreateIndex(
                name: "IX_Address_ProfileId",
                table: "Address",
                column: "ProfileId",
                unique: true);
        }

        protected override void Down(MigrationBuilder migrationBuilder)
        {
            migrationBuilder.DropTable(
                name: "Address");
        }
    }

Łatwo i przyjemnie, ale co najważniejsze – działa!

Podsumowanie

Konfigurowanie relacji w Entity Framework Core 5 jest tak proste, jak to tylko możliwe. Większość mapowania może być wykonana automatycznie przez framework, po prostu przez odpowiednie nazwanie właściwości. Jeśli zmagasz się z bardziej zaawansowanymi scenariuszami, możesz skorzystać z Fluent API, które oferuje dużo i a jego zapis jest dość zwięzły. W zaledwie kilku wierszach można zdefiniować na przykład mapowanie widoku na encję.

Moją ulubioną częścią jest jednak podejście Model First, w którym tworzysz model, z którym chcesz pracować, i generujesz kod SQL z migracjami EF Core.

Cały wymieniony tutaj kod jest dostępny na moim GitHubie, kodzie używającym również tych relacji! Zapraszam do odwiedzenia.

How to configure relationships in Entity Framework Core 5

Relationships in a database context define how two entities relate to each other. Entity Framework Core really shines in supporting relationships. It offers a convention-based configuration, that will configure relationships based on the model provided. For more advanced cases we can use robust Fluent API capabilities, that offer greater flexibility.

I must admit that working with relationships in Entity Framework Core 5 feels very natural for a developer and that might be simply its most important feature.

Types of relationships

Relationships in the database will mean, that two entities relate to each other. They are logically connected. Let’s take a look at a hotel model example:

We have a reservation, that has a single room and a list of guests. The room can be assigned to many reservations. A profile can be assigned to many reservations, but it has only one address related. We have 3 different types of relationships defined here:

  • one-to-many – room to a reservation
  • many-to-many – reservation to profile
  • one-to-one – profile to address

Those types are nicely supported by Entity Framework Core, so let’s have a look at the model that corresponds to this schema. Here is a Reservation:

    public class Reservation
    {
        public int Id { get; set; }

        public int RoomId { get; set; }

        public Room Room { get; set; }

        public List<Profile> Profiles { get; set; }

        public DateTime Created { get; set; }

        public DateTime From { get; set; }

        public DateTime To { get; set; }
    }

And Room:

    public class Room
    {
        public int Id { get; set; }

        public int Number { get; set; }

        public string Description { get; set; }

        public DateTime LastBooked { get; set; }

        public int Level { get; set; }

        public RoomType RoomType { get; set; }

        public bool WithBathroom { get; set; }

        public int NumberOfPlacesToSleep { get; set; }
    }

    public enum RoomType
    {
        Standard,
        Suite
    }

And Profile:

    public class Profile
    {
        public int Id { get; set; }

        public string Ref { get; set; }

        public string Salutation { get; set; }

        public string Forename { get; set; }

        public string Surname { get; set; }

        public string TelNo { get; set; }

        public string Email { get; set; }

        public string Country { get; set; }

        public DateTime? DateOfBirth { get; set; }

        public Address Address { get; set; }

        public List<Reservation> Reservations { get; set; }
    }

And finally, Address:

    public class Address
    {
        public int Id { get; set; }

        public string Street { get; set; }

        public string HouseNumber { get; set; }

        public string City { get; set; }

        public string PostCode { get; set; }

        public int ProfileId { get; set; }

        public Profile Profile { get; set; }
    }

And a cherry on top, a PrimeDbContext:

    public class PrimeDbContext : DbContext
    {
        public PrimeDbContext(DbContextOptions<PrimeDbContext> options)
            : base(options)
        {
        }

        public virtual DbSet<Room> Rooms { get; set; }

        public virtual DbSet<Profile> Profiles { get; set; }

        public virtual DbSet<Reservation> Reservations { get; set; }

        public virtual DbSet<Address> Address { get; set; }

        protected override void OnModelCreating(ModelBuilder modelBuilder)
        {
        }
    }

Please notice a very important thing, thanks to a convention-based configuration, there is no additional configuration needed in the model classes and PrimeDbContext class.

Configuration is easy

Have you noticed how easy it is to configure relationships in Entity Framework Core 5? If you have properties named correctly, then EF Core will deduct relationships on its own. A relationship is defined by a navigation property, that is an entity inside an entity. Look at the Reservation. There is a Room, that is a navigation property and there is a RoomId that will be treated as a foreign key to define a constraint. 

There are 3 ways to configure model and relationships:

  • convention-based – with properly named properties, EF Core will deduct how entities are related
  • data annotations – handy attributes that you can put on the entity property
  • Fluent API – a fully-featured API for configuring relations and entities as you wish

Here is an example of a data annotation to set a non-standard named foreign key:

public class Post
{
    public int PostId { get; set; }
    public string Title { get; set; }
    public string Content { get; set; }

    public int BlogForeignKey { get; set; }

    [ForeignKey("BlogForeignKey")]
    public Blog Blog { get; set; }
}

If the foreign key would be named BlogId, then it would be configured automatically, but a custom name has to be handled manually.

Even with many-to-many relationships there is no need to define a joining table and write additional configuration. It is a new feature available from RC1 version, so documentation available on the official Microsoft page can be misleading. Hopefully, it will be updated soon.

Luckily, in most cases, you would not need to write much of configuration manually, cause it is mainly required when coping with advanced scenarios and custom mappings.

Model First approach

Model First approach lets you define your model and relationships and use Entity Framework Core to generate SQL for you. All you need to do is to create models that you want and when you’re done, just create a database migration. This is true of course when you already have EF Core migrations in place. 

It also works for updating the model, when you need to add a related entity, EF Core migrations will handle that surprisingly well.

Let’s say I had a profile entity and I wanted to add an Address entity in a one-to-one relationship. You can take a look at the code of those both classes above. When I add a new migration from dotnet CLI, I get a new migration like this, already generated for me, based on my model changes.

    public partial class AddAddress : Migration
    {
        protected override void Up(MigrationBuilder migrationBuilder)
        {
            migrationBuilder.CreateTable(
                name: "Address",
                columns: table => new
                {
                    Id = table.Column<int>(type: "int", nullable: false)
                        .Annotation("SqlServer:Identity", "1, 1"),
                    Street = table.Column<string>(type: "nvarchar(max)", nullable: true),
                    HouseNumber = table.Column<string>(type: "nvarchar(max)", nullable: true),
                    City = table.Column<string>(type: "nvarchar(max)", nullable: true),
                    PostCode = table.Column<string>(type: "nvarchar(max)", nullable: true),
                    ProfileId = table.Column<int>(type: "int", nullable: false)
                },
                constraints: table =>
                {
                    table.PrimaryKey("PK_Address", x => x.Id);
                    table.ForeignKey(
                        name: "FK_Address_Profiles_ProfileId",
                        column: x => x.ProfileId,
                        principalTable: "Profiles",
                        principalColumn: "Id",
                        onDelete: ReferentialAction.Cascade);
                });

            migrationBuilder.CreateIndex(
                name: "IX_Address_ProfileId",
                table: "Address",
                column: "ProfileId",
                unique: true);
        }

        protected override void Down(MigrationBuilder migrationBuilder)
        {
            migrationBuilder.DropTable(
                name: "Address");
        }
    }

Nice and easy, but what’s most important – it works!

Summary

Configuring relationships in Entity Framework Core 5 is as simple as it can possibly be. Most of the mapping can be done automatically by the framework, just by naming properties right. If you’re struggling with more advanced scenarios you can go with Fluent API, which offers a lot and is rather compact. In just a few lines you can define how to map a view to an entity.

My favorite part, though, is a Model First approach, where you create a model that you would like to work with and generate SQL with EF Core migrations. 

All code mentioned here is available on my GitHub, code that uses those relationships as well! Feel free to drop by.

Czytanie nagłówków żądania jako obiekt w ASP.NET Core

Odczytywanie nagłówków jest standardową operacją w ASP.NET Core i jest używane od wieków. Napisałem nawet post podsumowujący wszystkie metody przekazywania parametrów: ASP.Net Core in .NET 5 – przekazywanie parametrów do akcji. W ASP.NET Core wprowadzono przydatne atrybuty do obsługi parametrów w metodach kontrolera, takich jak [FromQuery] lub [FromHeader]. Ale czy istnieje sposób na użycie tych atrybutów i odczytanie nagłówków jako własny obiekt? Zobaczmy.

Tak wygląda standardowa metoda kontrolera.

    // POST: weatherForecast/
    [HttpPost]
    public IActionResult Post([FromBody] WeatherForecast forecast, [FromHeader] string parentRequestId)
    {
        try
        {
            Console.WriteLine($"Got a forecast for data: {forecast.Date} with parentRequestId: {parentRequestId}!");
        }
        catch (Exception e)
        {
            Console.WriteLine(e);
            return StatusCode(StatusCodes.Status500InternalServerError);
        }
            
        return new AcceptedResult();
    }

W tym przykładzie [FromBody] oznacza, że forecast zostanie odwzorowana na obiekt z treści żądania, a [FromHeader] oznacza, że parentRequestId zostanie pobrany z nagłówka. To działa świetnie, ale jak zmapować więcej nagłówków, najlepiej jako osobny obiekt?

Spójrzmy na ten kod:

    // POST: weatherForecast/multipleHeaders
    [HttpPost("multipleHeaders")]
    public IActionResult Post([FromHeader] ForecastHeaders forecastHeaders)
    {
        try
        {
            Console.WriteLine($"Got a forecast for city: {forecastHeaders.City}," +
                                $"temperature: {forecastHeaders.TemperatureC} and" +
                                $"description: {forecastHeaders.Description}!");
        }
        catch (Exception e)
        {
            Console.WriteLine(e);
            return StatusCode(StatusCodes.Status500InternalServerError);
        }

        return new AcceptedResult();
    }

AForecastHeaders wygląda tak:

    public class ForecastHeaders
    {
        [FromHeader]
        public string City { get; set; }

        [FromHeader]
        public int TemperatureC { get; set; }

        [FromHeader]
        public string Description { get; set; }

        [FromQuery]
public string Sorting { get; set; } }

Czy zauważyłeś, że użyłem [FromHeader] zarówno w deklaracji parametrów metody kontrolera, jak i w mojej własnej klasie?

Teraz prześlijmy żądanie z Postmana.

Wynik? Czy Ciebie zdziwił tak samo jak mnie? 😀

Zadziałało!

Wszystkie nagłówki zostały poprawnie zmapowane jako obiekt. Zwróć uwagę, że sortowanie również zostało zmapowane, nawet jeśli pochodzi z parametru zapytania, a nie z nagłówka. Udowadnia to to, że możesz połączyć te dwa podejścia, jeśli w ogóle ma to sens.

Cały zamieszczony tutaj kod jest dostępny na moim GitHub – sprawdź.

Nie wiem tylko czy to błąd czy ficzer… ale mi się podoba! ❤️

Read request headers as an object in ASP.Net Core

Reading headers is a standard operation in ASP.NET Core and has been around for ages. I even wrote a post summarizing all methods of passing parameters: ASP.NET Core in .NET 5 – pass parameters to actions. ASP.NET Core introduced handy attributes to handle parameters in controller methods, like [FromQuery] or [FromHeader]. But is there a way to use those attributes and read headers as a custom object? Let’s see.

This is how a standard controller method looks like.

    // POST: weatherForecast/
    [HttpPost]
    public IActionResult Post([FromBody] WeatherForecast forecast, [FromHeader] string parentRequestId)
    {
        try
        {
            Console.WriteLine($"Got a forecast for data: {forecast.Date} with parentRequestId: {parentRequestId}!");
        }
        catch (Exception e)
        {
            Console.WriteLine(e);
            return StatusCode(StatusCodes.Status500InternalServerError);
        }
            
        return new AcceptedResult();
    }

In this example [FromBody] means that forecast will be mapped into an object from the request body, and [FromHeader] means that parentRequestId will be taken from the header. That works great, but how to map more headers, preferrable as a separate object?

Let’s take a look at this code:

    // POST: weatherForecast/multipleHeaders
    [HttpPost("multipleHeaders")]
    public IActionResult Post([FromHeader] ForecastHeaders forecastHeaders)
    {
        try
        {
            Console.WriteLine($"Got a forecast for city: {forecastHeaders.City}," +
                                $"temperature: {forecastHeaders.TemperatureC} and" +
                                $"description: {forecastHeaders.Description}!");
        }
        catch (Exception e)
        {
            Console.WriteLine(e);
            return StatusCode(StatusCodes.Status500InternalServerError);
        }

        return new AcceptedResult();
    }

And ForecastHeaders looks like this:

    public class ForecastHeaders
    {
        [FromHeader]
        public string City { get; set; }

        [FromHeader]
        public int TemperatureC { get; set; }

        [FromHeader]
        public string Description { get; set; }

        [FromQuery]
public string Sorting { get; set; } }

Have you noticed, that I used [FromHeader] in both controller method parameter declaration and inside my custom class?

Now let’s make a request with Postman.

And result? Are you surprised as I was? 😀

It worked!

All headers were mapped correctly, as a custom object. Notice that Sorting was also mapped, even if it comes from the query parameter, not the header. It proves you can combine those two if that makes sense.

All of it is available in my GitHub – check it out.

I’m not sure if it’s a bug or a feature… but I like it! ❤️

Nie przekacuj parametrów w ten sposób w Entity Framework Core 5

Niedawno napisałem post o wykonywaniu poleceń SQL w Entity Framework Core 5: Wykonanie polecenia SQL w Entity Framework Core 5. Jeden z czytelników zauważył, że popełniłem duży błąd podczas przekazywania parametrów. Przyjrzyjmy się bliżej.

Napisałem taki kod:

    [HttpPost("UpdateProfiles")]
    public async Task<IActionResult> UpdateProfiles([FromBody] int minimalProfileId = 0)
    {
        await primeDbContext.Database.ExecuteSqlRawAsync(
            $"UPDATE Profiles SET Country = 'Poland' WHERE LEFT(TelNo, 2) = '48' AND Id > {minimalProfileId}");

        return Ok();
    }

Ta metoda aktualizuje pole Country w profilu na wartość Poland, jeżeli numer telefonu zaczyna się od 48, a identyfikator jest wyższy niż podany. Zauważ, że użyłem ExecuteSqlRawAsync i podałem interpolowany ciąg, w którym przekazuję minimalProfileId. Więc gdzie jest błąd?

Podczas przekazywania parametrów do SQL należy być bardzo ostrożnym. Zwłaszcza gdy przekazujesz dane dostarczone przez użytkownika, jesteś narażony na atak typu SQL injection. Aby tego uniknąć, należy używać metod FromSqlInterpolated lub ExecuteSqlInterpolated. Zmiany w kodzie są minimalne:

    [HttpPost("UpdateProfiles")]
    public async Task<IActionResult> UpdateProfiles([FromBody] int minimalProfileId = 0)
    {
        await primeDbContext.Database.ExecuteSqlInterpolatedAsync(
            $"UPDATE Profiles SET Country = 'Poland' WHERE LEFT(TelNo, 2) = '48' AND Id > {minimalProfileId}");

        return Ok();
    }

Nieźle, co? Nadal mogę przekazać interpolowany ciąg, ale z metodą ExecuteSqlInterpolatedAsync robię to w sposób bezpieczny. Użycie tej metody pozwala przesłać parametry osobno, przez co .Net Core je sprawdzi, czy nie zawierają nieprawidłowych znaków lub wyrażeń. Więcej na ten temat wyczytasz na stronie Microsoft.

Mam nadzieję, że podobał Ci się ten post i bądź bezpieczny 🙂

Cały zamieszczony tutaj kod dostępny jest też na moim GitHub. Zaglądaj!

How not to pass parameters in Entity Framework Core 5

Recently I wrote a post about executing raw SQL scripts in Entity Framework Core 5: Executing raw SQL with Entity Framework Core 5. One of the readers noticed that I did a big mistake when passing parameters. Let’s take a closed look.

I had code like this:

    [HttpPost("UpdateProfiles")]
    public async Task<IActionResult> UpdateProfiles([FromBody] int minimalProfileId = 0)
    {
        await primeDbContext.Database.ExecuteSqlRawAsync(
            $"UPDATE Profiles SET Country = 'Poland' WHERE LEFT(TelNo, 2) = '48' AND Id > {minimalProfileId}");

        return Ok();
    }

This method updates profiles Country to Poland, where the phone number starts with 48, and an Id is higher than provided. Notice that I used ExecuteSqlRawAsync and provided an interpolated string, where I pass minimalProfileId. So where’s the catch?

When passing parameters to SQL you have to be super cautious. Especially when you’re passing a user-provided data, you are exposed to SQL injection attack. In order to avoid that, you should use FromSqlInterpolated or ExecuteSqlInterpolated methods. Changes to the code are minimal:

    [HttpPost("UpdateProfiles")]
    public async Task<IActionResult> UpdateProfiles([FromBody] int minimalProfileId = 0)
    {
        await primeDbContext.Database.ExecuteSqlInterpolatedAsync(
            $"UPDATE Profiles SET Country = 'Poland' WHERE LEFT(TelNo, 2) = '48' AND Id > {minimalProfileId}");

        return Ok();
    }

Nice huh? I can still pass an interpolated string, but with ExecuteSqlInterpolatedAsync I’m safe. Using this method allows parameters to be passed separately, causing .Net Core to check them for invalid characters or expressions. You can read more about it on the Microsoft website.

Hope you liked this post, stay safe 🙂

All code posted here can be found on my GitHub account. Enjoy!

Wykonanie polecenia SQL w Entity Framework Core 5

Entity Framework Core 5 to lekki, rozszerzalny i wieloplatformowy ORM typu open source. Jest łatwy w zastosowaniu i sprawia, że dostęp do bazy danych jest bardzo prosty. Jednak czasami praca z tabelami i widokami po prostu nie wystarczy. Jak wykonać surowy skrypt SQL za pomocą Entity Framework Core 5? Dowiedzmy Się.

Wykonanie polecenia SQL

Uruchomianie SQL bez mapowania wyniku jest dość proste. Spójrz na ten przykład:

var sql = "UPDATE Profiles SET Country = 'Poland' WHERE LEFT(TelNo, 2) = '48' AND Id > @p0";
await primeDbContext.Database.ExecuteSqlRawAsync(sql, parameters: new[] { minimalProfileId.ToString() });

Ten kod SQL aktualizuje kolumnę Country na podstawie TelNo dla profili z identyfikatorem wyższym niż podany. To tylko kilka linijek kodu i działa idealnie! Pokazuje również, jak możemy przekazać parametr do polecenia SQL, ale możesz także sformatować go za pomocą nawiasów klamrowych.

Wykonanie procedury składowanej

Procedura składowana jest doskonałym przykładem kodu SQL, który możesz chcieć uruchomić bezpośrednio w bazie danych, ale zachować SQL po stronie bazy danych. Załóżmy, że masz już procedurę składowaną o nazwie UpdateProfilesCountry z jednym parametrem. Jeśli chcesz go po prostu wykonać, możesz napisać taki kod:

await primeDbContext.Database.ExecuteSqlRawAsync(
    "UpdateProfilesCountry @p0",
    parameters: new[] { minimalProfileId.ToString() });

Nie musimy mapować wyników, więc możemy użyć metodyDbContext.Database.ExecuteSqlRawAsync i przekazać potrzebne parametry.

Jeżeli interesuje Cię ten proces dokładnie, na przykładzie, to opisałem to wszystko tutaj: Wykonanie procedury składowanej w Entity Framework Core.

Wykonanie procedury składowanej z wynikiem

Podczas gdy procedura składowana lub zwykłe polecenie SQL można wykonać bezpośrednio na poziomie bazy danych, zwrócenie wyniku jest nieco bardziej skomplikowane. Przede wszystkim musisz dodać model nie posiadający klucza, aby zmapować wyniki. Powiedzmy, że mamy procedurę składowaną GetGuestsForDate i chcielibyśmy zwrócić model o nazwie GuestArrival.

[Keyless]
public class GuestArrival
{
    public string Forename { get; set; }

    public string Surname { get; set; }

    public string TelNo { get; set; }

    public DateTime From { get; set; }

    public DateTime To { get; set; }

    public int RoomNumber { get; set; }
}

Musimy także dodać kolekcję do naszej klasy PrimeDbContext.

public class PrimeDbContext : DbContext
{
    public PrimeDbContext(DbContextOptions<PrimeDbContext> options)
        : base(options)
    {
    }

    // from stored procedures
    public virtual DbSet<GuestArrival> GuestArrivals { get; set; }
}

Teraz możemy iść dalej i użyć go. Oto, jak możemy to osiągnąć:

var guests = primeDbContext.GuestArrivals.FromSqlRaw($"GetGuestsForDate '{date}'").ToList();

A jeśli umieszczę go w moim projekcie API, zmapuje wyniki na encje:

Zauważ, że aby odwzorować wyniki na obiekty, musimy użyć kolekcji DbSet.

Jeśli chcesz uzyskać pełny obraz, przeczytaj osobny artykuł: Pobranie danych za pomocę procedury składowanej w Entity Framework Core 5

Podsumowanie

Wykonanie polecenia SQL w Entity Framework Core 5 jest nie tylko możliwe, ale także zaskakująco łatwe. Możesz wykonywać SQL na poziomie bazy danych, ale jeśli zależy Ci na zwracanym rezultacie, musisz dodać DbSet reprezentujący Twoje wyniki.

Cały zamieszczony tutaj kod można znaleźć na moim GitHubie, czeka żeby z nim poeksperymentować 🙂

Pozdrawiam!

Executing raw SQL with Entity Framework Core 5

Entity Framework Core 5 is an open-source, lightweight, extensible, and a cross-platform ORM. It is easy to apply and it makes database access super simple. However, sometimes working with tables and views is just not enough. How to execute raw SQL script with Entity Framework Core 5? Let’s find out.

Running the raw SQL

Running a SQL without carrying about the result is quite easy. Have a look at this example:

await primeDbContext.Database.ExecuteSqlInterpolatedAsync(
$"UPDATE Profiles SET Country = 'Poland' WHERE LEFT(TelNo, 2) = '48' AND Id > {minimalProfileId}");

This SQL updates the Country based on TelNo column for profiles with Id higher then the one provided. It is just a few lines of code and it works perfectly! It also shows how we can pass a parameter to SQL, but you also can format it with curly braces.

Executing a stored procedure

A stored procedure is a perfect example of a SQL, that you might want to run directly on the database, but keep SQL on the database side. Let’s say you already have a stored procedure named UpdateProfilesCountry with one parameter. If you would just like to execute it, you could simply have a code like this:

await primeDbContext.Database.ExecuteSqlInterpolatedAsync(
    $"UpdateProfilesCountry {minimalProfileId}");

You don’t need a DbSet to map the results, so you can use DbContext.Database.ExecuteSqlRawAsync and pass parameters if you’d like to.

If you’d like to get the full picture, read the separate article: Execute a stored procedure with Entity Framework Core 5.

Running a stored procedure with a result

While running a stored procedure or a plain SQL command can be done directly on the database level, returning the result is slightly more complicated. First of all, you need to add a keyless model to map your results. Let’s say we have a stored procedure GetGuestsForDate and we would like to return a model named GuestArrival.

[Keyless]
public class GuestArrival
{
    public string Forename { get; set; }

    public string Surname { get; set; }

    public string TelNo { get; set; }

    public DateTime From { get; set; }

    public DateTime To { get; set; }

    public int RoomNumber { get; set; }
}

We also need to add a DbSet to our PrimeDbContext.

public class PrimeDbContext : DbContext
{
    public PrimeDbContext(DbContextOptions<PrimeDbContext> options)
        : base(options)
    {
    }

    // from stored procedures
    public virtual DbSet<GuestArrival> GuestArrivals { get; set; }
}

Now we can go ahead and use it. Here is how we can accomplish that:

var guests = primeDbContext.GuestArrivals.FromSqlInterpolated($"GetGuestsForDate '{date}'").ToList();

And if I place it in my API project, it will map results to entities:

Notice that to map results to objects, we need to use DbSet collection.

If you’d like to get the full picture, read the separate article: Select data with a stored procedure with Entity Framework Core 5

Summary

It is not only possible but also surprisingly easy to run any SQL on the database with Entity Framework Core 5. You can execute SQL on a database level, but when you care about the result, you need to add a DbSet representing your results.

All code mentioned here can be found on my GitHub, feel free to experiment with it.

Cheers!


Widoki w Entity Framework Core 5

Widok w kontekście baz danych jest wirtualną tabelą opartą na zestawie wyników uzyskanych przez wykonanie zapytaniem SQL. Są one zwykle używane jako obiekty tylko do odczytu, które są zoptymalizowane pod kątem dostarczania danych dla danego scenariusza. Entity Framework Core 5 obsługuje widoki, a w tym artykule pokażę, jak to działa.

Dodanie widoku

Pierwszą rzecz jaką musimy zrobić, to dodać widok do bazy danych. Najlepszym sposobem na to jest dodanie migracji bazy danych z odpowiednim kodem SQL. Zacznijmy od dodania migracji za pomocą polecenia narzędzia globalnego EF Core:

dotnet ef migrations add vwGuestArrivals

To polecenie wygeneruje migrację, w której możemy umieścić nasz SQL. Zobaczmy, jak to może wyglądać:

public partial class vwGuestArrivals : Migration
{
    protected override void Up(MigrationBuilder migrationBuilder)
    {
        var sql = @"
            CREATE OR ALTER VIEW [dbo].[vwRoomsOccupied] AS
                SELECT r.[From], r.[To], ro.Number As RoomNumber, ro.Level, ro.WithBathroom
                FROM Reservations r
                JOIN Rooms ro ON r.RoomId = ro.Id";

        migrationBuilder.Sql(sql);
    }

    protected override void Down(MigrationBuilder migrationBuilder)
    {
        migrationBuilder.Sql(@"DROP VIEW vwRoomsOccupied");
    }
}

Ten widok przedstawia zajęte pokoje, które możemy filtrować według daty. Tego rodzaju dane mogą być przydatne na przykład podczas planowania konserwacji i prac remontowych.

Pobieranie danych z widoku

W Entity Framework Core 5 widoki mogą być reprezentowane jako zwykła kolekcja DbSet. W moim przypadku, aby zmapować wszystkie kolumny widoku, musimy stworzyć model RoomOcupied, który wygląda tak:

[Keyless]
public class RoomOccupied
{
    public DateTime From { get; set; }

    public DateTime To { get; set; }

    public int RoomNumber { get; set; }

    public int Level { get; set; }

    public bool WithBathroom { get; set; }
}

Teraz musimy dodać DbSet do mojego PrimeDbContext i musimy skonfigurować nasz model, aby RoomsOccupied był wykonywany na konkretnym widoku. Zobaczmy, jak można to osiągnąć:

public class PrimeDbContext : DbContext
{
    public PrimeDbContext(DbContextOptions<PrimeDbContext> options)
        : base(options)
    {
    }

    public virtual DbSet<RoomOccupied> RoomsOccupied { get; set; }

    protected override void OnModelCreating(ModelBuilder modelBuilder)
    {
        modelBuilder
            .Entity<RoomOccupied>(eb =>
            {
                eb.HasNoKey();
                eb.ToView("vwRoomsOccupied");
            });
    }
}

Jak widać, jest to normalna kolekcja DbSet, na który można filtrować jak jak chcemy. Jest jednak drobiazg, który wyróżnia tę kolekcję. Zwróć uwagę, że konfigurujemy encję RoomOccupied tak, aby nie miała klucza. W ten sposób nie musimy mieć klucza w wyniku, ale oznacza to również, że byłby to model tylko do odczytu.

Obecnie Entity Framework Core 5 nie obsługuje aktualizowania widoku, chociaż jest to możliwe w bazie danych SQL Server. Możesz jednak zdefiniować widok, który posiada klucz. Pamiętaj tylko, aby usunąć HasNoKey w konfiguracji i atrybut [Keyless] w encji.

Użyjmy kodu, który właśnie napisaliśmy. Aby to zrobić w najprostszy możliwy sposób, dodałem metodę do mojego interfejsu API ASP.NET Core. Oto jak to wygląda:

[HttpGet("GetRoomsOccupied")]
public IActionResult GetGuestArrivalsFromView([FromQuery] string date)
{
    var parsedDate = DateTime.ParseExact(date, "dd-MM-yyyy", CultureInfo.InvariantCulture);
    var rooms = primeDbContext.RoomsOccupied.Where(r => r.From <= parsedDate && r.To >= parsedDate);

    return Ok(rooms);
}

Tutaj podaję datę w formacie dd-MM-rrrr i pytam o wszystkie pokoje zajęte w tym dniu. Oto wynik.

Używam vwRoomsOccupied i wykonuje zapytanie SQL z zastosowanymi wszystkimi filtrami. W SQL Server Profiler możemy spojrzeć na SQL, który został wykonany.

Zauważ, że w tym przykładzie używamy tylko dat bez czasu i wszystko działa dobrze. Jeśli jednak chcesz porównać również daty z czasem, musisz zastosować nieco inne podejście.

Podsumowanie

Entity Framework Core 5 bezbłędnie obsługuje widoki. Musisz go skonfigurować w swojej klasie DbContext i określić, że określona jednostka zostanie zamapowana na widok. Gdy to zrobisz, możesz użyć DbSet, jak chcesz, a wszystkie filtry zostaną zastosowane bezpośrednio do wygenerowanego kodu SQL.

Co więcej, możesz obsłużyć dodawanie lub aktualizowanie widoku za pomocą migracji EF Core, co oznacza, że wszystkie wymagane prace można wykonać za pomocą EF Core.

Cały pokazany tutaj kod można znaleźć na moim GitHubie, możesz spokojnie z nim eksperymentować, zachętam!


Working with views in Entity Framework Core 5

In SQL, a view is a virtual table based on the result-set of an SQL statement. They are typically used as read-only objects that are optimized to provide data for a given scenario. Entity Framework Core 5 can handle views and in this article, I’m going to show you how.

Adding a view

First of all, we need to add a view to the database. The best way to do so is to add a database migration with an appropriate SQL. Let’s start by adding a migration with EF Core global tool command:

dotnet ef migrations add vwGuestArrivals

This will generate a migration, that we can put our SQL into. Let’s see how it may look:

public partial class vwGuestArrivals : Migration
{
    protected override void Up(MigrationBuilder migrationBuilder)
    {
        var sql = @"
            CREATE OR ALTER VIEW [dbo].[vwRoomsOccupied] AS
                SELECT r.[From], r.[To], ro.Number As RoomNumber, ro.Level, ro.WithBathroom
                FROM Reservations r
                JOIN Rooms ro ON r.RoomId = ro.Id";

        migrationBuilder.Sql(sql);
    }

    protected override void Down(MigrationBuilder migrationBuilder)
    {
        migrationBuilder.Sql(@"DROP VIEW vwRoomsOccupied");
    }
}

This view presents rooms that are occupied, where we can filter by date. This kind of data can be useful for example when planning maintenance.

Getting view data

In Entity Framework Core 5 views can be represented as a regular DbSet. In my case, to map all view’s columns, we need to create a RoomOcupied model, that would look like this:

[Keyless]
public class RoomOccupied
{
    public DateTime From { get; set; }

    public DateTime To { get; set; }

    public int RoomNumber { get; set; }

    public int Level { get; set; }

    public bool WithBathroom { get; set; }
}

Now we need to add a DbSet to my PrimeDbContext and we need to configure our model, so that RoomsOccupied will be executed against view. Let’s see how that can be accomplished:

public class PrimeDbContext : DbContext
{
    public PrimeDbContext(DbContextOptions<PrimeDbContext> options)
        : base(options)
    {
    }

    public virtual DbSet<RoomOccupied> RoomsOccupied { get; set; }

    protected override void OnModelCreating(ModelBuilder modelBuilder)
    {
        modelBuilder
            .Entity<RoomOccupied>(eb =>
            {
                eb.HasNoKey();
                eb.ToView("vwRoomsOccupied");
            });
    }
}

As you can see it is a normal DbSet, that can be queried as we wish. However, there is a tiny detail that makes this collection different. Notice that we configure RoomOccupied entity to have no key. This way we do not need to have a key in the result, but it also means that it would only be read-only model.

Currently, Entity Framework Core 5 does not support updating the view, while it is possible in SQL Server database. You can specify a view with a key, though. Just remember to remove HasNoKey in configuration and [Keyless] attribute in the entity.

Let’s use the code that we just wrote. To do so the easiest possible way, I just added a method to my ASP.NET Core API. Here is how it looks like:

[HttpGet("GetRoomsOccupied")]
public IActionResult GetGuestArrivalsFromView([FromQuery] string date)
{
    var parsedDate = DateTime.ParseExact(date, "dd-MM-yyyy", CultureInfo.InvariantCulture);
    var rooms = primeDbContext.RoomsOccupied.Where(r => r.From <= parsedDate && r.To >= parsedDate);

    return Ok(rooms);
}

Here I’m passing date in dd-MM-yyyy format and list all occupied rooms at the given date. Here is the result.

It uses a vwRoomsOccupied and executes a SQL query with all filters applied. We can take a look in SQL Server Profiler at the SQL that was executed.

Note that in this example we are using only dates with no time and it works fine. However, if you would like to compare dates with time as well, you would need to use a slightly different approach.

Summary

Entity Framework Core 5 can handle views flawlessly. You need to configure it in your DbContext class and specify that a specific entity will be mapped to the view. When that’s done, you can use a DbSet as you wish and all filters will be applied directly into generated SQL.

What’s more, you can handle adding or updating the view with EF Core migrations, which means that all work required can be done with EF Core.

All code mentioned here can be found on my GitHub, feel free to experiment with it.

Cheers!