Tag Archives: asp.net core

Read request headers as an object in ASP.Net Core

Reading headers is a standard operation in ASP.NET Core and has been around for ages. I even wrote a post summarizing all methods of passing parameters: ASP.NET Core in .NET 5 – pass parameters to actions. ASP.NET Core introduced handy attributes to handle parameters in controller methods, like [FromQuery] or [FromHeader]. But is there a way to use those attributes and read headers as a custom object? Let’s see.

This is how a standard controller method looks like.

    // POST: weatherForecast/
    [HttpPost]
    public IActionResult Post([FromBody] WeatherForecast forecast, [FromHeader] string parentRequestId)
    {
        try
        {
            Console.WriteLine($"Got a forecast for data: {forecast.Date} with parentRequestId: {parentRequestId}!");
        }
        catch (Exception e)
        {
            Console.WriteLine(e);
            return StatusCode(StatusCodes.Status500InternalServerError);
        }
            
        return new AcceptedResult();
    }

In this example [FromBody] means that forecast will be mapped into an object from the request body, and [FromHeader] means that parentRequestId will be taken from the header. That works great, but how to map more headers, preferrable as a separate object?

Let’s take a look at this code:

    // POST: weatherForecast/multipleHeaders
    [HttpPost("multipleHeaders")]
    public IActionResult Post([FromHeader] ForecastHeaders forecastHeaders)
    {
        try
        {
            Console.WriteLine($"Got a forecast for city: {forecastHeaders.City}," +
                                $"temperature: {forecastHeaders.TemperatureC} and" +
                                $"description: {forecastHeaders.Description}!");
        }
        catch (Exception e)
        {
            Console.WriteLine(e);
            return StatusCode(StatusCodes.Status500InternalServerError);
        }

        return new AcceptedResult();
    }

And ForecastHeaders looks like this:

    public class ForecastHeaders
    {
        [FromHeader]
        public string City { get; set; }

        [FromHeader]
        public int TemperatureC { get; set; }

        [FromHeader]
        public string Description { get; set; }

        [FromQuery]
public string Sorting { get; set; } }

Have you noticed, that I used [FromHeader] in both controller method parameter declaration and inside my custom class?

Now let’s make a request with Postman.

And result? Are you surprised as I was? 😀

It worked!

All headers were mapped correctly, as a custom object. Notice that Sorting was also mapped, even if it comes from the query parameter, not the header. It proves you can combine those two if that makes sense.

All of it is available in my GitHub – check it out.

I’m not sure if it’s a bug or a feature… but I like it! ❤️

PrimeHotel – passing parameters to actions – assignments

This is a post with assignments to do if you would like to check your knowledge about ASP.NET Core in .NET 5. This one is about passing parameters to controller actions, which is a crucial thing to master when developing micro-services.

You don’t need to start from scratch, you can base on a PrimeHotel project, created especially for learning purposes. You can download it on my GitHub page. Also, take a look at the post on how to run this project: PrimeHotel – how to run this project

Full article about passing parameters to actions in ASP.NET Core in .NET 5 can be found here: ASP.NET Core in .NET 5 – pass parameters to actions

Assignment 1

Difficulty: easy

Context

Learn how to write CRUD operations. Let’s say we would like to handle invoices – add all methods that will allow handling invoices.

What needs to be done

  • create a new class called Invoice
  • create Add, Get, Update and Delete methods to handle invoices
  • list of invoices can be hardcoded in the controller class
  • add optional filtering in Get with query string parameters

Hint

Have a look at the WeatherForecastController and how we handle weather forecasts there.

Assignment 2

Difficulty: medium

Context

Learn how to pass array in a query string. It can be useful when you would like to pass a collection of objects but use a query string for it

What needs to be done

  • create a GET method
  • this method needs to accept an array of integers from the query string
  • how you would invoke this method and pass parameters?

Where to post the answers?

Simply write a comment to this post, I’ll take a look.

Or, if you feel like it, make a pull request to PrimeHotel repo.

Good luck! 🙂

PrimeHotel – how to run this project

In this post, I will guide you through the process of downloading and running my project – PrimeHotel. It is a project created for learning purposes so you are free to contribute, clone, and use it for any non-commercial activity.

It is a medium-sized service, that represents a hotel management system. Is holds user reservations, user profiles and saves them in the MS SQL database. It can also connect to a 3-rd party weather service to fetch current weather. More features are yet to come, which will show more .NET integrations and capabilities, good practices, and some awesome features.

If you are new to .NET, please take a look at this post first: .NET 5 – How to start. It will help you with making your first steps.

Download the project

PrimeHotel is a .NET 5 project that uses ASP.NET Core and Entity Framework Core 5. It is hosted on GitHub, so you can go ahead and navigate to this link: https://github.com/mikuam/PrimeHotel

Make sure you have Git installed on your machine. Then you can clone the project by using a command in a console terminal.

git clone https://github.com/mikuam/PrimeHotel.git

Now open the project with your favorite IDE like Visual Studio or Visual Studio Code.

I’m using Visual Studio 2019 and on my machine, it looks like this.

Let’s now have a quick look at the project structure:

  • Clients – this is where are classes that communicate with other services with HttpClient
  • Controllers – here are all controller classes containing all the endpoints in this service
  • Data – repository classes that encapsulate SQL commands – currently Dapper
  • Migrations – Entity Framework Core 5 migrations, that keeps the database schema changes
  • Models – Entity Framework Core 5 classes, that represent tables in the database 

Configure the database

For learning purposes, it will be best to set up a SQL Server on your machine. This is what I’m doing. However, if you would like to set it up as a docker image, you can read my post about it: Set up a SQL Server in a docker container.

You can download a SQL Server Express version for free from the Microsoft website. Once you install and set up a server, it would be available probably with the localhost address. Try to connect to your SQL Server and check if you have a PrimeHotel database created. For connecting I’m using Azure Data Studio – an awesome and fast tool, great for simple actions.

If you don’t have a PrimeHotel database, just create it and leave it empty.

The last part is to update a connection string in our project. Go ahead and edit appsettings.json file. It looks like this:

The connection string might differ slightly, mine is:

Data Source=localhost;Initial Catalog=PrimeHotel;Integrated Security=True

Instead of localhost you could also have something as localhost\SQLEXPRESS, but that is your individual configuration of SQL Server.

Running the project

When you have everything in place, just go ahead and run the project. If everything is set-up and .NET 5 runtime and SDK are installed, you should be good.

In Visual Studio just press F5. In Visual Studio Code open the terminal and write two commands: dotnet build and dotnet run. Then when navigating to a given URL, you should see something like this:

Simple, right? Congratulation on running the project. Now you are good to go for coding and improving this service.

Good luck!


ASP.NET Core in .NET 5 – sending a request

Sending a request in ASP.NET Core in .NET 5 is a standard operation that can be achieved pretty easily. However, details matter in this case and I’ll show you the best practice available. We will also take a look at some advanced features to get the full scope.

Using a real available API

In this article, I will be using 3rd party free service for fetching weather forecasts – http://weatherstack.com. To be able to use it, just register on their website and you can use it as well. 1000 requests in a month are available for a free account and that should be more than enough to fulfill our needs.

First, let’s have a look at the requests we are going to make. To test the API, I’m using a Postman app, which is very powerful, yet intuitive. I strongly encourage you to read my article about it here: Postman the right way

Here is how a request to fetch current weather in Poznań looks like:

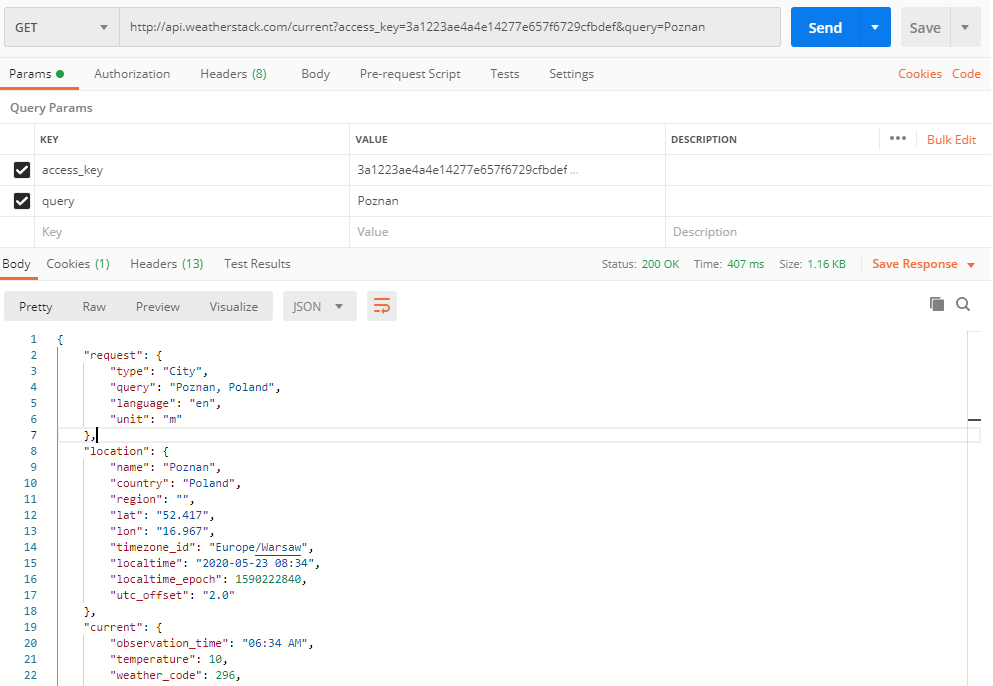
This is a GET request to http://api.weatherstack.com/current with two parameters:

  • access_key which you get when registering on the website
  • query that can be a city name

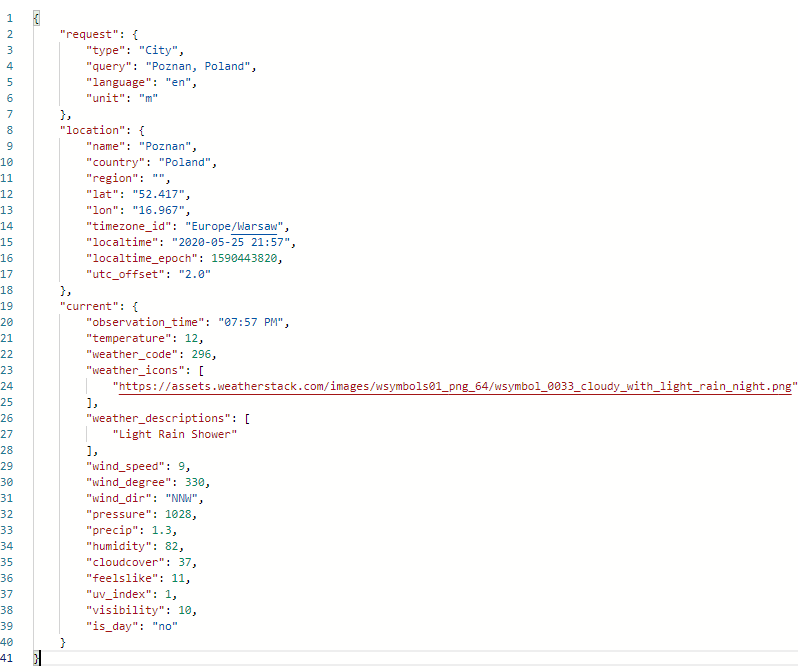
The response that we got is a 200 OK with JSON content.

 To make this request, I’ll create a WeatherStackClient class.

using Microsoft.Extensions.Logging;
using System;
using System.Net.Http;
using System.Text.Json;
using System.Threading.Tasks;

namespace PrimeHotel.Web.Clients
{
    public class WeatherStackClient : IWeatherStackClient
    {
        private const string AccessKey = "3a1223ae4a4e14277e657f6729cfbdef";
        private const string WeatherStackUrl = "http://api.weatherstack.com/current";

        private HttpClient _client;
        private readonly ILogger<WeatherStackClient> _logger;

        public WeatherStackClient(HttpClient client, ILogger<WeatherStackClient> logger)
        {
            _client = client;
            _logger = logger;
        }
    }
}

There are a few things to notice here:

  • AccessKey which is hardcoded for now, but in a real-life API should be moved to configuration
  • IWeatherStackClient interface that is introduced for Dependency Injection support
  • HttpClient class is passed in a constructor. It will be automatically created and maintained by the framework

Now let’s create the logic.

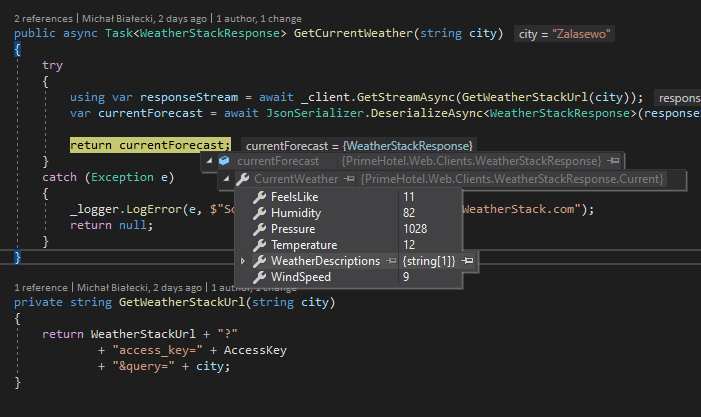
    public async Task<WeatherStackResponse> GetCurrentWeather(string city)
    {
        try
        {
            using var responseStream = await _client.GetStreamAsync(GetWeatherStackUrl(city));
            var currentForecast = await JsonSerializer.DeserializeAsync<WeatherStackResponse>(responseStream);
            
            return currentForecast;
        }
        catch (Exception e)
        {
            _logger.LogError(e, $"Something went wrong when calling WeatherStack.com");
            return null;
        }
    }

    private string GetWeatherStackUrl(string city)
    {
        return WeatherStackUrl + "?"
                + "access_key=" + AccessKey
                + "&query=" + city;
    }

Let’s go through this code and explain what’s going on:

  • _client.GetStreamAsync is an asynchronous method that takes a URL an returns a stream. There are more methods, like: GetAsync, PostAsync, PutAsync, PatchAsync, DeleteAsync for all CRUD operations. There is also GetStringAsync that serializes a response content to string – just like GetStreamAsync does
  • GetWeatherStackUrl is merging a service URL with query parameters, returning a full URL address
  • JsonSerializer.DeserializeAsync<WeatherStackResponse>(responseStream) deserializes a stream and format output as a WeatherStackResponse class

The WeatherStackResponse class looks like this:

using System.Text.Json.Serialization;

namespace PrimeHotel.Web.Clients
{
    public class WeatherStackResponse
    {
        [JsonPropertyName("current")]
        public Current CurrentWeather { get; set; }

        public class Current
        {
            [JsonPropertyName("temperature")]
            public int Temperature { get; set; }

            [JsonPropertyName("weather_descriptions")]
            public string[] WeatherDescriptions { get; set; }

            [JsonPropertyName("wind_speed")]
            public int WindSpeed { get; set; }

            [JsonPropertyName("pressure")]
            public int Pressure { get; set; }

            [JsonPropertyName("humidity")]
            public int Humidity { get; set; }

            [JsonPropertyName("feelslike")]
            public int FeelsLike { get; set; }
        }
    }
}

Notice that I used JsonPropertyName attribute to identify what JSON property is each property matching. Here is the structure that we are going to map.

One last thing – we need to register our WeatherStackClient in a Dependency Injection container. In order to do so, we need to go to Startup class and add the following line in ConfigureServices method.

services.AddHttpClient<IWeatherStackClient, WeatherStackClient>();

We are using a dedicated method for registering classes using HttpClient. Underneath it’s using IHttpClientFactory that helps to maintain the pooling and lifetime of clients. You have a limited number of HTTP connections that you can maintain on your machine and if you create too much clients each blocking a connection, you will end up failing some of your requests. It also adds a configurable logging experience (via ILogger) for all requests sent through. All in all, it makes a developer’s life easier and allows you to do some smart stuff too.

Does it work? Yes it does! The response was correctly mapped into my class and I can return it.

Do you wonder what was logged when making this request? Let’s have a quick look.

As I mentioned earlier IHttpClientFactory also provides a logging mechanism, so that every request is logged. Here you can see that not only address was logged, but also HTTP method and time of execution. This can be pretty useful for debugging.

Adding a retry mechanism

In a micro-services world, every micro-service can have a bad day once in a while. Therefore, we need to have a retry mechanism for services we call and we know that they fail from time to time. In ASP.NET Core for .NET 5 there is a third-party library integrated just that purpose – it’s Polly. Polly is a comprehensive resilience and transient fault-handling library for .NET. It allows developers to express policies such as Retry, Circuit Breaker, Timeout, Bulkhead Isolation, and Fallback in a fluent and thread-safe manner.

For our scenario let’s add a retry mechanism, that will call WeatherStack service and retry 3 times after an initial failure. With Polly, a number of retries and delays between then can be easily set. Let’s have a look at the example – it’s in the Startup method where we configure DI container.

    services.AddHttpClient<IWeatherStackClient, WeatherStackClient>()
        .AddTransientHttpErrorPolicy(
            p => p.WaitAndRetryAsync(new[]
            {
                TimeSpan.FromSeconds(1),
                TimeSpan.FromSeconds(5),
                TimeSpan.FromSeconds(10)
            }));

With this code we will retry the same request after 1, 5, and 10 seconds delay. There is no additional code needed. Polly will do everything for us. We will see logs that something failed, only after all retries will fail, we will get the exception.

Adding a cancellation token

A cancellation token is a mechanism that can stop the execution of an async call. Let’s say that our request shouldn’t take more than 3 seconds, because if it does, we know that something isn’t right and there is no point to wait.

To implement that we need to create a cancellation token and provide that when making a call with an HTTP client.

    public async Task<WeatherStackResponse> GetCurrentWeatherWithAuth(string city)
    {
        try
        {
            using var cancellationTokenSource = new CancellationTokenSource(TimeSpan.FromSeconds(3));

            using var responseStream = await _client.GetStreamAsync(GetWeatherStackUrl(city), cancellationTokenSource.Token);
            var currentForecast = await JsonSerializer.DeserializeAsync<WeatherStackResponse>(responseStream);

            return currentForecast;
        }
        catch (TaskCanceledException ec)
        {
            _logger.LogError(ec, $"Call to WeatherStack.com took longer then 3 seconds and had timed out ");
            return null;
        }
        catch (Exception e)
        {
            _logger.LogError(e, $"Something went wrong when calling WeatherStack.com");
            return null;
        }
    }

If the request takes too long, we will receive a TaskCancelledException, which we can catch and react to it differently, that when getting unexpected exception.

Provide authorization

Basic authorization is definitely the simplest and one of the most popular ones used. The idea is that every request to the specific service needs to be authorized, so that along with our content, we need to send authorization info. With basic authorization, we need to pass a user and password encoded as base64 string and put in a request header. Let’s see how that can be accomplished. 

    private const string ApiKey = "3a1223ae4a4e14277e657f6729cfbdef";
    private const string Username = "Mik";
    private const string Password = "****";

    public WeatherStackClient(HttpClient client, ILogger<WeatherStackClient> logger)
    {
        _client = client;
        _logger = logger;

        var authToken = Encoding.ASCII.GetBytes($"{Username}:{Password}");
        _client.DefaultRequestHeaders.Authorization = new AuthenticationHeaderValue(
            "Basic",
            Convert.ToBase64String(authToken));
    }

In this way every call from WeatherStackClient will have authorization info and we do not need to add anything when we make requests. The only place we need to put additional code is a constructor.

Note that authorization is not needed to call weatherstack.com and is added only to show how it can be done.

This article did not cover all of the possibilities of IHttpClientFactory so if you want to know more, just go to this Microsoft article.

Hope you like this post, all code posted in this article is available at my GitHub account:

https://github.com/mikuam/PrimeHotel


ASP.Net Core 3 – configuration

In this chapter, we will cover how we can use configuration in ASP.Net Core 3. But before diving in, let’s see for a moment how it looked in plain old ASP.Net

Configuration before .Net Core

In old ASP.Net configuration was handled typically in only one XML file – Web.config. It was a place where everything was placed. From connection strings to assembly versions and detailed framework settings. This file got bigger and bigger while our project grew and was hard to read. Luckily you could use different files if you link them in the Web.config. Here is how the most important part of this file looked like:

The XML format was perfectly readable, but you would need to follow a specific convention. Let’s now see how things changed in .Net Core.

New possibilities

In .Net Core 3 things are completely different:

  • configuration can be stored in many files and most common format is JSON
  • we can follow our own format
  • we can have nesting
  • configuration can be parsed to whole classes with nested objects
  • we can make configuration refreshable when an application is running, without the need to restart it

Instead of having a configuration in an XML format, in .Net Core we have much more possibilities. Here are the sources that we can use(that are supported by default by the framework):

  • Azure Key Vault
  • Azure App Configuration
  • Command-line arguments
  • Directory files (INI, JSON, XML)
  • Environment variables (by default prefixed by DOTNET_)
  • In-memory .Net objects
  • Settings files
  • and custom providers

Note that variables can be overridden when another source provides the same variable. Then an order that we apply configuration with is important.

One more thing – we can have different configurations for the environment. In order to achieve that, we can suffix our configuration files with environment names. We have environment names set by the framework to: development, staging, production. So we can name our files like this:

  • appsettings.json – that would contain development variables
  • appsettings.production.json – that would contain production variables

Let’s use a configuration in .Net Core 3

First, let’s have an example of an appsettings.json configuration file:

In this configuration file, I have an Email section for configuration to send e-mails. In order to fetch the whole configuration at once, I’ll add three classes:

    public class ServiceConfiguration
    {
        public ConnectionStringsConfiguration ConnectionStrings { get; set; }

        public EmailConfiguration Email { get; set; }
    }

    public class EmailConfiguration
    {
        public string SmtpServerAddress { get; set; }

        public int SmtpServerPort { get; set; }

        public string SenderAddress { get; set; }
    }

    public class ConnectionStringsConfiguration
{
public string DB { get; set; }
}

ServiceConfiguration represents whole configuration and EmailConfiguration represents Email section.

Let’s now go to my Startup class. IConfiguration is an interface for handling configuration, provided by the framework and registered in DI by default. In ConfigureServices we can bind configuration and register it in Dependency Injection container.

    public IConfiguration Configuration { get; }

    public void ConfigureServices(IServiceCollection services)
    {
        // configuration
        var serviceConfiguration = new ServiceConfiguration();
        Configuration.Bind(serviceConfiguration);
        services.AddSingleton(serviceConfiguration);
    }

Notice that we need just those 3 lines to make it work. Now let’s see how we can implement class, that would send e-mails.

    public class EmailSenderService : IEmailSenderService
    {
        private readonly EmailConfiguration emailConfiguration;
        private readonly SmtpClient _client;

        public EmailSenderService(ServiceConfiguration configuration)
        {
            emailConfiguration = configuration.Email;
            _client = new SmtpClient(emailConfiguration.SmtpServerAddress, emailConfiguration.SmtpServerPort);
        }

        public async Task SendEmail(string emailAddress, string content)
        {
            var message = new MailMessage(emailConfiguration.SenderAddress, emailAddress)
            {
                Subject = content
            };

            await _client.SendMailAsync(message);
        }
    }

This is programming pleasure in its purest form. Notice what we are injecting ServiceConfiguration, that is our representation of configuration in code. We do not need to use or parse JSON files, digg for nested variables. We just fetch configuration the way we defined it – simple.

What you don’t need to do

In many tutorials and even in official Microsoft documentation you could see, that in order to read appsettings.json file, you would need to make this change in Program.cs file:

    public static IHostBuilder CreateHostBuilder(string[] args) =>
        Host.CreateDefaultBuilder(args)
            .ConfigureAppConfiguration((hostingContext, config) =>
            {
                config.AddJsonFile("appsettings.json");
            })
            .ConfigureWebHostDefaults(webBuilder =>
            {
                webBuilder.UseStartup<Startup>();
            });

The truth is that appsettings.json file will be read by default by the framework without using ConfigureAppConfiguration.

This can cause you problems when deploying to Azure. When I was doing it for the first time it took me hours to figure that out. I set up variables in App Sevice configuration, but they were overridden by local appsettings.json file because of this line. This configuration was applied after reading the configuration from App Service. You can safely remove this line.


Hope you enjoyed this post, you can have a look at the code posted here on my Github:

https://github.com/mikuam/TicketStore