Monthly Archives: February 2021

Refaktoryzacja przy pomocy refleksji

Czasami zdarza się, że muszę przeprowadzić refaktoryzację, w której Resharper nie może mi pomóc. W moim ostatnim poście opisałem, jak przydatne mogą być wyrażenia regularne przy takiej pracy: Refaktoryzacj przy pomocy wyrażeń regularnych w Visual Studio

Tym razem sprawa jest inna i prosta podmiana nie zadziała w tym przypadku.

Domyślna wartość dla właściwości

Natrafiłem na kod, w którym atrybut DefaultValue był często używany, ale w nie tak, jak powinien. Atrybut DefaultValue jest częścią platformy .Net Framework i jest używany przez generatory kodu w celu sprawdzenia, czy wartość domyślna właściwości jest taka sama jak wartość bieżąca i czy należy wygenerować dla tej właściwości kod. Nie chcę wchodzić w szczegóły, ale możesz zajrzeć do tego artykułu, aby uzyskać więcej informacji.

W moim przypadku musiałem zmienić wszystkie domyślne wartości na  przypisania właściwości podczas tworzenia klasy. Problem polegał na tym, że ta klasa miała ponad 1000 takich właściwości, a zrobienie tego ręcznie nie tylko zajęłoby dużo czasu, ale mogłoby potencjalnie wprowadzić błędy.

Spójrzmy na przykładowy kod:

    public class DefaultSettings
    {
        public DefaultSettings()
        {
            // assignments should be here
        }

        [DefaultValue(3)]
        public int LoginNumber { get; set; }

        [DefaultValue("PrimeHotel")]
        public string HotelName { get; set; }

        [DefaultValue("London")]
        public string Town { get; set; }

        [DefaultValue("Greenwod")]
        public string Street { get; set; }

        [DefaultValue("3")]
        public string HouseNumber { get; set; }

        [DefaultValue(RoomType.Standard)]
        public RoomType Type { get; set; }
    }

Tutaj przydaje się refleksja. Mógłbym łatwo zidentyfikować atrybuty właściwości dla danego typu, ale jak zmienić je w kod?

Napiszmy test jednostkowy! Test jednostkowy to mały fragment kodu, który może korzystać z niemal każdej klasy z testowanego projektu i co najważniejsze – można go łatwo uruchomić. 💪

    [TestFixture]
    public class PropertyTest
    {
        [Test]
        public void Test1()
        {
            var prop = GetProperties();

            Assert.True(true);
        }

        public string GetProperties()
        {
            var sb = new StringBuilder();

            PropertyDescriptorCollection sourceObjectProperties = TypeDescriptor.GetProperties(typeof(DefaultSettings));

            foreach (PropertyDescriptor sourceObjectProperty in sourceObjectProperties)
            {
                var attribute = (DefaultValueAttribute)sourceObjectProperty.Attributes[typeof(DefaultValueAttribute)];

                if (attribute != null)
                {
                    // produce a string
                }
            }

            return sb.ToString();
        }
    }

To prosty kod, który uruchamia metodę GetProperties. Metoda ta pobiera PropertyDescriptorCollection która reprezentuje wszystkie właściwości w klasie DefaultSettings. Następnie dla każdej z nich sprawdzamy, czy zawiera DefaultValueAttribute. Teraz pozostaje tylko wygenerowanie kodu dla każdej właściwości przy użyciu klasy StringBuilder. Domyślasz się jak? Jest to łatwiejsze niż może się wydawać.

Sprawdźmy jak kod będzie się różnił dla poszczególnych typów:

public string GetProperties()
{
    var sb = new StringBuilder();

    PropertyDescriptorCollection sourceObjectProperties = TypeDescriptor.GetProperties(typeof(DefaultSettings));

    foreach (PropertyDescriptor sourceObjectProperty in sourceObjectProperties)
    {
        var attribute = (DefaultValueAttribute)sourceObjectProperty.Attributes[typeof(DefaultValueAttribute)];

        if (attribute != null)
        {
            if (sourceObjectProperty.PropertyType.IsEnum)
            {
                sb.AppendLine($"{sourceObjectProperty.Name} = {sourceObjectProperty.PropertyType.FullName.Replace("+", ".")}.{attribute.Value};");
            }
            else if (sourceObjectProperty.PropertyType.Name.Equals("string", StringComparison.OrdinalIgnoreCase))
            {
                sb.AppendLine($"{sourceObjectProperty.Name} = \"{attribute.Value}\";");
            }
            else
            {
                var value = attribute.Value == null ? "null" : attribute.Value;
                sb.AppendLine($"{sourceObjectProperty.Name} = {value};");
            }
        }
    }

    return sb.ToString();
}

Dla typu enum, musimy wyświetlić przestrzeń nazw(namespace) oraz typ i jego wartość po kropce. Dla ciągów znaków,  musimy wstawić apostrofy, a dla typu nullowalnego, wartością powinno być null. Dla innych musimy tylko przypisać wartość.

Jesteś ciekawy co z tego wyszło? 🤔

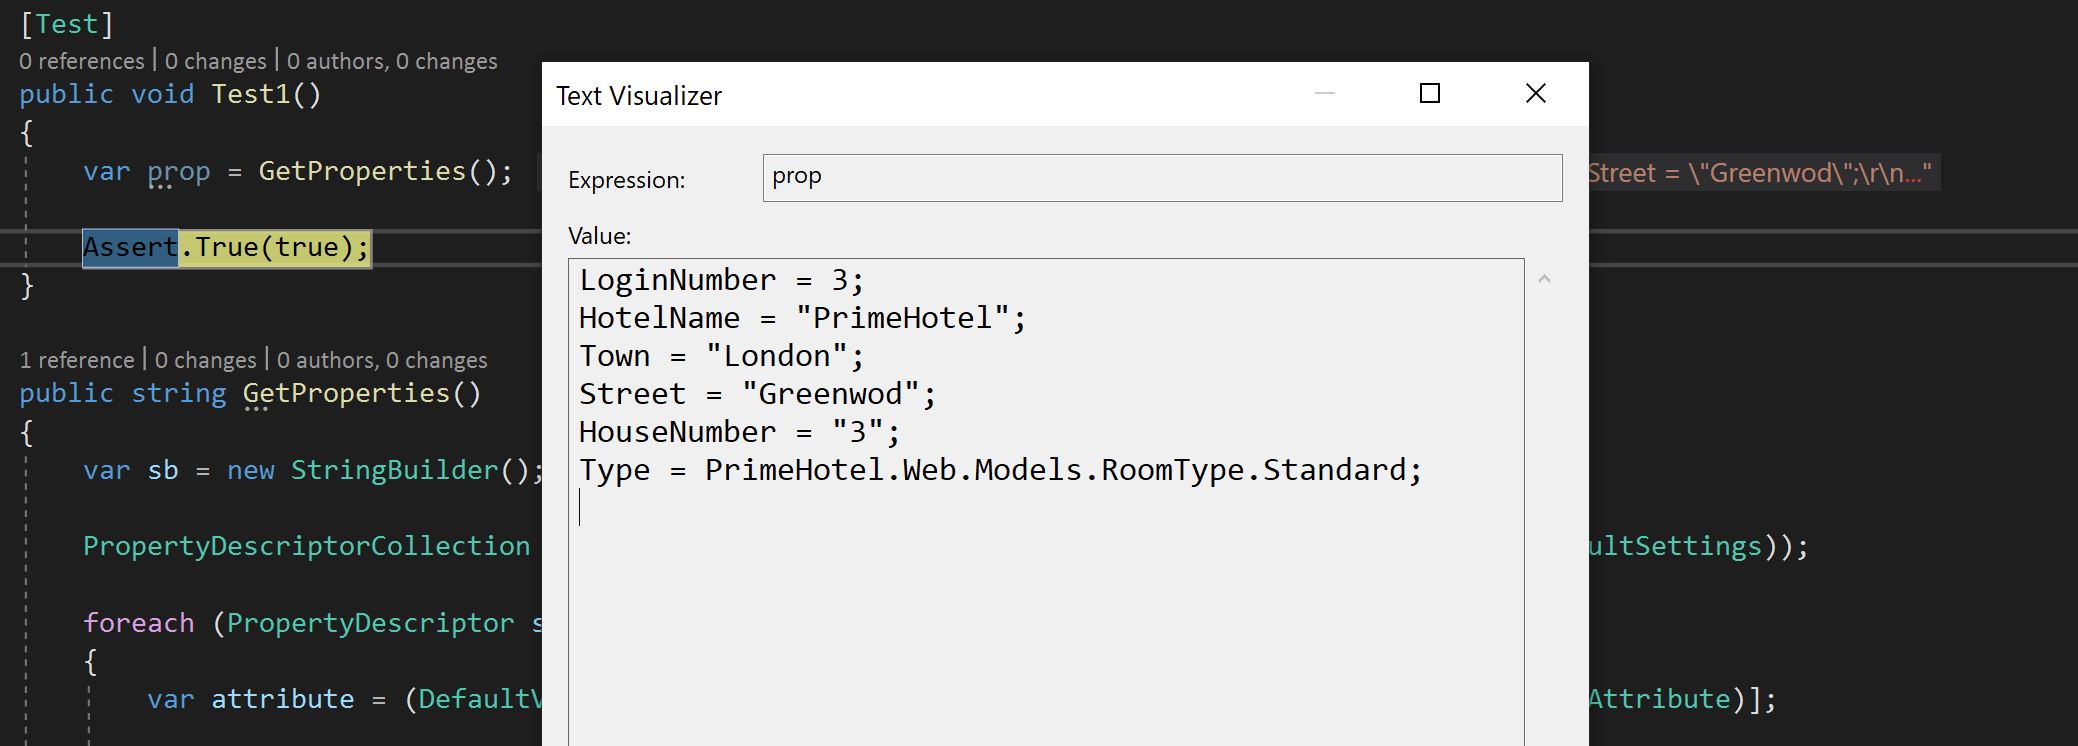
Powiedziałbym, że całkiem, całkiem:) 

Kiedy wkleję go do mojego konstruktora, kod będzie wyglądał następująco:

    public DefaultSettings()
    {
        LoginNumber = 3;
        HotelName = "PrimeHotel";
        Town = "London";
        Street = "Greenwod";
        HouseNumber = "3";
        Type = PrimeHotel.Web.Models.RoomType.Standard;
    }

I wiesz co? Działa!

Podsumowanie

Używanie refleksji nie jest najlepszą praktyką, ale jest ona bardzo potężnym narzędziem. W tym przykładzie pokazałem, jak jej użyć i wywołać ten kod w bardzo prosty sposób – jako test jednostkowy. Nie jest to kod, który bym commitował, ale w przypadku podejścia prób i błędów jest świetny. Jeśli natrafiłeś na takie ręczne zadanie w swoim kodzie, spróbuj je zautomatyzować 😎

Mam nadzieję, że nauczyłeś się czegoś dzisiaj i jeżeli tak, to świetnie! 🍺

Nie zapomnij zapisać się na newsletter, aby nie przegapić kolejnych postów. 📣


Refactoring with reflection

There are often times when you need to do a refactoring, that Resharper cannot help you with. In my last post I described how regular expressions can be useful: Static refactoring with Visual Studio regular expressions

This time the case is different and simple replacement would not work in this case.

The default value for a property

I came across the code, where the DefaultValue attribute was heavily used, but actually, not like it should be. The DefaultValue attribute provided by the .Net Framework is useful for code generators to see if the property default value is the same as the current value and if the code for that property should be generated. I don’t want to get into details, but you can have a look at this article for more information.

In my case, I needed to change all the default values to assignments of properties when the class was created. The problem was that this class had more than 1000 properties like this and doing it manually would not only take a lot of time but could potentially introduce bugs.

Let’s have a look at the sample code:

    public class DefaultSettings
    {
        public DefaultSettings()
        {
            // assignments should be here
        }

        [DefaultValue(3)]
        public int LoginNumber { get; set; }

        [DefaultValue("PrimeHotel")]
        public string HotelName { get; set; }

        [DefaultValue("London")]
        public string Town { get; set; }

        [DefaultValue("Greenwod")]
        public string Street { get; set; }

        [DefaultValue("3")]
        public string HouseNumber { get; set; }

        [DefaultValue(RoomType.Standard)]
        public RoomType Type { get; set; }
    }

This is where reflection comes in handy. I could easily identify the attributes on properties for a given type, but how to change that into code?

Let’s write a unit test! A unit test is a small piece of code that can use almost any class from the tested project and what’s the most important – can be easily run. 💪

    [TestFixture]
    public class PropertyTest
    {
        [Test]
        public void Test1()
        {
            var prop = GetProperties();

            Assert.True(true);
        }

        public string GetProperties()
        {
            var sb = new StringBuilder();

            PropertyDescriptorCollection sourceObjectProperties = TypeDescriptor.GetProperties(typeof(DefaultSettings));

            foreach (PropertyDescriptor sourceObjectProperty in sourceObjectProperties)
            {
                var attribute = (DefaultValueAttribute)sourceObjectProperty.Attributes[typeof(DefaultValueAttribute)];

                if (attribute != null)
                {
                    // produce a string
                }
            }

            return sb.ToString();
        }
    }

It’s a simple test that just runs GetProperties method. This method fetches PropertyDescriptorCollection that represents all properties in DefaultSettings class. Then for each of those, we check if they contain DefaultValueAttribute. Now we just need to somehow generate code for every property and write it to StringBuilder. It’s actually simpler than it sounds.

Let’s check how code will behave differently for enums, strings, and other types:

public string GetProperties()
{
    var sb = new StringBuilder();

    PropertyDescriptorCollection sourceObjectProperties = TypeDescriptor.GetProperties(typeof(DefaultSettings));

    foreach (PropertyDescriptor sourceObjectProperty in sourceObjectProperties)
    {
        var attribute = (DefaultValueAttribute)sourceObjectProperty.Attributes[typeof(DefaultValueAttribute)];

        if (attribute != null)
        {
            if (sourceObjectProperty.PropertyType.IsEnum)
            {
                sb.AppendLine($"{sourceObjectProperty.Name} = {sourceObjectProperty.PropertyType.FullName.Replace("+", ".")}.{attribute.Value};");
            }
            else if (sourceObjectProperty.PropertyType.Name.Equals("string", StringComparison.OrdinalIgnoreCase))
            {
                sb.AppendLine($"{sourceObjectProperty.Name} = \"{attribute.Value}\";");
            }
            else
            {
                var value = attribute.Value == null ? "null" : attribute.Value;
                sb.AppendLine($"{sourceObjectProperty.Name} = {value};");
            }
        }
    }

    return sb.ToString();
}

For an enum, we need to provide a name with namespace and an enum value after a dot. For strings, we need to add apostrophes and for nullable types, we need to provide null. For others – we just assign the attribute value.

Are you curious if that would work? 🤔

Not too bad, not too bad at all 🙂 

If I paste that into my constructor, it will look like this:

    public DefaultSettings()
    {
        LoginNumber = 3;
        HotelName = "PrimeHotel";
        Town = "London";
        Street = "Greenwod";
        HouseNumber = "3";
        Type = PrimeHotel.Web.Models.RoomType.Standard;
    }

Guess what? It works!

The summary

Reflection is not considered as the best practice but it is a very powerful tool. In this example, I showed how to use it and invoke that code in a very simple way – as a unit test. It’s not the code that you would commit, but for a try and error process, it’s great. If you came across a manual task like this in your code, try to hack it 😎

I hope that you learned something with me today. If so, happy days 🍺

Don’t forget to subscribe to the newsletter to get notifications about my next posts. 📣


Refaktoryzacj przy pomocy wyrażeń regularnych w Visual Studio

Wyrażenia regularne to uniwersalne narzędzie w skrzynce narzędziowej każdego programisty. Jednym z miejsc, w których mogą one być przydatne, są okna dialogowe Quick Find i Quick Replace w Visual Studio. W tym poście pokażę, jak wykorzystać możliwości wyrażeń regularnych w inteligentnej refaktoryzacji.

Zmiana enum na string

Załóżmy, że chciałbym zmienić enum na ciąg znaków w mojej aplikacji, ponieważ zdałem sobie sprawę, że ta właściwość może zawierać wartość, którą użytkownik dodał ręcznie i nie można jej wstępnie zdefiniować. Rzućmy okiem na ten enum:

public enum EventType
{
    Unknown = 0,
    Concert = 1,
    Movie = 2
}

Teraz spróbujmy znaleźć wszystkie zastosowania tego enuma. Do tego zadania używam Quick Find w programie Visual Studio, Ctrl + F.

Czy zauważyłeś niebieski prostokąt w oknie dialogowym Quick Find? Jest to opcja wyszukiwania za pomocą wyrażenia regularnego. Włączmy to i przejdźmy do okna dialogowego Quick Replace. Możesz to zrobić za pomocą przełącznika po lewej stronie lub skrótu Ctrl + H.

Wpisałem wyrażenie EventType\.(\w+), które oznacza że szukam czegoś, co zaczyna się od EventType, później następuje zwyczajna kropka, którą muszę poprzedzić \. Następnie nawiasy, ktore oznaczają, że rozliczynam podgrupę, a /w+ oznacza dowolną literę jeden lub więcej razy. Zamienię to na "$1", czyli standardowe cudzyslowy oraz $1, który jest oznaczeniem pierwszej grupy.

Rezultat jest całkiem niezły:

Możemy nieco dopracować to wyrażenie i dodać nazwę grupy.

Zamieniając (\w+) na  (?<entryType>\w+) nadaję nazwę rezultatom tej grupy, której możemy użyć w Quick Replace.

Podsumowanie

Tworzenie wyrażeń regularnych to proces prób i błędów, w którym trzeba dopracować wyrażenie kilka razy, aż będzie pasowało do tego co potrzebujemy. Rezultaty mogą jednk przerosnąć nasze oczekiwania i przy takiej ręcznej pracy można zaoszczędzić dużo czasu.

Mam nadzieję, że nauczyłeś się dziś czegoś nowego, a jeśli tak, to ten dzień na pewno będzie spoko! 💗 

Static refactoring with Visual Studio regular expressions

Regular expressions are a multi-tool in every developer toolbox. One of the places they can be useful is Quick Find and Quick Replace dialogs in Visual Studio. In this post, I’m going to show you how you can use the power of regular expressions in smart refactoring.

Changing an enum to string

Let’s assume I’d like to change an enum to a string in my application, cause I realized that this property can include a value that the user added by hand and cannot be predefined. Let’s have a look at this enum:

public enum EventType
{
    Unknown = 0,
    Concert = 1,
    Movie = 2
}

Now let’s try to find all the usages of this enum. For that task, I’m using a Quick Find in Visual Studio, Ctrl + F.

Have you noticed a blue rectangle in a Quick Find dialog? It is an option to search with a regular expression. Let’s enable that and switch to the Quick Replace dialog. You can do it with the toggle on the left side or with the Ctrl + H.

I entered EventType\.(\w+) expression that means, that it will start with a EventType string, then a regular dot, which I must escape with \. Next are parenthesis, which means that I’m starting a subexpression group, and /w+ will match a word character one or more times. I’m going to replace it with "$1", which is a standard quotation mark and $1 is a reference to the first group.

And the result is really good:

We can refine this expression a bit and add a name for a group.

By changing (\w+) to  (?<entryType>\w+) we have given a name to the results of this group. We can use it in the Replace With input.

Summary 

Creating a regular expression is a try-and-error process, where you would need to refine your expression a couple of times until it matches what you need. However, it can be really useful and with a manual job like that, can save a lot of time.

I hope that you learned something new today and if so, happy days! 💗 

Zwracanie więcej niż jednego wyniku z metody – tuple

Czy zmierzyłeś się kiedyś z programem, w którym trzeba było zwrócić więcej niż jeden wynik z metody? Jest kilka sposobów, aby sobie z tym poradzić, a tuple może być tym, czego potrzebujesz.

Problem

Spójrzmy na kod, w którym analizujemy dane transakcji, aby pokazać je na ekranie. Mamy na to oddzielną metodę: GetTransactionData

string Data = "Michał;Breakfast;59;2021-02-13";

var value = new TupleExample().GetTransactionData(Data, out string customer);
Console.WriteLine($"Customer {customer} bought an item for {value}");

public class TupleExample
{
    public decimal GetTransactionData(string data, out string customer)
    {
        var chunks = data.Split(';');
        customer = chunks.First();

        return decimal.Parse(chunks[2]);
    }
}


A oto rezultat aplikacji konsolowej:

Możliwe rozwiązania

Możemy do tego problemu podejść na kilka sposobów. Najgorszy wydaje się ten, który zaproponowałem na początku, zwracając dodatkowe wyniki jako parametry wyjściowe. Niemniej jednak widziałem tę konstrukcję więcej niż raz i są przypadki, w których może być ona użyteczna. Na przykład:

var isSuccess = decimal.TryParse("59,95", out decimal result);

Innym podejściem będzie stworzenie nowej klasy, która zwróci rezultat jaki chcemy. Kod będzie wyglądał następująco:

var transactionData = new TupleExample().GetTransactionData(Data);
Console.WriteLine($"Customer {transactionData.Customer} bought an item for {transactionData.Value}");

public class TransactionData
{
    public string Customer { get; set; }
    public decimal Value { get; set; }
}

public class TupleExample
{
    public TransactionData GetTransactionData(string data)
    {
        var chunks = data.Split(';');

        return new TransactionData
        {
            Customer = chunks.First(),
            Value = decimal.Parse(chunks[2])
        };
    }
}

To rozwiązanie jest poprawne pod każdym względem. Stworzyliśmy klasę reprezentującą to, co zwracamy z metody. Właściwości mają prawidłowe nazwy.
A co by było, gdybyśmy mogli osiągnąć ten sam rezultat bez tworzenia nowej klasy?

Poznaj tuple

Tuple(krotka) to typ wartościowy, który może przechowywać zestaw danych. Jest to bardzo elastyczna struktura, podobna do typów dynamicznych, dzięki czemu możesz nadawać nazwy swoim właściwościom. Skończmy mówić i przejdźmy do kodu:

var transactionData = new TupleExample().GetTransactionData(Data);
Console.WriteLine($"Customer {transactionData.Customer} bought an item for {transactionData.Value}");

public class TupleExample
{
    public (string Customer, decimal Value) GetTransactionData(string data)
    {
        var chunks = data.Split(';');

        return (chunks.First(), decimal.Parse(chunks[2]));
    }
}

Czy zauważyłeś, że w ogóle nie zmieniłem kodu, który wywołuje metodę GetTransactionData? 😲 Jest to zmiana, która wpływa tylko na samą metodę, ale czyni ją prostszą i bardziej zwięzłą.

Zwróć uwagę, jak można zdefiniować tuple:

Możesz stworzyć tuple przy pomocy operatora new lub przy pomocy nawiasów.

var tuple = new Tuple<string, decimal>("John", 20);
(string, decimal) tuple2 = ("Anna", 30);
(string Name, decimal Value) tuple3 = ("Cathrine", 40);

Console.WriteLine($"Customer {tuple2.Item1} bought an item for {tuple2.Item2}");
Console.WriteLine($"Customer {tuple3.Name} bought an item for {tuple3.Value}");

Możesz określić nazwy właściwości jeśli chcesz, a jeżeli nie, to będą miały swoje domyślne nazwy: Item1, Item2, itd.

Podsumowanie

Tuple to prosty, dynamiczny typ, który świetnie nadaje się w momencie, gdy nie chcemy tworzyć klasy tylko do jednego użycia. Jest elastyczny i łatwy w tworzeniu.

Czy tuple sprawdzi się w Twoim kodzie? Ja zdecydowanie dam mu szanse 😀


Returning more than one result from a method – tuple

Have you ever had a case, when you needed to return more than one parameter from a method? There are a couple of ways to cope with that and tuple might just be what you need.

The problem

Let’s look at the code, where we parse transaction data just to show it on the screen. We have a separate method for that GetTransactionData

string Data = "Michał;Breakfast;59;2021-02-13";

var value = new TupleExample().GetTransactionData(Data, out string customer);
Console.WriteLine($"Customer {customer} bought an item for {value}");

public class TupleExample
{
    public decimal GetTransactionData(string data, out string customer)
    {
        var chunks = data.Split(';');
        customer = chunks.First();

        return decimal.Parse(chunks[2]);
    }
}


And here is the result:

Possible solutions

There are a couple of ways we can approach this. The one that I proposed in the beginning, passing additional return values as out parameters seems to be the worst one. Nevertheless, I saw this construction more than once and there are certain cases it might be useful. For example:

var isSuccess = decimal.TryParse("59,95", out decimal result);

Another approach would be creating a new class to return the result, that might look like this:

var transactionData = new TupleExample().GetTransactionData(Data);
Console.WriteLine($"Customer {transactionData.Customer} bought an item for {transactionData.Value}");

public class TransactionData
{
    public string Customer { get; set; }
    public decimal Value { get; set; }
}

public class TupleExample
{
    public TransactionData GetTransactionData(string data)
    {
        var chunks = data.Split(';');

        return new TransactionData
        {
            Customer = chunks.First(),
            Value = decimal.Parse(chunks[2])
        };
    }
}

This solution is correct in every way. We created a class to represent what we return from a method. Properties are named correctly.
What if we could achieve the same without creating a new class?

Meet tuples

A tuple is a value type that can store a set of data elements. It is a very flexible structure, similar to dynamic types, so you can set names for your properties. Let’s finish talking and jump into code:

var transactionData = new TupleExample().GetTransactionData(Data);
Console.WriteLine($"Customer {transactionData.Customer} bought an item for {transactionData.Value}");

public class TupleExample
{
    public (string Customer, decimal Value) GetTransactionData(string data)
    {
        var chunks = data.Split(';');

        return (chunks.First(), decimal.Parse(chunks[2]));
    }
}

Have you noticed, that I haven’t changed the code that’s using a method GetTransactionData? 😲 It is the change that affects only the method itself, but it just makes it simpler and more concise.

Notice how tuple can be defined:

You can create a tuple with new keyword or with parenthesis.

var tuple = new Tuple<string, decimal>("John", 20);
(string, decimal) tuple2 = ("Anna", 30);
(string Name, decimal Value) tuple3 = ("Cathrine", 40);

Console.WriteLine($"Customer {tuple2.Item1} bought an item for {tuple2.Item2}");
Console.WriteLine($"Customer {tuple3.Name} bought an item for {tuple3.Value}");

You can specify property names, but if you don’t, you can use default names like Item1, Item2, etc.

Summary

A tuple is a simple, dynamic type when we don’t want to create a class for just a single usage. It is flexible and easy to create.

Would it be useful for you? I will give it a try 😀