Dodanie Entity Framework Core 5 do istniejącej bazy danych

Entity Framework Core 5 to lekki i łatwy w użyciu ORM, który pozwala korzystać z bazy danych bez pisania jakichkolwiek poleceń SQL. Wbudowane mechanizmy będą tłumaczyć zapytania LINQ dotyczące klas encji na zapytania SQL i zwracać zamapowane obiekty.

Zerknij też na post dotyczący dodawania EF Core z migracjami do pustej bazy danych: PrimeHotel – dodanie Entity Framework Core 5 w .NET 5

Dodanie Entity Framework Core 5 jest bardzo proste, jeśli masz pustą bazę danych, ale czy jest to takie łatwe podczas pracy z bazą danych, która posiada już swoją strukturę? Czy musimy to wszystko mapować, czy możemy po prostu pracować z częścią bazy danych, która nas interesuje? Zacznijmy od początku.

Czego potrzebujemy

Aby pracować z EF Core 5, musimy zainstalować pakiety NuGet:

  • Microsoft.EntityFrameworkCore
  • Microsoft.EntityFrameworkCore.Design
  • Microsoft.EntityFrameworkCore.SqlServer

Ostatni pakiet zdradza nam, że będziemy pracować z bazą danych MS SQL Server. Teraz połączmy się z naszą bazą danych i zobaczmy, jak to wygląda.

Do pracy z bazą danych używam Azure Data Studio, które jest lekkim i szybkim narzędziem, które może wykonywać większość podstawowych operacji na bazach danych. Jest znacznie szybszy niż SQL Server Management Studio i do większości mojej pracy używam właśnie tego pierwszego.

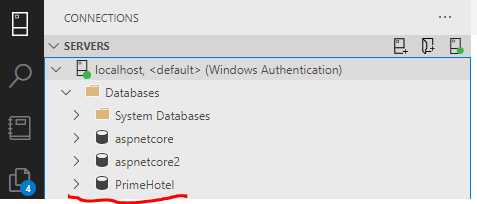
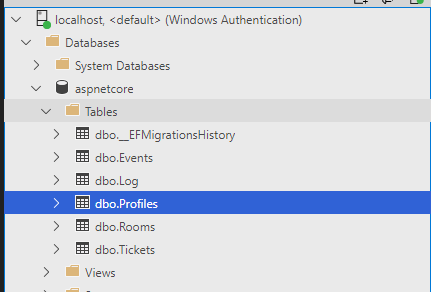
Dodamy EF Core dla bazy danych aspnetcore, która wygląda następująco.

Dodanie klasy DbContext

Następną rzeczą, którą musimy zrobić, jest utworzenie klasy DbContext. Moglibyśmy stworzyć ją ręcznie i wszystko wpisać ręcznie. Jednak .NET Core ma narzędzia do tworzenia i generowania ich automatycznie.

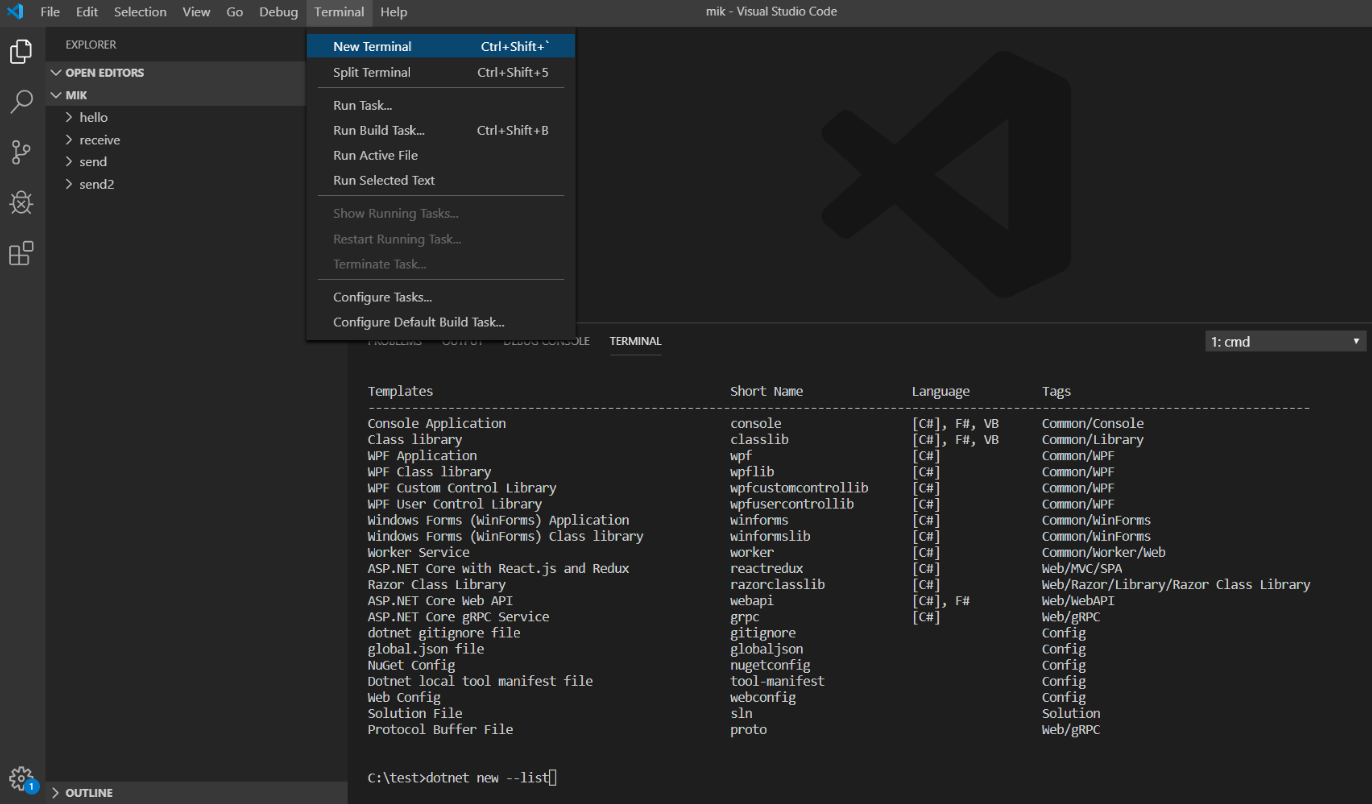
Proces ten nazywa się inżynierią wsteczną i jest to tworzenie szkieletów klas encji i klasy DbContext w oparciu o schemat bazy danych. Aby wykonać tę operację, użyjemy narzędzia .NET CLI, które musisz zainstalować, jeśli jeszcze tego nie zrobiłeś. Wpisz poniższe polecenie, aby to sprawdzić:

dotnet tool install --global dotnet-ef

Możesz także zaktualizować narzędzie po jego zainstalowaniu:

Proces tworzenia szkieletu wymaga connection stringa do przekazania. Moglibyśmy go przekazać w poleceniu, ale możemy też wykonać to zadanie w bardziej elegancki sposób, podając tylko jego nazwę.

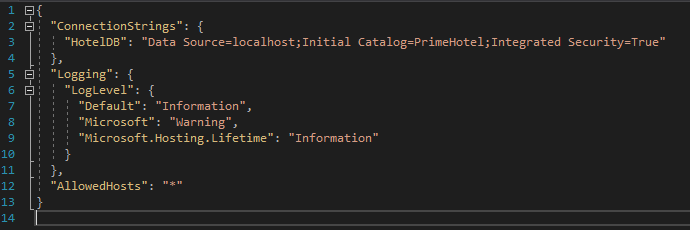
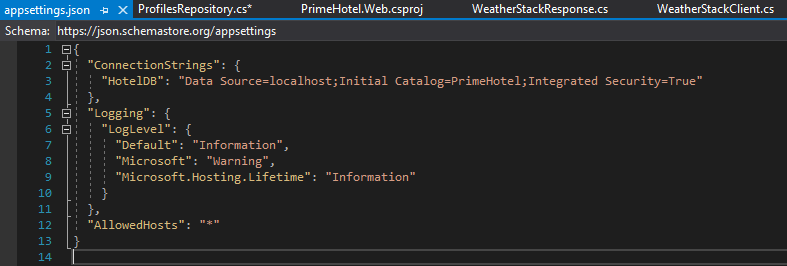
Przejdźmy do pliku appsettings.json i skonfigurujmy connection string dla naszej nowej bazy danych.

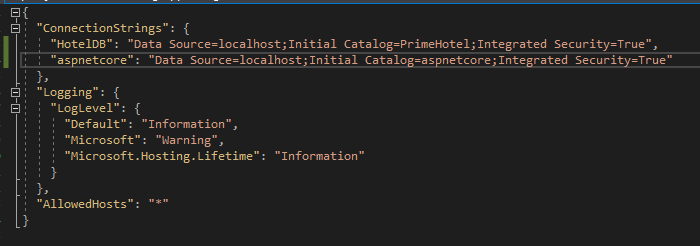
Dodałem connection string o nazwie aspnetcore w sekcji ConnectionStrings.

Polecenie, którego będziemy używać, jest bardzo proste, uruchom je w katalogu swojego projektu:

dotnet ef dbcontext scaffold Name=aspnetcore Microsoft.EntityFrameworkCore.SqlServer

Powyższe polecenie doda aspnetcoreDbContext i wszystkie encje reprezentujące bazę danych.

Efekt jest zadowalający, jednak byłoby wygodniej mieć większą kontrolę nad tym procesem.

Dostosuj proces do swoich potrzeb

Na szczęście jest więcej parametrów, których możemy użyć. Przyjrzyjmy się niektórym z nich:

  • --table może służyć do dołączania określonych tabel
  • --use-database-names zachowa oryginalne nazwy baz danych tak bardzo, jak to możliwe. Jednak nieprawidłowe identyfikatory .NET nadal zostaną zmienione
  • --context może służyć do nadania wygenerowanemu kontekstowi DbContext własnej nazwy
  • --context-dir służy do tworzenia szkieletu klasy DbContext w określonym katalogu
  • --output-dir służy do tworzenia klas jednostek w określonym katalogu
  • --force nadpisze istniejącą klasę DbContext i klasy encji

Zmodyfikowałem moje polecenie, aby wyglądało tak:

dotnet ef dbcontext scaffold Name=aspnetcore --table Profiles --table Events
  --context AspNetCoreDbContext --context-dir AspNetCoreModels 
  --output-dir AspNetCoreModels Microsoft.EntityFrameworkCore.SqlServer

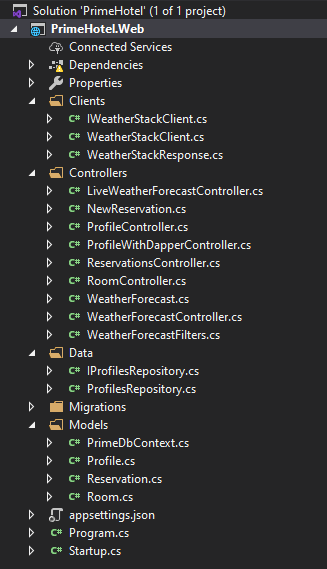
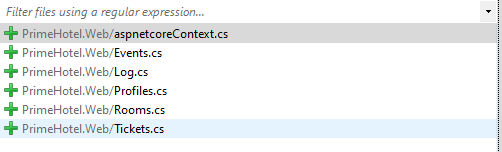
Zobaczmy, jakie klasy zostały wygenerowane.

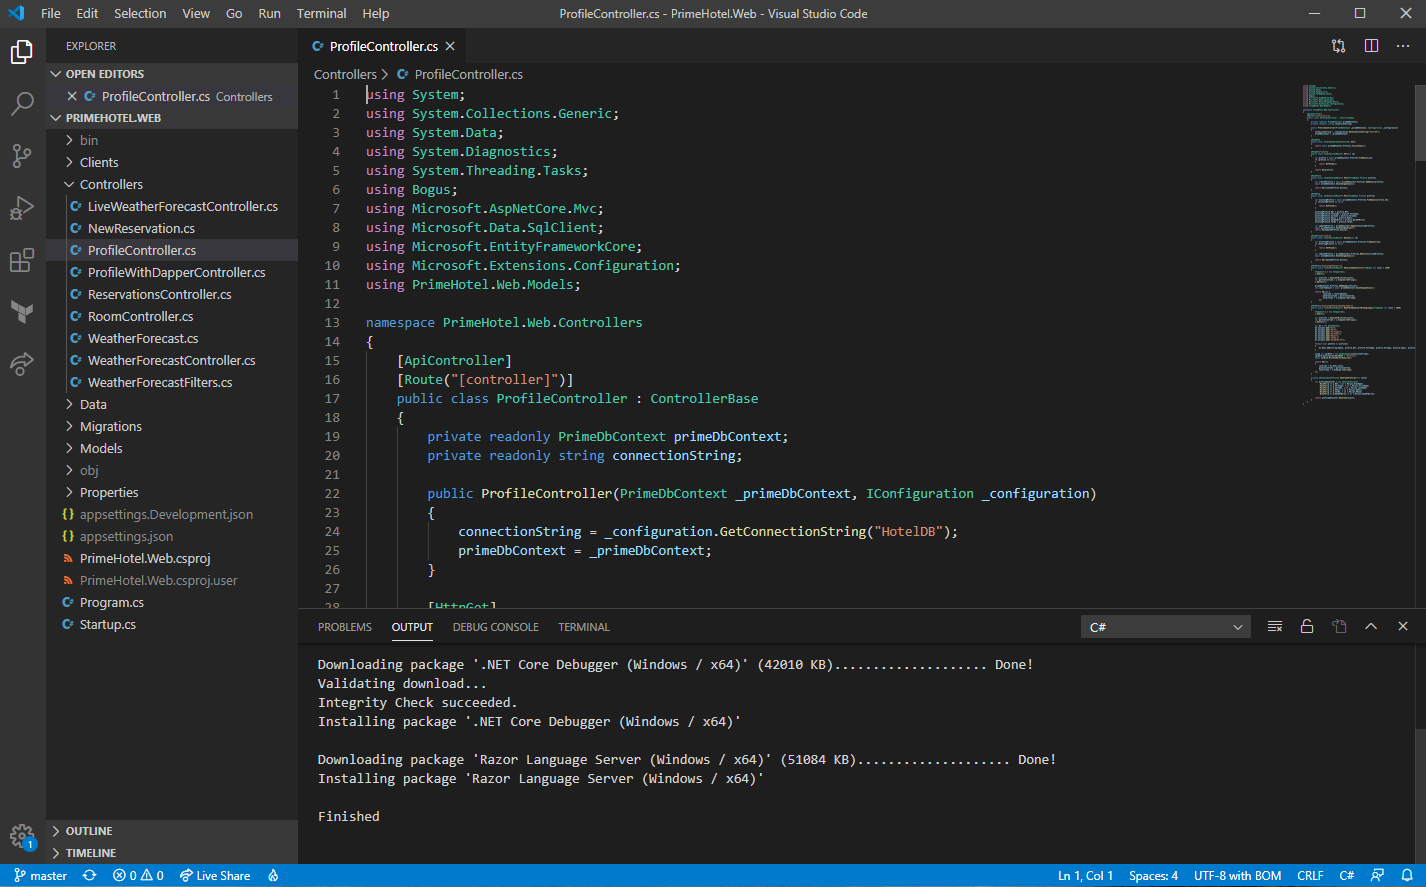
Zwróć uwagę, że zostały wygenerowane tylko tabele Events i Profiles, klasa DbContext ma nazwę AspNetCoreCotext i wszystko zostało wygenerowane w katalogu AspNetCoreModels. O to chodziło!

Ograniczenia

Inżynieria wsteczna wykonuje ogromną pracę polegającą na tworzeniu szkieletów klas encji, więc nie musimy pisać jej samodzielnie. Istnieją jednak pewne ograniczenia tego procesu:

  • nie wszystko na temat modelu jest przedstawione w schemacie bazy danych. Na przykład hierarchie dziedziczenia, typy własne i tabele dzielone nie zostaną odtworzone
  • ponadto dokumentacja EF Core twierdzi, że istnieją pewne typy kolumn, które nie zostaną uwzględnione w modelu
  • typy dopuszczające wartość null nie zostaną zamapowane jako dopuszczające wartość null. Na przykład kolumny typu string, które mogą mieć wartość null, nie będą mapowane jako typ string?. Taką zmianę trzeba dodać samodzielnie.

Więcej o tym możesz przeczytać w tym artykule Microsoft-u.

Aktualizowanie modelu

Zawsze, gdy coś się zmieni w bazie danych, będziesz musiał zaktualizować swój model. Większość zmian będzie trywialnych, takich jak dodanie kolumny do tabeli, zmiana nazwy tabeli lub zmiana typu kolumn. Te zmiany można szybko wprowadzić w klasach encji własnoręcznie.

Jeśli jednak nie masz pewności, jak mapować zmiany, zawsze możesz ponownie wygenerować cały DbContext ze wszystkimi klasami encji. Aby to zrobić, użyj parametru --force w poleceniu scaffold. Należy jednak pamiętać, że wszystkie zmiany wprowadzone ręcznie zostaną nadpisane. Obecnie nie ma możliwości aktualizacji modelu ze schematu bazy danych i zachowania ręcznych zmian.

Aktualizowanie bazy danych

Tworzenie szkieletu DbContext to tylko sposób na generowanie klas pasujących do bazy danych. Oznacza to, że możesz dodać migracje nawet do istniejącej bazy danych.

Najpierw musisz dodać AspNetCoreDbContext do kontenera DI. Przejdź do pliku Startup.cs i w metodzie ConfigureServices dodaj następujący wiersz.

    services.AddDbContext<AspNetCoreDbContext>(options =>
        options.UseSqlServer(Configuration.GetConnectionString("aspnetcore")));

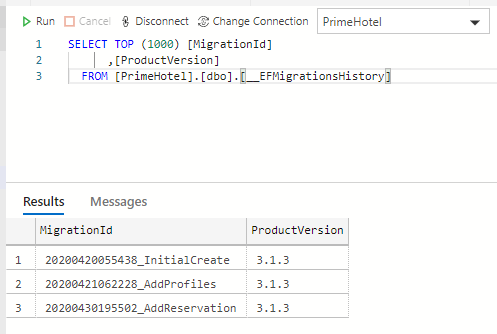
Teraz możesz dodać migracje do drugiej bazy danych. Dobrą praktyką jest rozdzielenie modeli i migracji dla każdej bazy danych. Wykonaj to polecenie:

dotnet ef migrations add InitialCreate --context AspNetCoreDbContext --output-dir Migrations/AspNetCore

Spójrzmy co zostało wygenerowane:

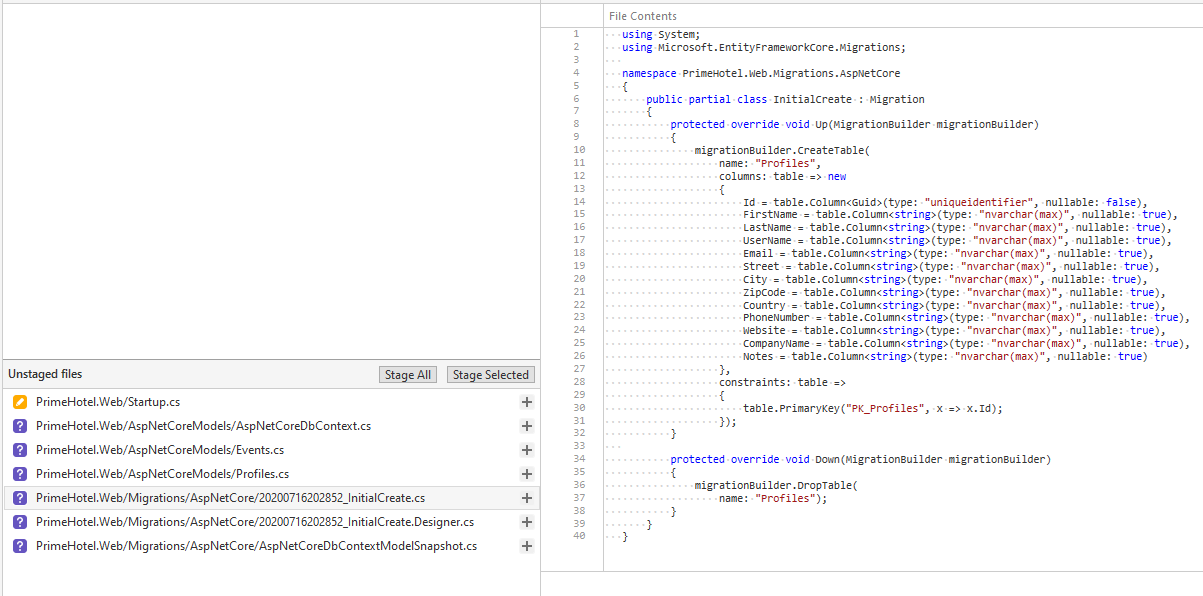
Warto zwrócić uwagę na jedną rzecz. Entity Framework Core wygenerował początkową migrację ze wszystkimi zmianami, które są obecnie w AspNetCoreDbContext. Może być konieczne wyczyszczenie wszystkich zmian w tej migracji, ponieważ te tabele już istnieją.

Podsumowanie

Podczas dodawania Entity Framework Core 5 do istniejącej bazy danych dobrym pomysłem jest stworzenie szkieletu klas jednostek i kontekstu za pomocą dedykowanego narzędzia .NET CLI. Na szczęście istnieje kilka parametrów, które możesz użyć, aby zbudować dokładnie to, czego potrzebujesz i tak jak tego potrzebujesz.

Migracje EF Core 5 można dodać później, aby zapewnić aktualność bazy danych za pomocą kodu. Jedną z rzeczy, o których należy pamiętać, jest to, że ponowne zaktualizowanie DbContext z bazy danych spowoduje nadpisanie wszystkich zmian, które zostały wprowadzone ręcznie. Z tego powodu tworzenie szkieletów DbContext jest raczje operacją jednorazową.

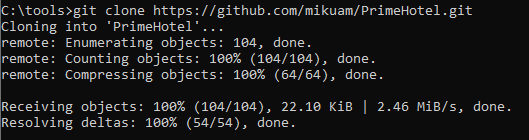
Cały zamieszczony tutaj kod został zademonstrowany na przykładzie projektu PrimeHotel, który jest dostępny na moim GitHubie, więc możesz go bezpłatnie pobrać i na nim eksperymentować. Spójrz również na ten post, jak uruchomić ten projekt: PrimeHotel – jak uruchomić projekt.

Mam nadzieję, że podobał Ci się ten post. Pozdrawiam! 🙂

Adding an Entity Framework Core 5 to an existing database

Entity Framework Core 5 is a light and easy to use ORM, that let you use the database without writing any SQL commands. Built-in mechanisms will translate your LINQ queries on your entity classes to SQL queries and return mapped objects.

Here is an article about adding EF Core with migrations to an empty database: PrimeHotel – adding Entity Framework Core 5 in .NET

Adding an Entity Framework Core 5 is super simple if you have an empty database, but is it that easy when working with a database that has some data inside? Do we need to map it all, or can we just work with a part of the database that interests us? Let’s start from the beginning.

Let’s see what we need

To work with EF Core 5 we need to install NuGet packages:

  • Microsoft.EntityFrameworkCore
  • Microsoft.EntityFrameworkCore.Design
  • Microsoft.EntityFrameworkCore.SqlServer

The last one reveals that we will work with the MS SQL Server database. Now let’s connect to our database and see how it looks like.

I’m using an Azure Data Studio, which is a lightweight and fast tool that can perform most of the basic operations of databases. It’s much faster than SQL Server Management Studio and now for most of my work, I just use the first one.

We will add EF Core for aspnetcore database, which looks like this.

We need a DbContext

The next thing we need to do is to create our DbContext. We could create it by hand and type everything manually. However, .NET Core has tools to scaffold that and generate it for us.

The process is called reverse engineering and it is scaffolding entity type classes and a DbContext class based on a database schema. To perform this operation we will use the .NET CLI tool, that you would have to install if you haven’t done it already. Type this command to check it out:

dotnet tool install --global dotnet-ef

You can also update the tool, once installed:

The scaffolding process needs a connection string to pass. We could pass it in our command, but we can also accomplish this task in a more elegant way by passing only its name.

Let’s go to the appsettings.json file and set up a connection string for our new database.

I’ve added a connection string with the name aspnetcore in ConnectionStrings section. 

The command that we are going to use is very simple, run it in your project directory:

dotnet ef dbcontext scaffold Name=aspnetcore Microsoft.EntityFrameworkCore.SqlServer

This command will add aspnetcoreDbContext and all entities representing your database.

However, it would be nice to have some more control over the process.

Customize the process to your needs

Thankfully, there are more parameters that we can use. Let’s take a look at some of them:

  • --table can be used to include specific tables
  • --use-database-names option will preserve the original database names as much as possible. However, invalid .NET identifiers will still be fixed
  • --context can be used to give generated DbContext your own name
  • --context-dir can be used to scaffold the DbContext class to a specific directory
  • --output-dir can be used to scaffold entity classes to a specific directory
  • --force will override the existing DbContext class and entity classes

I’m going to modify my command, so it will look like this:

dotnet ef dbcontext scaffold Name=aspnetcore --table Profiles --table Events
  --context AspNetCoreDbContext --context-dir AspNetCoreModels 
  --output-dir AspNetCoreModels Microsoft.EntityFrameworkCore.SqlServer

Let’s see what classes were generated.

Notice that only tables Events and Profiles were generated, DbContext class is named AspNetCoreCotext and all was generated in AspNetCoreModels directory. Awesome! 

The limitations

Reverse engineering does a tremendous job of scaffolding entity classes so that we don’t need to write it on our own. However, there are some limitations to this process:

  • not everything about the model is presented in the database schema. For example inheritance hierarchies, owned types and table splitting will not be reverse-engineered
  • also, EF Core documentation claims, that there are some column types that will not be included in the model
  • nullable types will not be mapped as nullable. For example, string columns that can be null, will not be scaffolded as string? type. You will have to edit it yourself

More of that you can read in this Microsoft article.

Updating the model

Whenever something changes in the database, you would need to update your model. Most of the changes will be trivial, like adding a column to the table, renaming a table name, or change columns type. Those changes can be quickly applied in the entity classes manually. 

However, if you’re not sure how to map your changes, you can always regenerate the whole DbContext with all entity classes. To do this, use --force parameter in the scaffold command. Note, however, that all changes done manually, will be overwritten. Currently, there is no option to update model from database schema and preserve manual changes.

Updating the database

Scaffolding a DbContext is just a way to generate classes, that match the database. This means that you can add migrations even to an existing database.

First, you would need to add AspNetCoreDbContext to your DI container. Go to the Startup.cs file and in ConfigureServices add the following line.

    services.AddDbContext<AspNetCoreDbContext>(options =>
        options.UseSqlServer(Configuration.GetConnectionString("aspnetcore")));

Now you can add migrations to the second database. It’s a good practice to keep models and migrations separate for every database. Execute this command:

dotnet ef migrations add InitialCreate --context AspNetCoreDbContext --output-dir Migrations/AspNetCore

Here is what was generated:

There’s one thing worth noticing. Entity Framework Core generated initial migration with all changes that are currently in the AspNetCoreDbContext. You might need to clear all changes in that migration because those tables already exist.

Summary

When adding an Entity Framework Core 5 to an existing database, a good idea is to scaffold entity classes and context with a dedicated .NET CLI tool. You have a handful of parameters that you can provide and scaffold exactly what you need and how you need it.

You can add EF Core 5 migrations later on for keeping your database up to date with your code. One thing that you should keep in mind is that updating DbContext from the database again will override all changes that you did manually. Because of this, scaffolding DbContext is more of a one-time thing.

All code posted here was applied to a PrimeHotel project, that is available at my GitHub, so you can download it freely and experiment. Take a look also at this post on how to run it: PrimeHotel – how to run this project.

Hope you liked the post, cheers!


PrimeHotel – dodanie Entity Framework Core 5 w .NET 5

Przyjrzyjmy się, jak wprowadzić Entity Framework Core 5 w projekcie ASP.NET Core w .NET 5. Zaczniemy od pustej bazy danych, w której mamy pełne pole do popisu i możemy dodawać tabele tak, jak chcemy.

W tym poście będziemy pracować z projektem PrimeHotel, który stworzyłem do celów edukacyjnych. Wszystko to jest dostępne w moim GitHub, więc możesz go pobrać bezpłatnie. Zobacz także ten post, aby dowiedzieć się jak uruchomić ten projekt: PrimeHotel – jak uruchomić projekt.

Czym jest Entity Framework Core

Entity Framework Core 5 to lekka, rozszerzalna, otwarta i wieloplatformowa wersja popularnej technologii dostępu do danych Entity Framework. EF Core jest obiektowym mapperem (O/RM), umożliwia programistom pracę z bazą danych przy użyciu obiektów .NET i eliminuje potrzebę korzystania z większości kodu dostępu do danych, który zwykle muszą pisać. Oznacza to koniec pisania komend w SQL. Sprawdza się doskonale w większości przypadków, jednak gdy trzeba pracować z dużą ilością danych, prawdopodobnie lepiej będzie napisać własne polecenia SQL.

Dodanie Entity Framework Core

Dodawanie EF Core 5 do projektu ASP.NET Core jest bardzo proste. Zacznij od instalacji pakietów NuGet:

  • Microsoft.EntityFrameworkCore
  • Microsoft.EntityFrameworkCore.Design
  • Microsoft.EntityFrameworkCore.SqlServer

Po zakończeniu dodaj PrimeDbContext do folderu Models, który wyglądałby następująco:

    public class PrimeDbContext : DbContext
    {
        public PrimeDbContext(DbContextOptions<PrimeDbContext> options)
            : base(options)
        {
        }

        public virtual DbSet<Room> Rooms { get; set; }
    }

Teraz musimy dodać klasę Room, która reprezentowałaby encję pokoju, z tabeli Rooms.

    public class Room
    {
        public int Id { get; set; }

        public int Number { get; set; }

        public string Description { get; set; }

        public DateTime LastBooked { get; set; }

        public int Level { get; set; }

        public RoomType RoomType { get; set; }

        public int NumberOfPlacesToSleep { get; set; }
    }

    public enum RoomType
    {
        Standard,
        Suite
    }

Teraz zajmiemy się częścią konfiguracyjną. Użyjmy pustej bazy danych, która jest hostowana przez nas lokalnie. Najłatwiejszym sposobem jest zainstalowanie SQL Server w wersji Express i skonfigurowanie jej lokalnie. Możesz jednak skonfigurować serwer bazy danych w kontenerze docker. Sprawdź mój post, jak to zrobić: Set up a SQL Server in a docker container.

W pliku appsettings.json musimy wpisać nasz connection string. Powinien on wyglądać podobnie jak tutaj:

A teraz przejdźmy do pliku Startup.cs, gdzie musimy skonfigurować EF Core, aby używał naszego connection stringa. W metodzie ConfigureServices dodaj następujący wiersz:

    // Entity Framework
    services.AddDbContext<PrimeDbContext>(options =>
         options.UseSqlServer(Configuration.GetConnectionString("HotelDB")));

Zauważ, że użyłem nazwy HotelDB, która jest nazwą mojego connection stringa z pliku appsettings.json. To ważne, żeby te dwie wartości do siebie pasowały.

Wykonaliśmy już większość kluczowych rzeczy, ale potrzebujemy czegoś, co stworzyłoby tabele w bazie danych z naszego PrimeDbContext. Do tej pory mamy tylko jedną, ale nadszedł właściwy czas na wprowadzenie mechanizmów migracji.

Dodanie migracji w EF Core

Migracje w EF Core bazy danch pozwalają wprowadzać zmiany w bazie danych tak, aby była ona aktualna z kodem aplikacji, które ją używa. Jest to bardzo istotny mechanizm, ponieważ zmiany w strukturze bazy danych wprowadzane są dość często, nawet przez wielu programistów, więc potrzebujemy uniwersalnego mechanizmu, żeby te zmiany śledzić i wprowadzać. 

Dodawanie pierwszej migracji niewiele różni się od dodawania kolejnych. Musisz otworzyć okno terminala w lokalizacji projektu i wykonać polecenie:

dotnet ef migrations add InitMigration

Po pomyślnym wykonaniu tego polecenia zostanie wygenerowany plik migracji, w którym można sprawdzić, jakie zmiany zostaną zastosowane.

W tym pliku znajdziesz dwie metody: Up i Down. Reprezentują zmiany, kiedy migracja zostanie zastosowana i kiedy zostanie wycofana.

    public partial class InitialCreate : Migration
    {
        protected override void Up(MigrationBuilder migrationBuilder)
        {
            migrationBuilder.CreateTable(
                name: "Rooms",
                columns: table => new
                {
                    Id = table.Column<int>(nullable: false)
                        .Annotation("SqlServer:Identity", "1, 1"),
                    Number = table.Column<int>(nullable: false),
                    Description = table.Column<string>(nullable: true),
                    LastBooked = table.Column<DateTime>(nullable: false),
                    Level = table.Column<int>(nullable: false),
                    RoomType = table.Column<int>(nullable: false),
                    NumberOfPlacesToSleep = table.Column<int>(nullable: false)
                },
                constraints: table =>
                {
                    table.PrimaryKey("PK_Rooms", x => x.Id);
                });
        }

        protected override void Down(MigrationBuilder migrationBuilder)
        {
            migrationBuilder.DropTable(
                name: "Rooms");
        }
    }

Ostatnią rzeczą do zrobienia jest uruchomienie aktualizacji bazy danych. Byłoby wspaniale, gdyby nasze zmiany były sprawdzane i stosowane przy każdym uruchomieniu projektu. Zobaczmy zatem, jak możemy to osiągnąć. Przede wszystkim przejdźmy do pliku Startup.cs i utwórzmy metodę.

    private void UpgradeDatabase(IApplicationBuilder app)
    {
        using (var serviceScope = app.ApplicationServices.CreateScope())
        {
            var context = serviceScope.ServiceProvider.GetService<PrimeDbContext>();
            if (context != null && context.Database != null)
            {
                context.Database.Migrate();
            }
        }
    }

Ta metoda wykorzysta wbudowany mechanizm wstrzykiwania zależności do pobrania instancji naszego PrimeDbContext i użycia jej do uruchomienia migracji bazy danych. Uruchomione zostaną tylko te, które nie zostały jeszcze zastosowane.

Pozostaje jeszcze jedna linia do dodania w metodzieConfigure, na samym dole.

    UpgradeDatabase(app);

Jeśli spojrzymy na bazę danych, zobaczymy, jakie migracje zostały zastosowane. Tabela __EFMigrationsHistory zostanie utworzona automatycznie przez Entity Framework Core.

Używanie EF Core 5

Gdy mamy już wszystko na miejscu, odpowiednią konfigurację i migracje baz danych, możemy zacząć korzystać z mechanizmu O/RM.

Wszystkie operacje na tabelach w EF Core muszą przejść przez PrimeDbContext. Korzystanie z niego jest bardzo proste, gdy zarejestrujemy go w klasie Startup.cs, będzie on dostępny w dowolnej klasie do wstrzyknięcia i użycia. Spójrz na ten przykład prostych operacji CRUD w RoomController.

    [ApiController]
    [Route("[controller]")]
    public class RoomController : ControllerBase
    {
        private readonly PrimeDbContext primeDbContext;

        public RoomController(PrimeDbContext _primeDbContext)
        {
            primeDbContext = _primeDbContext;
        }

        [HttpGet]
        public async Task<IEnumerable<Room>> Get()
        {
            return await primeDbContext.Rooms.ToListAsync();
        }

        [HttpGet("{id}")]
        public async Task<IActionResult> Get(int id)
        {
            var room = await primeDbContext.Rooms.FindAsync(id);
            if (room == null)
            {
                return NotFound();
            }

            return Ok(room);
        }

        [HttpPost]
        public async Task<IActionResult> Post([FromBody] Room room)
        {
            var createdRoom = await primeDbContext.Rooms.AddAsync(room);
            await primeDbContext.SaveChangesAsync();

            return Ok(createdRoom.Entity);
        }

        [HttpPut]
        public async Task<IActionResult> Put([FromBody] Room room)
        {
            var existingRoom = await primeDbContext.Rooms.FindAsync(room.Id);
            if (existingRoom == null)
            {
                return NotFound();
            }

            existingRoom.Number = room.Number;
            existingRoom.Description = room.Description;
            existingRoom.LastBooked = room.LastBooked;
            existingRoom.Level = room.Level;
            existingRoom.RoomType = room.RoomType;
            existingRoom.NumberOfPlacesToSleep = room.NumberOfPlacesToSleep;

            var updatedRoom = primeDbContext.Update(existingRoom);
            await primeDbContext.SaveChangesAsync();
            return Ok(updatedRoom.Entity);
        }

        [HttpDelete("{id}")]
        public async Task<IActionResult> Delete(int id)
        {
            var existingRoom = await primeDbContext.Rooms.FindAsync(id);
            if (existingRoom == null)
            {
                return NotFound();
            }

            var removedRoom = primeDbContext.Rooms.Remove(existingRoom);
            await primeDbContext.SaveChangesAsync();

            return Ok(removedRoom.Entity);
        }
    }

Zauważ, że w EF Core każda metoda ma wersję asynchroniczną. Wykorzystanie asynchroniczności jest dobrym pomysłem. W ten sposób Twój kod będzie szybszy i może być uruchamiany wydajniej z wieloma innymi żądaniami równolegle.

Ważne rzeczy, o których należy pamiętać:

  • możemy wyszukiwać kolekcje encji w sposób, w jaki chcemy z LINQ, używając Where, Select i innych metod, które na koniec wygenerują SQL ze wszystkich tych warunków
  • Jeśli tylko filtrujesz encje do wyświetlenia, możesz użyć AsNoTracking() w celu poprawy wydajności
  • Wywołanie bazy danych zostanie wykonane dopiero wtedy, gdy kod, który piszemy, wymaga wyników. Dzieje się tak na przykład, gdy używamy ToListAsync
  • Wszystkie zmiany, które wprowadzamy, należy zapisać za pomocą SaveChangesAsync, aby je zapisać w bazie danych

To tylko kilka punktów, o których należy pamiętać, ale jest jeszcze wiele rzeczy dziejących się pod spodem, o których warto wiedzieć. To wprowadzenie wystarczy jednak na początek i jest więcej niż wystarczające, aby samodzielnie zacząć pracę z Entity Framework Core.

Podsumowanie

Schludnie i wygodnie! Entity Framework Core jest idealny do prawie każdego prostego użycia bazy danych. Jestem pewien, że uznasz jego możliwości za przydatne i intuicyjne.

Cały kod opublikowany w tym poście jest dostępny na moim GitHub, więc możesz go dowolnie ściągać i modyfikować. Zerknij także na post jak uruchomić projekt PrimeHotel: PrimeHotel – jak uruchomić projekt

Dzięki za przeczytanie, daj mi znać, jeśli podoba Ci się ten post 🙂

PrimeHotel – adding Entity Framework Core 5 in .NET

Let’s have a look at how to introduce Entity Framework Core 5 in ASP.NET Core project in .NET 5. We will start from an empty database, where we have a clean slate and can add tables the way we want.

In this post we will work with the PrimeHotel project, that was created for learning purposes. It’s all available at my GitHub, so you can download it freely. Take a look also at this post on how to run it: PrimeHotel – how to run this project.

What is Entity Framework Core

Entity Framework Core 5 is a lightweight, extensible, open-source, and cross-platform version of the popular Entity Framework data access technology. EF Core is an object-relational mapper (O/RM), enables developers to work with a database using .NET objects, and eliminating the need for most of the data-access code they usually need to write. This means no more SQLs. It proves to be great for most of the scenarios, however, when you need to work with big amounts of data, you might be better off with writing SQLs.

Adding an Entity Framework Core

Adding EF Core to an ASP.NET Core project is super easy. Start with installing NuGet packages:

  • Microsoft.EntityFrameworkCore
  • Microsoft.EntityFrameworkCore.Design
  • Microsoft.EntityFrameworkCore.SqlServer

Once it’s all done, add a PrimeDbContext in the Models folder, that would look like this:

    public class PrimeDbContext : DbContext
    {
        public PrimeDbContext(DbContextOptions<PrimeDbContext> options)
            : base(options)
        {
        }

        public virtual DbSet<Room> Rooms { get; set; }
    }

Now we need to add a Room class, that would represent an entity of a room, from Rooms table.

    public class Room
    {
        public int Id { get; set; }

        public int Number { get; set; }

        public string Description { get; set; }

        public DateTime LastBooked { get; set; }

        public int Level { get; set; }

        public RoomType RoomType { get; set; }

        public int NumberOfPlacesToSleep { get; set; }
    }

    public enum RoomType
    {
        Standard,
        Suite
    }

Now let’s handle the configuration part. Let’s use an empty database, that is hosted by us locally. The easiest approach is to install SQL Server Express edition and setup it locally. However, you can set up your database server in the docker container. Check my post on how to do it: Set up a SQL Server in a docker container.

In appsettings.json file we need to set our connection string. It should look similar to this:

Now let’s go to the Startup.cs file, where we need to configure EF Core to use our connection string. In ConfigureServices method, add this line:

    // Entity Framework
    services.AddDbContext<PrimeDbContext>(options =>
        options.UseSqlServer(Configuration.GetConnectionString("HotelDB")));

Notice that I used a HotelDB name, that is a name of my connection string in the appsettings.json file.

We have most of the crucial things done, but we need something, that would create tables in DB from our PrimeDbContext. So far we got only one, but it’s the right time to introduce migration mechanisms.

Adding EF Core migrations

Migrations in the EF Core database allow you to make changes to the database so that it is in line with the code of the application that uses it. This is a very important mechanism because changes in the structure of the database are introduced quite often, even by many programmers, so we need a universal mechanism to track and introduce these changes.

Adding first migration doesn’t differ much from adding the next ones. You need to open a terminal window in the location of the project and execute the command:

dotnet ef migrations add InitialCreate

When this command executes successfully, it will generate a migration file, where you can check what changes will be applied.

In this file you will find two methods: Up and Down. Those will represent the changes when migration will be applied and when it would be rolled back.

    public partial class InitialCreate : Migration
    {
        protected override void Up(MigrationBuilder migrationBuilder)
        {
            migrationBuilder.CreateTable(
                name: "Rooms",
                columns: table => new
                {
                    Id = table.Column<int>(nullable: false)
                        .Annotation("SqlServer:Identity", "1, 1"),
                    Number = table.Column<int>(nullable: false),
                    Description = table.Column<string>(nullable: true),
                    LastBooked = table.Column<DateTime>(nullable: false),
                    Level = table.Column<int>(nullable: false),
                    RoomType = table.Column<int>(nullable: false),
                    NumberOfPlacesToSleep = table.Column<int>(nullable: false)
                },
                constraints: table =>
                {
                    table.PrimaryKey("PK_Rooms", x => x.Id);
                });
        }

        protected override void Down(MigrationBuilder migrationBuilder)
        {
            migrationBuilder.DropTable(
                name: "Rooms");
        }
    }

The last thing left to do is to trigger updating the database. It would be great if our changes were checked and applied on every project run. Let’s see how we can accomplish that. First of all, let’s go to Startup.cs file and create a method. 

    private void UpgradeDatabase(IApplicationBuilder app)
    {
        using (var serviceScope = app.ApplicationServices.CreateScope())
        {
            var context = serviceScope.ServiceProvider.GetService<PrimeDbContext>();
            if (context != null && context.Database != null)
            {
                context.Database.Migrate();
            }
        }
    }

This method will use built-in Dependency Injection mechanism to fetch an instance of our PrimeDbContext and use it to run database migrations. Only ones that were not applied yet will be run.

Now, in the Configure method add a line at the bottom.

    UpgradeDatabase(app);

If we take a look into the database, we will see what migrations were applied. __EFMigrationsHistory table is created automatically by Entity Framework Core.

Using EF Core 5

Once we have everything in place, we have a proper configuration and database migrations, we can start benefit from having an O/RM mechanism.

All operations on tables in EF Core needs to go through PrimeDbContext. Using it is super simple, once we registered it in Startup.cs class, it will be available in any class for us to use. Take a look at this example of simple CRUD operations in the RoomController.

    [ApiController]
    [Route("[controller]")]
    public class RoomController : ControllerBase
    {
        private readonly PrimeDbContext primeDbContext;

        public RoomController(PrimeDbContext _primeDbContext)
        {
            primeDbContext = _primeDbContext;
        }

        [HttpGet]
        public async Task<IEnumerable<Room>> Get()
        {
            return await primeDbContext.Rooms.ToListAsync();
        }

        [HttpGet("{id}")]
        public async Task<IActionResult> Get(int id)
        {
            var room = await primeDbContext.Rooms.FindAsync(id);
            if (room == null)
            {
                return NotFound();
            }

            return Ok(room);
        }

        [HttpPost]
        public async Task<IActionResult> Post([FromBody] Room room)
        {
            var createdRoom = await primeDbContext.Rooms.AddAsync(room);
            await primeDbContext.SaveChangesAsync();

            return Ok(createdRoom.Entity);
        }

        [HttpPut]
        public async Task<IActionResult> Put([FromBody] Room room)
        {
            var existingRoom = await primeDbContext.Rooms.FindAsync(room.Id);
            if (existingRoom == null)
            {
                return NotFound();
            }

            existingRoom.Number = room.Number;
            existingRoom.Description = room.Description;
            existingRoom.LastBooked = room.LastBooked;
            existingRoom.Level = room.Level;
            existingRoom.RoomType = room.RoomType;
            existingRoom.NumberOfPlacesToSleep = room.NumberOfPlacesToSleep;

            var updatedRoom = primeDbContext.Update(existingRoom);
            await primeDbContext.SaveChangesAsync();
            return Ok(updatedRoom.Entity);
        }

        [HttpDelete("{id}")]
        public async Task<IActionResult> Delete(int id)
        {
            var existingRoom = await primeDbContext.Rooms.FindAsync(id);
            if (existingRoom == null)
            {
                return NotFound();
            }

            var removedRoom = primeDbContext.Rooms.Remove(existingRoom);
            await primeDbContext.SaveChangesAsync();

            return Ok(removedRoom.Entity);
        }
    }

Notice that in EF Core there is an asynchronous version of every method. Taking advantage of this is a good idea. This way your code will be faster and could be run more efficiently with many other requests in parallel.

Important things to have in mind:

  • we can query entities collections the way we want with LINQ using Where, Select and other methods and that will generate SQL out of all those conditions
  • If you’re just querying entities, you can use AsNoTracking() to improve performance
  • A call to the database will be performed when the code we write needs the results. This is for example where we use ToListAsync
  • All changes that we make needs to be saved with SaveChangesAsync to be applied

Those are only a few points to have in mind, but there us much more that is going underneath to be aware of. However, this is good for a start, and it more than enough to play with Entity Framework Core on your own.

Summary

Nice and clean! Entity Framework Core is perfect for almost every simple database usage. I’m sure you’ll find it useful and intuitive.

All code posted here is available at my GitHub, so you can download it freely. Take a look also at this post on how to run it: PrimeHotel – how to run this project.

Thanks for reading, let me know if you liked this post 🙂

PrimeHotel – przekazywanie parametrów do akcji – zadania

To jest post z zadaniami do zrobienia, jeśli chcesz sprawdzić swoją wiedzę na temat ASP.NET Core w .NET 5. Ten wpis dotyczy przekazywania parametrów do akcji kontrolera, co jest niezwykle ważne do opanowania podczas tworzenia mikro-serwisów.

Nie musisz zaczynać od zera, możesz bazować na projekcie PrimeHotel, stworzonym specjalnie do celów edukacyjnych. Możesz pobrać go na mojej stronie GitHub. Zobacz także post dotyczący tego projektu: PrimeHotel – jak uruchomić projekt

Pełny artykuł na temat przekazywania parametrów do akcji w ASP.NET Core w .NET 5 można znaleźć tutaj: ASP.NET Core w .NET 5 – przekazywanie parametrów do akcji

Zadanie 1

Trudność: łatwa

Kontekst

Dowiedz się, jak pisać operacje CRUD. Powiedzmy, że chcielibyśmy obsługiwać faktury – dodaj wszystkie metody, które pozwolą na obsługę faktur.

Co musi być zrobione

  • utwórz nową klasę o nazwie Invoice
  • utwórz metody Add, Get, Update oraz Delete do obsługi faktur
  • lista faktur może być zakodowana na stałe w klasie kontrolera
  • dodaj opcjonalne filtrowanie w metodzie Get z parametrami ciągu zapytania

Wskazówka

Spójrz na WeatherForecastController i jak tam obsługujemy prognozy pogody.

Zadanie 2

Trudność: średnia

Kontekst

Dowiedz się, jak przekazać tablicę w ciągu zapytania. Ten sposób może być przydatny, gdy chcesz przekazać kolekcję obiektów, ale musisz użyć do tego ciągu zapytania

Co musi być zrobione

  • utwórz metodę GET
  • metoda musi zaakceptować tablicę liczb całkowitych z ciągu zapytania
  • jak wywołałbyś tę metodę i przekazał parametry?

Gdzie zamieszczać odpowiedzi?

Po prostu napisz komentarz do tego posta, spojrzę.

Lub, jeśli masz na to ochotę, zgłoś pull request do repozytorium PrimeHotel.

Powodzenia! 🙂


PrimeHotel – passing parameters to actions – assignments

This is a post with assignments to do if you would like to check your knowledge about ASP.NET Core in .NET 5. This one is about passing parameters to controller actions, which is a crucial thing to master when developing micro-services.

You don’t need to start from scratch, you can base on a PrimeHotel project, created especially for learning purposes. You can download it on my GitHub page. Also, take a look at the post on how to run this project: PrimeHotel – how to run this project

Full article about passing parameters to actions in ASP.NET Core in .NET 5 can be found here: ASP.NET Core in .NET 5 – pass parameters to actions

Assignment 1

Difficulty: easy

Context

Learn how to write CRUD operations. Let’s say we would like to handle invoices – add all methods that will allow handling invoices.

What needs to be done

  • create a new class called Invoice
  • create Add, Get, Update and Delete methods to handle invoices
  • list of invoices can be hardcoded in the controller class
  • add optional filtering in Get with query string parameters

Hint

Have a look at the WeatherForecastController and how we handle weather forecasts there.

Assignment 2

Difficulty: medium

Context

Learn how to pass array in a query string. It can be useful when you would like to pass a collection of objects but use a query string for it

What needs to be done

  • create a GET method
  • this method needs to accept an array of integers from the query string
  • how you would invoke this method and pass parameters?

Where to post the answers?

Simply write a comment to this post, I’ll take a look.

Or, if you feel like it, make a pull request to PrimeHotel repo.

Good luck! 🙂

PrimeHotel – jak uruchomić projekt

W tym poście poprowadzę Cię przez proces pobierania i uruchamiania mojego projektu – PrimeHotel. Jest to projekt stworzony do celów edukacyjnych, dzięki czemu masz swobodę wprowadzania zmian, klonowania projektu i wykorzystywania go do wszelkich działań niekomercyjnych.

Jest to średniej wielkości serwis reprezentujący system do zarządzania hotelem. Przechowuje rezerwacje użytkowników, profile użytkowników i zapisuje je w bazie danych MS SQL. Może także połączyć się z zewnętrzną usługą pogodową, aby pobrać bieżącą pogodę. Z czasem pojawi się jeszcze więcej funkcji, które pokażą więcej integracji i możliwości platformy .NET, dobre praktyki i niesamowite możliwości.

Jeżeli dopiero zaczynasz swoją przygodę z .NET, zerknij proszę na ten post: .NET 5 – Jak zacząć. Pomoże Ci w skonfigurowaniu twojego środowiska pracy i pokrótce opowie jakie są możliwości .NET.

Pobieranie projektu

PrimeHotel to projekt .NET 5, który wykorzystuje ASP.NET Core i Entity Framework Core 5. Jest on hostowany na GitHub, dzięki czemu możesz przejść do tego linku: https://github.com/mikuam/PrimeHotel

Upewnij się, że masz zainstalowany Git na swoim komputerze. Następnie możesz sklonować projekt za pomocą polecenia w terminalu konsoli.

git clone https://github.com/mikuam/PrimeHotel.git

Teraz otwórz projekt w swoim ulubionym IDE, takim jak Visual Studio lub Visual Studio Code.

Korzystam z programu Visual Studio 2019 i na moim komputerze wygląda to tak.

Rzućmy teraz okiem na strukturę projektu:

  • Clients – tutaj są klasy komunikujące się z innymi usługami za pomocą HttpClient
  • Controllers – tutaj są wszystkie klasy kontrolerów zawierające wszystkie punkty końcowe w tej usłudze
  • Data – klasy repozytoriów, które zawierają polecenia SQL – obecnie Dapper
  • Migrations – migracje Entity Framework Core 5, które utrzymują zmiany schematu bazy danych
  • Models – klasy Entity Framework Core 5, które reprezentują tabele w bazie danych

Konfiguracja bazy danych

Do celów edukacyjnych najlepiej skonfigurować SQL Server na komputerze. Właśnie to robię. Jeśli jednak chcesz ustawić go jako obraz dokera, możesz przeczytać o nim mój post: Set up a SQL Server in a docker container.

Możesz pobrać wersję SQL Server Express za darmo ze strony Microsoft. Po zainstalowaniu i skonfigurowaniu serwera będzie on prawdopodobnie dostępny z adresem localhost. Spróbuj połączyć się z serwerem SQL Server i sprawdź, czy masz bazę danych PrimeHotel. Do łączenia używam Azure Data Studio – niesamowite i szybkie narzędzie, idealne do prostych zadań.

Jeżeli nie masz bazy PrimeHotel, to po prostu ją stwórz i pozostaw pustą.

Ostatnią częścią jest zmiana connection stringa w projekcie. Aby to zrobić przejdź do edycji pliku appsettings.json. Wygląda on następująco:

Connection string może się nieco różnić, jednak mój wygląda tak:

Data Source=localhost;Initial Catalog=PrimeHotel;Integrated Security=True

Zamiast członu localhost możesz mieć coś podobnego do localhost\SQLEXPRESS, jednak jaki dokładnie będzie adres zależy od konfiguracji SQL Servera.

Uruchomienie projektu

Kiedy wszystko jest już gotowe, możesz już uruchomić projekt. Pamiętaj, że potrzebujesz także mieć zainstalowane środowisko uruchomieniowe .NET 5(.NET 5 runtime) oraz pakiet SDK.

W Visual Studio możesz po prostu nacisnąć F5. W Visual Studio Code otwórz okno terminala i wpisz dwie komendy: dotnet build oraz dotnet run. Następnie przejdź w przeglądarce do linku, który wyświetli się na konsoli. Powinieneś zobaczyć coś takiego:

Proste, prawda? Gratulacje, właśnie uruchomiłeś PrimeHotel. Teraz możesz zacząć kodować i ulepszać ten serwis.

Powodzenia!

PrimeHotel – how to run this project

In this post, I will guide you through the process of downloading and running my project – PrimeHotel. It is a project created for learning purposes so you are free to contribute, clone, and use it for any non-commercial activity.

It is a medium-sized service, that represents a hotel management system. Is holds user reservations, user profiles and saves them in the MS SQL database. It can also connect to a 3-rd party weather service to fetch current weather. More features are yet to come, which will show more .NET integrations and capabilities, good practices, and some awesome features.

If you are new to .NET, please take a look at this post first: .NET 5 – How to start. It will help you with making your first steps.

Download the project

PrimeHotel is a .NET 5 project that uses ASP.NET Core and Entity Framework Core 5. It is hosted on GitHub, so you can go ahead and navigate to this link: https://github.com/mikuam/PrimeHotel

Make sure you have Git installed on your machine. Then you can clone the project by using a command in a console terminal.

git clone https://github.com/mikuam/PrimeHotel.git

Now open the project with your favorite IDE like Visual Studio or Visual Studio Code.

I’m using Visual Studio 2019 and on my machine, it looks like this.

Let’s now have a quick look at the project structure:

  • Clients – this is where are classes that communicate with other services with HttpClient
  • Controllers – here are all controller classes containing all the endpoints in this service
  • Data – repository classes that encapsulate SQL commands – currently Dapper
  • Migrations – Entity Framework Core 5 migrations, that keeps the database schema changes
  • Models – Entity Framework Core 5 classes, that represent tables in the database 

Configure the database

For learning purposes, it will be best to set up a SQL Server on your machine. This is what I’m doing. However, if you would like to set it up as a docker image, you can read my post about it: Set up a SQL Server in a docker container.

You can download a SQL Server Express version for free from the Microsoft website. Once you install and set up a server, it would be available probably with the localhost address. Try to connect to your SQL Server and check if you have a PrimeHotel database created. For connecting I’m using Azure Data Studio – an awesome and fast tool, great for simple actions.

If you don’t have a PrimeHotel database, just create it and leave it empty.

The last part is to update a connection string in our project. Go ahead and edit appsettings.json file. It looks like this:

The connection string might differ slightly, mine is:

Data Source=localhost;Initial Catalog=PrimeHotel;Integrated Security=True

Instead of localhost you could also have something as localhost\SQLEXPRESS, but that is your individual configuration of SQL Server.

Running the project

When you have everything in place, just go ahead and run the project. If everything is set-up and .NET 5 runtime and SDK are installed, you should be good.

In Visual Studio just press F5. In Visual Studio Code open the terminal and write two commands: dotnet build and dotnet run. Then when navigating to a given URL, you should see something like this:

Simple, right? Congratulation on running the project. Now you are good to go for coding and improving this service.

Good luck!


What I learned from $2500 Udi Dahan course

Around the beginning of April 2020 Udi Dahan, owner of Particular Software, released his course in a form of online videos, for free. The big deal is that Udi is one of the world’s foremost experts on Service-Oriented Architecture, Distributed Systems, and Domain-Driven Design. This was a trigger for me and my whole team to watch the course and have a weekly discussion session to talk through completed chapters. Here is what I learned.

Use messaging

In his course, Udi highlighted many times, that messaging can solve most of your service-to-service communication. It may be slower than traditional RPC calls, but it’s more reliable and stable. It also scales better, because it doesn’t really matter how many subscribers there are, but rather how easy we can change the existing architecture.

With RPCs, services are strongly bonded together and need to support the same contract. When the change is needed, we often need to change more than one service. With messaging we can use messages that are already sent and build a service that we need. 

It is also worth mentioning that messaging systems are in the business for a long time and there is a handful of solutions to choose from. It’s not a technology that is still changing quickly, but it’s been here for a while.

There’s no single best solution

This is something that was repeated dozens of times across the course. Udi showed the best available approaches and architectural styles available: RPCs, messaging, micro-services, CQRS, Sagas, and showed their good and bad usages. All those concepts are great, but it doesn’t mean that we should use one of them for everything. It’s actually better to combine a few approaches, technologies, database models and use whatever suits the problem best.

For example, if CQRS works great for one e-commerce solution, it doesn’t mean that now it is the formula for every e-commerce there is. Therefore we shouldn’t take unconsciously whatever worked for previous project without greater analysis.

Find your service boundaries

This was one of the most important chapters and an a-ha moment for me and my teammates. Udi explained how important it is to find the service boundaries – places where a business domain can be divided into smaller pieces. It also defines the best places where big codebase can be divided into smaller, independent services.

Let’s take a look at the example. Let’s say we are building a hospitality system, that a guest can interact with.

So we have nicely separated micro-services, each with separate front-end and DB. They are communicating via messages in Service Bus and save data they need in DB, in the form they need them. Every change done by the user is saved in DB and propagated via message.

So what’s wrong?

It may seem that it’s a perfect decoupled solution, that can be scaled according to needs. However, there are a few problems. The first one is that we have a lot on infrastructure to maintain: services and databases must have a deployment process and with this approach, we are going to have more and more small services.

The second one is scalability. They seem easy to scale because everything is separate, but in most cases, there will be no need to do so. We will end up using resources we do not need. The other thing is that it’s not easy to maintain many instances of a service, where you have the same database. Stateful services are hard to scale, where stateless services can be scaled easily. Scalable services need to be designed with this specific goal in mind.

The third and less obvious one is that those services are actually not decoupled. They are working on the same data: user basic data, reservation details, reservation suborders, and payments. We will end up having all those data in every database. Don’t get me wrong, data duplication isn’t a bad thing when it comes to reading. But when a change is necessary, it has to be synchronized with every service that uses this data. Now, let’s have a look at a different approach.

In this approach, we still have separate front-ends but we have a single API and DB. The deployment process is easier, applying a change of contract is also easier, because we can do it all at once and we need much less synchronization. Of course, this is only an example and it wouldn’t fit every scenario, but here it makes sense.

Micro-services approach doesn’t have to be better than the monolith

When looking at an example above, we clearly see that having slightly bigger services can bring certain advantages to our architecture. When building micro-service it is a common pattern, that it should do one thing only. It can lead to services, that would have a single method in their APIs. While it may make sense in some cases, it would result in creating many very small services, that contain more synchronization code, than the actual business logic.

On the other hand, a monolith does not need to be a bad idea. If we can make it performant enough and the codebase isn’t that bad, then it actually has some advantages. For example, introducing a change is far easier and quicker than in many micro-services. Also, we have all business logic and contracts in front of our eyes, where we can easily see it. It’s also easier to write unit tests in the monolith than integration tests with a micro-service approach.

Don’t try to model reality – it doesn’t exist

A very powerful sentence, that Udi said when talking about domain modeling. Although it is said that Object-Oriented Programming should mimic the real world, it doesn’t seem to be the right approach. Let me bring the example that Udi mentioned.

We need to count the amount for transactions that were done this week and the last week. When reflecting that as a real-life model, we would end up having a table of transactions with dates and amounts. Like this:

Then when we need the sum, we would calculate it on the fly. This, of course, would work, but calculating the sum of transactions every time is just a bad idea. If we shift our thinking, we could just have a structure like this:

It doesn’t remind a transaction list from the real-world, but in this case, we simply don’t need it. It will require some maintenance when the week is over, but it will be far less than calculating the sum on every read. 

The summary

Learn Advanced Distributed Systems Design course changed the way I’m thinking about distributed architecture and micro-services. Udi is an amazing speaker, that used his experience from many real-life projects and was able to explain the most complicated concepts in a way that child would understand. 

Although it wasn’t easy to go through 30+ hours of the course, it was a huge dose of knowledge and I would recommend it to anyone.

BTW, here is the link: https://particular.net/adsd

.NET 5 – How to start

Would you like to learn how to write programs in .NET and find out what the platform from Microsoft can do? What tools to use and where to start? You’ve come to the right place! I will explain everything step by step.

What is .NET?

.NET is a programming platform created by Microsoft. Here are the most important features:

  • You can write in many languages: C #, F # and VB.NET
  • libraries written in different languages ​​in .NET can work together because they are compiled into IL intermediate code
  • .NET 5 and associated technologies are open and their sources are available on the GitHub platform
  • in .NET 5 you can build console applications, websites, APIs, games, mobile applications and desktop computers
  • .NET is extremely popular, therefore it has many ready integrations with Amazon or Google technologies, but the easiest way will be to work with Microsoft products and the Azure cloud
  • the program written in .NET 5 can be easily run on Windows, Linux and MacOS

Of course, these few points in no way exhaust the topic, because you could easily write a few books what .NET is capable of, but at the beginning it’s a quick summary is enough.

What do I need to install?

To build applications you need to install the development tools package, i.e. the SDK. To run them – the development package.

You’ll find both here: https://dotnet.microsoft.com/download/dotnet/5.0

When choosing the Runtime, choose the one that you need:

  • ASP.NET Core – for building a web application
  • Desktop – for building Windows-based desktop applications
  • .NET Runtime – for building console applications

One of the above is enough to start with. I would recommend ASP.NET Core.

What to write programs with?

Apparently, a good programmer will cope with a notepad, but I think this era is long over. There are actually two good options to choose from.

Visual Studio

A huge and very popular code editor. It is a real multi-tool, it is perfectly integrated with all Microsoft technologies, especially the older ones. I use it for many years and I can’t imagine working without it.

The most important features:

  • convenient editor, where many things can be done from UI
  • support for older Microsoft technologies
  • available on Windows and MacOS
  • paid, however, there is a free, stripped-down version – Community

Visual Studio Code

Simple, cross-platform code editor, developed open-source. It does not have as many integrations as Visual Studio, but it is lightweight and thanks to free extensions, it can be easily adapted to your needs. Certainly, however, it works comfortably with smaller projects and with websites. I use it when I’m working with React.js, for example.

The most important features:

  • is fast and light
  • it’s free and it’s easy to customize
  • works under Windows, Linux and MacOS
  • integration with older Microsoft technologies is not the best, but with .NET Core and .NET 5 it works great 

And any other actually

Because .NET 5 comes with CLI we can create, build and run the project, and also execute tests with simple console commands. For writing code, any editor will do and some of my peers choose to use JetBrain Rider. It is a great, cross-platform IDE, that has a built-in Resharper. It’s also fast and intuitive, so the choice is yours. 

Your first app

The wizard in Visual Studio

The easiest way to create your first program in .NET 5 is to use one of the ready-made programs in Visual Studio. This environment offers us many options to choose from:

The simplest project that you can choose to start with is the console application in C #. However, if you prefer to start with a web project, select ASP.NET Core application.


To make sure you’re using .NET 5, edit the project file and check what value is entered in the TargetFramework should be net5.0.


To start the project, simply press F5. At this point, the console application will start and a black window will appear saying Hello World!.

New project in Visual Studio Code

.NET Core and .NET 5 are released together with .NET CLI, a cross-platform set of commands that allows you to create, build, and publish .NET projects. Cross-platform is an important word here – it is thanks to CLI that we can build and run programs in .NET 5 not only on Windows but also on Linux and MacOS.

Let’s create a new project. When we open Visual Studio Code, open a new terminal and enter the dotnet new --list command to see what projects are currently available.

To create a console application called ConsoleApp2, type dotnet new console -n ConsoleApp2.

Great, we already have a console application with a single C# file called Program.cs. We need to know two more commands:

  • dotnet build–  to build the app
  • dotnet run – to run the app

After a few seconds, your eyes will see a black window with the program.

The summary

Programming in .NET 5 can start very quickly and after a while writing your own programs. In addition, they will work not only on Windows but also on Linux and MacOS. They can also operate in the cloud, e.g. in containers. The possibilities are really huge.

If you would like to learn more about programming in the console, take a look at the series of my articles: How to make you console app look cool

If you’re starting your adventure with .NET, you’ve come to the right place. Subscribe to my blog and get information about new posts – you will definitely learn something interesting from them.

Cheers and good luck 🙂