Category Archives: ASP.NET Core for .NET 5 & EF Core 5

All posts about ASP.NET for .NET 5 and Entity Framework Core 5

Execute a stored procedure with Entity Framework Core 5

Stored procedures are an integral part of any MS SQL database. They are perfect to wrap complicated SQL into a database object, that we can reuse. How to execute a stored procedure in Entity Framework Core 5? Let’s have a look.

Adding a stored procedure

First of all we need to add a stored procedure. The best way to do so is to add a database migration with an appropriate SQL. Let’s start by adding a migration with EF Core global tool command:

dotnet ef migrations add spUpdateProfilesCountry

This will generate a migration, that we can put our SQL into. Let’s see how it may look:

public partial class spUpdateProfilesCountry : Migration
{
    protected override void Up(MigrationBuilder migrationBuilder)
    {
        var sql = @"
            IF OBJECT_ID('UpdateProfilesCountry', 'P') IS NOT NULL
            DROP PROC UpdateProfilesCountry
            GO

            CREATE PROCEDURE [dbo].[UpdateProfilesCountry]
                @StardId int
            AS
            BEGIN
                SET NOCOUNT ON;
                UPDATE Profiles SET Country = 'Poland' WHERE LEFT(TelNo, 2) = '48' AND Id > @StardId
            END";

        migrationBuilder.Sql(sql);
    }

    protected override void Down(MigrationBuilder migrationBuilder)
    {
        migrationBuilder.Sql(@"DROP PROC UpdateProfilesCountry");
    }
}

This is a simple SQL code, that first checks if procedure exists and if so, it deletes it. Then it creates a new procedure with UpdateProfilesCountry name, which will update Country column for every Profile that phone number starts from 48.

When this migration will be run on the database, it will create UpdateProfilesCountry stored procedure as in my case.

Running the stored procedure

There is no dedicated method to run a stored procedure, so in the case where a stored procedure doesn’t return data, we can just invoke it as a raw SQL. This can be achieved like this:

await primeDbContext.Database.ExecuteSqlInterpolatedAsync(
    "UpdateProfilesCountry @p0",
    parameters: new[] { minimalProfileId.ToString() });

When I query the database for all numbers starting with 48, I will see that the country has been updated to Poland. This means that our procedure was executed successfully.

BTW. Don’t worry, those are fake data, generated with Bogus 🙂

Summary

Entity Framework Core can handle stored procedures quite well. There is no dedicated method to run the procedure, but it can be run as a standard raw SQL. However, when you’d like to query the database with a stored procedure, you must use a different approach. I have described that in a separate post: Select data with a stored procedure with Entity Framework Core 5.

What’s more, you can handle adding or updating stored procedures with EF Core migrations, which means that all work required can be done with EF Core.

All code mentioned here can be found on my GitHub, feel free to experiment with it.

Cheers!

Merging migrations in Entity Framework Core 5

When working with a fast-evolving project changes happen rapidly not only to the project’s code but also to the database schema. It happens especially when working on a micro-service from the start when its purpose shifts.

How EF Core 5 migrations work

In Entity Framework Core 5 migrations we are adding a migration as a delta changes between our DbContext class and existing [DbContext name]ModelSnapshot. When generating new migration a CLI Tool will generate only the differences between those two and put them in two methods: Up and Down. In the first one, there will be a change to apply the migration and in the second one, to remove the migration.

After the migration is applied, its name is noted in the __EFMigrationsHistory table.

Merging multiple migrations 

Let’s say that after changing a schema multiple times in the early stages our project is now stable. We have a bunch of migrations that could be merged into one, that would create a model once, without many small updates. 

When we can remove everything

The easiest way to merge all migrations would be removing everything! What I mean is:

  • remove Migrations directory with all migrations
  • clear __EFMigrationHistory table
  • remove all tables and other database objects that were added via migrations
  • create new migration with all changes

This is a drastic way of merging migrations because we will lose all the data. However, it’s super simple and it might work in some cases.

When we need to preserve data

This means that we cannot remove all already created database objects, but we can merge migration files in our code. Let’s see how that can be done.

  1. Delete all migration scripts from Migrations folder
  2. Add a new migration with command dotnet ef migrations add MergedMigration
  3. Copy the entire file and clear both Up and Down methods
  4. Update the database and apply MergedMigration migration with command dotnet ef database update
  5. After that, replace the content of the MergedMigration file with earlier generated code

As a result, you will have only one migration file. In my example the __EFMigrationHistory table looks like this.

And now in the Visual Studio, I can see only on migration.

That contains changes from all my previous migrations merged together.

It worked!

Tip! You can also name you merged migration as the first one, that was already applied so that you wouldn’t have to update the database and add it to the __EFMigrationHistory table. 

It will not work in every case

We can easily merge migrations when they are applied only to the database that we control. I addition, it will not work for environments that don’t have all merged migrations applied. The process is easy, but there are certain things that need to be taken into account.

On the other hand, do we need to keep all migrations, even when we know that we won’t run them ever again? I don’t think so. At this point, it would be great to merge old migrations but leave the newest ones. It could be accomplished with a very similar process.

  1. Revert last N migrations locally, one by one, and move them somewhere
  2. Check out the project in the place matching the migrations
  3. Merge all existing migrations
  4. Check out the project in the newest state
  5. Add saved newest migrations, one by one

In this case, we will keep the newest migrations and create a big initial migration, that would be consistent with your project. If there will be a case, where all migrations would need to be applied to a database, the database schema wouldn’t be broken.

Summary

Merging migrations in Entity Framework Core 5 is possible and I can say it’s surprisingly easy. However, it involves an automatic generation process and you need to check if merged migration does exactly the same thing as all migrations applied one by one. Moreover, there is more than one way to merge migrations and you need to choose the one that is best for you.

All code posted here is available at my GitHub, so you can download it and play with it. Take a look also at this post on how to run it: PrimeHotel – how to run this project.

Thanks for reading and hopefully see you again 🙂

Adding Entity Framework Core 5 migrations to .NET 5 project

Database migrations help a developer to keep database schema up-to-date with the code. It is a core mechanism, that keeps changes in code and applies them in the database. Entity Framework Core 5 migrations are designed to keep track of DbContext class and generate migrations when you update it.

Installing the tools

To add EF Core migrations, you need to have Entity Framework Core already set up in your project. You can check how to go through that process in this post: PrimeHotel – adding Entity Framework Core 5 in .NET

The easiest way to add and manage migrations is to use .NET Core CLI tools, which you should have already installed. Type this command to check it out:

dotnet tool install --global dotnet-ef

You can also update the tool, once installed:

Adding a migration

Adding first migration doesn’t differ much from adding the next ones. You need to open a terminal window in the location of the project and execute the command:

dotnet ef migrations add InitialCreate

When this command executes successfully, it will generate a Migrations directory. InitialCreate file represents individual migration to match the DbContext. PrimeDbContextModelSnapshot represents the current state of the model. It is added to the project when the first migration is created and updated with each subsequent migration. It enables the migrations framework to calculate the changes required to bring the database up to date with the model.

In the InitialCreate file you will find two methods: Up and Down. Those will represent the changes when migration will be applied and when it would be rolled back.

Generated migration will stay the way it is. It’s not an auto-generated file that will be updated later in the process. This migration was generated for you to have a look and check if it does what it should. You can modify the migration according to your needs, nothing stops you from making some improvements.

Adding second and next migrations is a very similar process to the one presented above. You just need to use the command dotnet migrations add <name> add next migration will be generated.

Applying migrations manually

At this point, you can run your Entity Framework Core 5 migrations and update the database schema. You can do this via the following command:

dotnet ef database update

Database migrations will be applied and all executed migrations will be noted in the __EFMigrationsHistory. Here is the listing of this table after a couple of migrations.

Applying migrations automatically

It would be great if our changes were checked and applied on every project run. Let’s see how we can accomplish that. First of all, let’s go to Startup.cs file and create a method. 

    private void UpgradeDatabase(IApplicationBuilder app)
    {
        using (var serviceScope = app.ApplicationServices.CreateScope())
        {
            var context = serviceScope.ServiceProvider.GetService<PrimeDbContext>();
            if (context != null && context.Database != null)
            {
                context.Database.Migrate();
            }
        }
    }

This method will use built-in Dependency Injection mechanism to fetch an instance of our PrimeDbContext and use it to run database migrations. Only ones that were not applied yet will be run.

Now, in the Configure method add a line at the bottom.

    UpgradeDatabase(app);

With this mechanism set-up, the application will update the database it’s using, whether it is run locally, or deployed and run on a production server. 

Summary

Database migrations will help you keep database schema updated accordingly to the code changes. Adding an Entity Framework Core 5 migrations is a natural step when you have Entity Framework Core in place. All operations can be accomplished with .NET Core CLI tools and very simple commands. Remember that you can always edit migrations before applying them.

All code posted here is available at my GitHub, so you can download it freely. Take a look also at this post on how to run it: PrimeHotel – how to run this project.

Thanks for reading and good luck 🙂

Adding an Entity Framework Core 5 to an existing database

Entity Framework Core 5 is a light and easy to use ORM, that let you use the database without writing any SQL commands. Built-in mechanisms will translate your LINQ queries on your entity classes to SQL queries and return mapped objects.

Here is an article about adding EF Core with migrations to an empty database: PrimeHotel – adding Entity Framework Core 5 in .NET

Adding an Entity Framework Core 5 is super simple if you have an empty database, but is it that easy when working with a database that has some data inside? Do we need to map it all, or can we just work with a part of the database that interests us? Let’s start from the beginning.

Let’s see what we need

To work with EF Core 5 we need to install NuGet packages:

  • Microsoft.EntityFrameworkCore
  • Microsoft.EntityFrameworkCore.Design
  • Microsoft.EntityFrameworkCore.SqlServer

The last one reveals that we will work with the MS SQL Server database. Now let’s connect to our database and see how it looks like.

I’m using an Azure Data Studio, which is a lightweight and fast tool that can perform most of the basic operations of databases. It’s much faster than SQL Server Management Studio and now for most of my work, I just use the first one.

We will add EF Core for aspnetcore database, which looks like this.

We need a DbContext

The next thing we need to do is to create our DbContext. We could create it by hand and type everything manually. However, .NET Core has tools to scaffold that and generate it for us.

The process is called reverse engineering and it is scaffolding entity type classes and a DbContext class based on a database schema. To perform this operation we will use the .NET CLI tool, that you would have to install if you haven’t done it already. Type this command to check it out:

dotnet tool install --global dotnet-ef

You can also update the tool, once installed:

The scaffolding process needs a connection string to pass. We could pass it in our command, but we can also accomplish this task in a more elegant way by passing only its name.

Let’s go to the appsettings.json file and set up a connection string for our new database.

I’ve added a connection string with the name aspnetcore in ConnectionStrings section. 

The command that we are going to use is very simple, run it in your project directory:

dotnet ef dbcontext scaffold Name=aspnetcore Microsoft.EntityFrameworkCore.SqlServer

This command will add aspnetcoreDbContext and all entities representing your database.

However, it would be nice to have some more control over the process.

Customize the process to your needs

Thankfully, there are more parameters that we can use. Let’s take a look at some of them:

  • --table can be used to include specific tables
  • --use-database-names option will preserve the original database names as much as possible. However, invalid .NET identifiers will still be fixed
  • --context can be used to give generated DbContext your own name
  • --context-dir can be used to scaffold the DbContext class to a specific directory
  • --output-dir can be used to scaffold entity classes to a specific directory
  • --force will override the existing DbContext class and entity classes

I’m going to modify my command, so it will look like this:

dotnet ef dbcontext scaffold Name=aspnetcore --table Profiles --table Events
  --context AspNetCoreDbContext --context-dir AspNetCoreModels 
  --output-dir AspNetCoreModels Microsoft.EntityFrameworkCore.SqlServer

Let’s see what classes were generated.

Notice that only tables Events and Profiles were generated, DbContext class is named AspNetCoreCotext and all was generated in AspNetCoreModels directory. Awesome! 

The limitations

Reverse engineering does a tremendous job of scaffolding entity classes so that we don’t need to write it on our own. However, there are some limitations to this process:

  • not everything about the model is presented in the database schema. For example inheritance hierarchies, owned types and table splitting will not be reverse-engineered
  • also, EF Core documentation claims, that there are some column types that will not be included in the model
  • nullable types will not be mapped as nullable. For example, string columns that can be null, will not be scaffolded as string? type. You will have to edit it yourself

More of that you can read in this Microsoft article.

Updating the model

Whenever something changes in the database, you would need to update your model. Most of the changes will be trivial, like adding a column to the table, renaming a table name, or change columns type. Those changes can be quickly applied in the entity classes manually. 

However, if you’re not sure how to map your changes, you can always regenerate the whole DbContext with all entity classes. To do this, use --force parameter in the scaffold command. Note, however, that all changes done manually, will be overwritten. Currently, there is no option to update model from database schema and preserve manual changes.

Updating the database

Scaffolding a DbContext is just a way to generate classes, that match the database. This means that you can add migrations even to an existing database.

First, you would need to add AspNetCoreDbContext to your DI container. Go to the Startup.cs file and in ConfigureServices add the following line.

    services.AddDbContext<AspNetCoreDbContext>(options =>
        options.UseSqlServer(Configuration.GetConnectionString("aspnetcore")));

Now you can add migrations to the second database. It’s a good practice to keep models and migrations separate for every database. Execute this command:

dotnet ef migrations add InitialCreate --context AspNetCoreDbContext --output-dir Migrations/AspNetCore

Here is what was generated:

There’s one thing worth noticing. Entity Framework Core generated initial migration with all changes that are currently in the AspNetCoreDbContext. You might need to clear all changes in that migration because those tables already exist.

Summary

When adding an Entity Framework Core 5 to an existing database, a good idea is to scaffold entity classes and context with a dedicated .NET CLI tool. You have a handful of parameters that you can provide and scaffold exactly what you need and how you need it.

You can add EF Core 5 migrations later on for keeping your database up to date with your code. One thing that you should keep in mind is that updating DbContext from the database again will override all changes that you did manually. Because of this, scaffolding DbContext is more of a one-time thing.

All code posted here was applied to a PrimeHotel project, that is available at my GitHub, so you can download it freely and experiment. Take a look also at this post on how to run it: PrimeHotel – how to run this project.

Hope you liked the post, cheers!


PrimeHotel – adding Entity Framework Core 5 in .NET

Let’s have a look at how to introduce Entity Framework Core 5 in ASP.NET Core project in .NET 5. We will start from an empty database, where we have a clean slate and can add tables the way we want.

In this post we will work with the PrimeHotel project, that was created for learning purposes. It’s all available at my GitHub, so you can download it freely. Take a look also at this post on how to run it: PrimeHotel – how to run this project.

What is Entity Framework Core

Entity Framework Core 5 is a lightweight, extensible, open-source, and cross-platform version of the popular Entity Framework data access technology. EF Core is an object-relational mapper (O/RM), enables developers to work with a database using .NET objects, and eliminating the need for most of the data-access code they usually need to write. This means no more SQLs. It proves to be great for most of the scenarios, however, when you need to work with big amounts of data, you might be better off with writing SQLs.

Adding an Entity Framework Core

Adding EF Core to an ASP.NET Core project is super easy. Start with installing NuGet packages:

  • Microsoft.EntityFrameworkCore
  • Microsoft.EntityFrameworkCore.Design
  • Microsoft.EntityFrameworkCore.SqlServer

Once it’s all done, add a PrimeDbContext in the Models folder, that would look like this:

    public class PrimeDbContext : DbContext
    {
        public PrimeDbContext(DbContextOptions<PrimeDbContext> options)
            : base(options)
        {
        }

        public virtual DbSet<Room> Rooms { get; set; }
    }

Now we need to add a Room class, that would represent an entity of a room, from Rooms table.

    public class Room
    {
        public int Id { get; set; }

        public int Number { get; set; }

        public string Description { get; set; }

        public DateTime LastBooked { get; set; }

        public int Level { get; set; }

        public RoomType RoomType { get; set; }

        public int NumberOfPlacesToSleep { get; set; }
    }

    public enum RoomType
    {
        Standard,
        Suite
    }

Now let’s handle the configuration part. Let’s use an empty database, that is hosted by us locally. The easiest approach is to install SQL Server Express edition and setup it locally. However, you can set up your database server in the docker container. Check my post on how to do it: Set up a SQL Server in a docker container.

In appsettings.json file we need to set our connection string. It should look similar to this:

Now let’s go to the Startup.cs file, where we need to configure EF Core to use our connection string. In ConfigureServices method, add this line:

    // Entity Framework
    services.AddDbContext<PrimeDbContext>(options =>
        options.UseSqlServer(Configuration.GetConnectionString("HotelDB")));

Notice that I used a HotelDB name, that is a name of my connection string in the appsettings.json file.

We have most of the crucial things done, but we need something, that would create tables in DB from our PrimeDbContext. So far we got only one, but it’s the right time to introduce migration mechanisms.

Adding EF Core migrations

Migrations in the EF Core database allow you to make changes to the database so that it is in line with the code of the application that uses it. This is a very important mechanism because changes in the structure of the database are introduced quite often, even by many programmers, so we need a universal mechanism to track and introduce these changes.

Adding first migration doesn’t differ much from adding the next ones. You need to open a terminal window in the location of the project and execute the command:

dotnet ef migrations add InitialCreate

When this command executes successfully, it will generate a migration file, where you can check what changes will be applied.

In this file you will find two methods: Up and Down. Those will represent the changes when migration will be applied and when it would be rolled back.

    public partial class InitialCreate : Migration
    {
        protected override void Up(MigrationBuilder migrationBuilder)
        {
            migrationBuilder.CreateTable(
                name: "Rooms",
                columns: table => new
                {
                    Id = table.Column<int>(nullable: false)
                        .Annotation("SqlServer:Identity", "1, 1"),
                    Number = table.Column<int>(nullable: false),
                    Description = table.Column<string>(nullable: true),
                    LastBooked = table.Column<DateTime>(nullable: false),
                    Level = table.Column<int>(nullable: false),
                    RoomType = table.Column<int>(nullable: false),
                    NumberOfPlacesToSleep = table.Column<int>(nullable: false)
                },
                constraints: table =>
                {
                    table.PrimaryKey("PK_Rooms", x => x.Id);
                });
        }

        protected override void Down(MigrationBuilder migrationBuilder)
        {
            migrationBuilder.DropTable(
                name: "Rooms");
        }
    }

The last thing left to do is to trigger updating the database. It would be great if our changes were checked and applied on every project run. Let’s see how we can accomplish that. First of all, let’s go to Startup.cs file and create a method. 

    private void UpgradeDatabase(IApplicationBuilder app)
    {
        using (var serviceScope = app.ApplicationServices.CreateScope())
        {
            var context = serviceScope.ServiceProvider.GetService<PrimeDbContext>();
            if (context != null && context.Database != null)
            {
                context.Database.Migrate();
            }
        }
    }

This method will use built-in Dependency Injection mechanism to fetch an instance of our PrimeDbContext and use it to run database migrations. Only ones that were not applied yet will be run.

Now, in the Configure method add a line at the bottom.

    UpgradeDatabase(app);

If we take a look into the database, we will see what migrations were applied. __EFMigrationsHistory table is created automatically by Entity Framework Core.

Using EF Core 5

Once we have everything in place, we have a proper configuration and database migrations, we can start benefit from having an O/RM mechanism.

All operations on tables in EF Core needs to go through PrimeDbContext. Using it is super simple, once we registered it in Startup.cs class, it will be available in any class for us to use. Take a look at this example of simple CRUD operations in the RoomController.

    [ApiController]
    [Route("[controller]")]
    public class RoomController : ControllerBase
    {
        private readonly PrimeDbContext primeDbContext;

        public RoomController(PrimeDbContext _primeDbContext)
        {
            primeDbContext = _primeDbContext;
        }

        [HttpGet]
        public async Task<IEnumerable<Room>> Get()
        {
            return await primeDbContext.Rooms.ToListAsync();
        }

        [HttpGet("{id}")]
        public async Task<IActionResult> Get(int id)
        {
            var room = await primeDbContext.Rooms.FindAsync(id);
            if (room == null)
            {
                return NotFound();
            }

            return Ok(room);
        }

        [HttpPost]
        public async Task<IActionResult> Post([FromBody] Room room)
        {
            var createdRoom = await primeDbContext.Rooms.AddAsync(room);
            await primeDbContext.SaveChangesAsync();

            return Ok(createdRoom.Entity);
        }

        [HttpPut]
        public async Task<IActionResult> Put([FromBody] Room room)
        {
            var existingRoom = await primeDbContext.Rooms.FindAsync(room.Id);
            if (existingRoom == null)
            {
                return NotFound();
            }

            existingRoom.Number = room.Number;
            existingRoom.Description = room.Description;
            existingRoom.LastBooked = room.LastBooked;
            existingRoom.Level = room.Level;
            existingRoom.RoomType = room.RoomType;
            existingRoom.NumberOfPlacesToSleep = room.NumberOfPlacesToSleep;

            var updatedRoom = primeDbContext.Update(existingRoom);
            await primeDbContext.SaveChangesAsync();
            return Ok(updatedRoom.Entity);
        }

        [HttpDelete("{id}")]
        public async Task<IActionResult> Delete(int id)
        {
            var existingRoom = await primeDbContext.Rooms.FindAsync(id);
            if (existingRoom == null)
            {
                return NotFound();
            }

            var removedRoom = primeDbContext.Rooms.Remove(existingRoom);
            await primeDbContext.SaveChangesAsync();

            return Ok(removedRoom.Entity);
        }
    }

Notice that in EF Core there is an asynchronous version of every method. Taking advantage of this is a good idea. This way your code will be faster and could be run more efficiently with many other requests in parallel.

Important things to have in mind:

  • we can query entities collections the way we want with LINQ using Where, Select and other methods and that will generate SQL out of all those conditions
  • If you’re just querying entities, you can use AsNoTracking() to improve performance
  • A call to the database will be performed when the code we write needs the results. This is for example where we use ToListAsync
  • All changes that we make needs to be saved with SaveChangesAsync to be applied

Those are only a few points to have in mind, but there us much more that is going underneath to be aware of. However, this is good for a start, and it more than enough to play with Entity Framework Core on your own.

Summary

Nice and clean! Entity Framework Core is perfect for almost every simple database usage. I’m sure you’ll find it useful and intuitive.

All code posted here is available at my GitHub, so you can download it freely. Take a look also at this post on how to run it: PrimeHotel – how to run this project.

Thanks for reading, let me know if you liked this post 🙂

PrimeHotel – passing parameters to actions – assignments

This is a post with assignments to do if you would like to check your knowledge about ASP.NET Core in .NET 5. This one is about passing parameters to controller actions, which is a crucial thing to master when developing micro-services.

You don’t need to start from scratch, you can base on a PrimeHotel project, created especially for learning purposes. You can download it on my GitHub page. Also, take a look at the post on how to run this project: PrimeHotel – how to run this project

Full article about passing parameters to actions in ASP.NET Core in .NET 5 can be found here: ASP.NET Core in .NET 5 – pass parameters to actions

Assignment 1

Difficulty: easy

Context

Learn how to write CRUD operations. Let’s say we would like to handle invoices – add all methods that will allow handling invoices.

What needs to be done

  • create a new class called Invoice
  • create Add, Get, Update and Delete methods to handle invoices
  • list of invoices can be hardcoded in the controller class
  • add optional filtering in Get with query string parameters

Hint

Have a look at the WeatherForecastController and how we handle weather forecasts there.

Assignment 2

Difficulty: medium

Context

Learn how to pass array in a query string. It can be useful when you would like to pass a collection of objects but use a query string for it

What needs to be done

  • create a GET method
  • this method needs to accept an array of integers from the query string
  • how you would invoke this method and pass parameters?

Where to post the answers?

Simply write a comment to this post, I’ll take a look.

Or, if you feel like it, make a pull request to PrimeHotel repo.

Good luck! 🙂

PrimeHotel – how to run this project

In this post, I will guide you through the process of downloading and running my project – PrimeHotel. It is a project created for learning purposes so you are free to contribute, clone, and use it for any non-commercial activity.

It is a medium-sized service, that represents a hotel management system. Is holds user reservations, user profiles and saves them in the MS SQL database. It can also connect to a 3-rd party weather service to fetch current weather. More features are yet to come, which will show more .NET integrations and capabilities, good practices, and some awesome features.

If you are new to .NET, please take a look at this post first: .NET 5 – How to start. It will help you with making your first steps.

Download the project

PrimeHotel is a .NET 5 project that uses ASP.NET Core and Entity Framework Core 5. It is hosted on GitHub, so you can go ahead and navigate to this link: https://github.com/mikuam/PrimeHotel

Make sure you have Git installed on your machine. Then you can clone the project by using a command in a console terminal.

git clone https://github.com/mikuam/PrimeHotel.git

Now open the project with your favorite IDE like Visual Studio or Visual Studio Code.

I’m using Visual Studio 2019 and on my machine, it looks like this.

Let’s now have a quick look at the project structure:

  • Clients – this is where are classes that communicate with other services with HttpClient
  • Controllers – here are all controller classes containing all the endpoints in this service
  • Data – repository classes that encapsulate SQL commands – currently Dapper
  • Migrations – Entity Framework Core 5 migrations, that keeps the database schema changes
  • Models – Entity Framework Core 5 classes, that represent tables in the database 

Configure the database

For learning purposes, it will be best to set up a SQL Server on your machine. This is what I’m doing. However, if you would like to set it up as a docker image, you can read my post about it: Set up a SQL Server in a docker container.

You can download a SQL Server Express version for free from the Microsoft website. Once you install and set up a server, it would be available probably with the localhost address. Try to connect to your SQL Server and check if you have a PrimeHotel database created. For connecting I’m using Azure Data Studio – an awesome and fast tool, great for simple actions.

If you don’t have a PrimeHotel database, just create it and leave it empty.

The last part is to update a connection string in our project. Go ahead and edit appsettings.json file. It looks like this:

The connection string might differ slightly, mine is:

Data Source=localhost;Initial Catalog=PrimeHotel;Integrated Security=True

Instead of localhost you could also have something as localhost\SQLEXPRESS, but that is your individual configuration of SQL Server.

Running the project

When you have everything in place, just go ahead and run the project. If everything is set-up and .NET 5 runtime and SDK are installed, you should be good.

In Visual Studio just press F5. In Visual Studio Code open the terminal and write two commands: dotnet build and dotnet run. Then when navigating to a given URL, you should see something like this:

Simple, right? Congratulation on running the project. Now you are good to go for coding and improving this service.

Good luck!


.NET 5 – How to start

Would you like to learn how to write programs in .NET and find out what the platform from Microsoft can do? What tools to use and where to start? You’ve come to the right place! I will explain everything step by step.

What is .NET?

.NET is a programming platform created by Microsoft. Here are the most important features:

  • You can write in many languages: C #, F # and VB.NET
  • libraries written in different languages ​​in .NET can work together because they are compiled into IL intermediate code
  • .NET 5 and associated technologies are open and their sources are available on the GitHub platform
  • in .NET 5 you can build console applications, websites, APIs, games, mobile applications and desktop computers
  • .NET is extremely popular, therefore it has many ready integrations with Amazon or Google technologies, but the easiest way will be to work with Microsoft products and the Azure cloud
  • the program written in .NET 5 can be easily run on Windows, Linux and MacOS

Of course, these few points in no way exhaust the topic, because you could easily write a few books what .NET is capable of, but at the beginning it’s a quick summary is enough.

What do I need to install?

To build applications you need to install the development tools package, i.e. the SDK. To run them – the development package.

You’ll find both here: https://dotnet.microsoft.com/download/dotnet/5.0

When choosing the Runtime, choose the one that you need:

  • ASP.NET Core – for building a web application
  • Desktop – for building Windows-based desktop applications
  • .NET Runtime – for building console applications

One of the above is enough to start with. I would recommend ASP.NET Core.

What to write programs with?

Apparently, a good programmer will cope with a notepad, but I think this era is long over. There are actually two good options to choose from.

Visual Studio

A huge and very popular code editor. It is a real multi-tool, it is perfectly integrated with all Microsoft technologies, especially the older ones. I use it for many years and I can’t imagine working without it.

The most important features:

  • convenient editor, where many things can be done from UI
  • support for older Microsoft technologies
  • available on Windows and MacOS
  • paid, however, there is a free, stripped-down version – Community

Visual Studio Code

Simple, cross-platform code editor, developed open-source. It does not have as many integrations as Visual Studio, but it is lightweight and thanks to free extensions, it can be easily adapted to your needs. Certainly, however, it works comfortably with smaller projects and with websites. I use it when I’m working with React.js, for example.

The most important features:

  • is fast and light
  • it’s free and it’s easy to customize
  • works under Windows, Linux and MacOS
  • integration with older Microsoft technologies is not the best, but with .NET Core and .NET 5 it works great 

And any other actually

Because .NET 5 comes with CLI we can create, build and run the project, and also execute tests with simple console commands. For writing code, any editor will do and some of my peers choose to use JetBrain Rider. It is a great, cross-platform IDE, that has a built-in Resharper. It’s also fast and intuitive, so the choice is yours. 

Your first app

The wizard in Visual Studio

The easiest way to create your first program in .NET 5 is to use one of the ready-made programs in Visual Studio. This environment offers us many options to choose from:

The simplest project that you can choose to start with is the console application in C #. However, if you prefer to start with a web project, select ASP.NET Core application.


To make sure you’re using .NET 5, edit the project file and check what value is entered in the TargetFramework should be net5.0.


To start the project, simply press F5. At this point, the console application will start and a black window will appear saying Hello World!.

New project in Visual Studio Code

.NET Core and .NET 5 are released together with .NET CLI, a cross-platform set of commands that allows you to create, build, and publish .NET projects. Cross-platform is an important word here – it is thanks to CLI that we can build and run programs in .NET 5 not only on Windows but also on Linux and MacOS.

Let’s create a new project. When we open Visual Studio Code, open a new terminal and enter the dotnet new --list command to see what projects are currently available.

To create a console application called ConsoleApp2, type dotnet new console -n ConsoleApp2.

Great, we already have a console application with a single C# file called Program.cs. We need to know two more commands:

  • dotnet build–  to build the app
  • dotnet run – to run the app

After a few seconds, your eyes will see a black window with the program.

The summary

Programming in .NET 5 can start very quickly and after a while writing your own programs. In addition, they will work not only on Windows but also on Linux and MacOS. They can also operate in the cloud, e.g. in containers. The possibilities are really huge.

If you would like to learn more about programming in the console, take a look at the series of my articles: How to make you console app look cool

If you’re starting your adventure with .NET, you’ve come to the right place. Subscribe to my blog and get information about new posts – you will definitely learn something interesting from them.

Cheers and good luck 🙂

ASP.NET Core in .NET 5 – sending a request

Sending a request in ASP.NET Core in .NET 5 is a standard operation that can be achieved pretty easily. However, details matter in this case and I’ll show you the best practice available. We will also take a look at some advanced features to get the full scope.

Using a real available API

In this article, I will be using 3rd party free service for fetching weather forecasts – http://weatherstack.com. To be able to use it, just register on their website and you can use it as well. 1000 requests in a month are available for a free account and that should be more than enough to fulfill our needs.

First, let’s have a look at the requests we are going to make. To test the API, I’m using a Postman app, which is very powerful, yet intuitive. I strongly encourage you to read my article about it here: Postman the right way

Here is how a request to fetch current weather in Poznań looks like:

This is a GET request to http://api.weatherstack.com/current with two parameters:

  • access_key which you get when registering on the website
  • query that can be a city name

The response that we got is a 200 OK with JSON content.

 To make this request, I’ll create a WeatherStackClient class.

using Microsoft.Extensions.Logging;
using System;
using System.Net.Http;
using System.Text.Json;
using System.Threading.Tasks;

namespace PrimeHotel.Web.Clients
{
    public class WeatherStackClient : IWeatherStackClient
    {
        private const string AccessKey = "3a1223ae4a4e14277e657f6729cfbdef";
        private const string WeatherStackUrl = "http://api.weatherstack.com/current";

        private HttpClient _client;
        private readonly ILogger<WeatherStackClient> _logger;

        public WeatherStackClient(HttpClient client, ILogger<WeatherStackClient> logger)
        {
            _client = client;
            _logger = logger;
        }
    }
}

There are a few things to notice here:

  • AccessKey which is hardcoded for now, but in a real-life API should be moved to configuration
  • IWeatherStackClient interface that is introduced for Dependency Injection support
  • HttpClient class is passed in a constructor. It will be automatically created and maintained by the framework

Now let’s create the logic.

    public async Task<WeatherStackResponse> GetCurrentWeather(string city)
    {
        try
        {
            using var responseStream = await _client.GetStreamAsync(GetWeatherStackUrl(city));
            var currentForecast = await JsonSerializer.DeserializeAsync<WeatherStackResponse>(responseStream);
            
            return currentForecast;
        }
        catch (Exception e)
        {
            _logger.LogError(e, $"Something went wrong when calling WeatherStack.com");
            return null;
        }
    }

    private string GetWeatherStackUrl(string city)
    {
        return WeatherStackUrl + "?"
                + "access_key=" + AccessKey
                + "&query=" + city;
    }

Let’s go through this code and explain what’s going on:

  • _client.GetStreamAsync is an asynchronous method that takes a URL an returns a stream. There are more methods, like: GetAsync, PostAsync, PutAsync, PatchAsync, DeleteAsync for all CRUD operations. There is also GetStringAsync that serializes a response content to string – just like GetStreamAsync does
  • GetWeatherStackUrl is merging a service URL with query parameters, returning a full URL address
  • JsonSerializer.DeserializeAsync<WeatherStackResponse>(responseStream) deserializes a stream and format output as a WeatherStackResponse class

The WeatherStackResponse class looks like this:

using System.Text.Json.Serialization;

namespace PrimeHotel.Web.Clients
{
    public class WeatherStackResponse
    {
        [JsonPropertyName("current")]
        public Current CurrentWeather { get; set; }

        public class Current
        {
            [JsonPropertyName("temperature")]
            public int Temperature { get; set; }

            [JsonPropertyName("weather_descriptions")]
            public string[] WeatherDescriptions { get; set; }

            [JsonPropertyName("wind_speed")]
            public int WindSpeed { get; set; }

            [JsonPropertyName("pressure")]
            public int Pressure { get; set; }

            [JsonPropertyName("humidity")]
            public int Humidity { get; set; }

            [JsonPropertyName("feelslike")]
            public int FeelsLike { get; set; }
        }
    }
}

Notice that I used JsonPropertyName attribute to identify what JSON property is each property matching. Here is the structure that we are going to map.

One last thing – we need to register our WeatherStackClient in a Dependency Injection container. In order to do so, we need to go to Startup class and add the following line in ConfigureServices method.

services.AddHttpClient<IWeatherStackClient, WeatherStackClient>();

We are using a dedicated method for registering classes using HttpClient. Underneath it’s using IHttpClientFactory that helps to maintain the pooling and lifetime of clients. You have a limited number of HTTP connections that you can maintain on your machine and if you create too much clients each blocking a connection, you will end up failing some of your requests. It also adds a configurable logging experience (via ILogger) for all requests sent through. All in all, it makes a developer’s life easier and allows you to do some smart stuff too.

Does it work? Yes it does! The response was correctly mapped into my class and I can return it.

Do you wonder what was logged when making this request? Let’s have a quick look.

As I mentioned earlier IHttpClientFactory also provides a logging mechanism, so that every request is logged. Here you can see that not only address was logged, but also HTTP method and time of execution. This can be pretty useful for debugging.

Adding a retry mechanism

In a micro-services world, every micro-service can have a bad day once in a while. Therefore, we need to have a retry mechanism for services we call and we know that they fail from time to time. In ASP.NET Core for .NET 5 there is a third-party library integrated just that purpose – it’s Polly. Polly is a comprehensive resilience and transient fault-handling library for .NET. It allows developers to express policies such as Retry, Circuit Breaker, Timeout, Bulkhead Isolation, and Fallback in a fluent and thread-safe manner.

For our scenario let’s add a retry mechanism, that will call WeatherStack service and retry 3 times after an initial failure. With Polly, a number of retries and delays between then can be easily set. Let’s have a look at the example – it’s in the Startup method where we configure DI container.

    services.AddHttpClient<IWeatherStackClient, WeatherStackClient>()
        .AddTransientHttpErrorPolicy(
            p => p.WaitAndRetryAsync(new[]
            {
                TimeSpan.FromSeconds(1),
                TimeSpan.FromSeconds(5),
                TimeSpan.FromSeconds(10)
            }));

With this code we will retry the same request after 1, 5, and 10 seconds delay. There is no additional code needed. Polly will do everything for us. We will see logs that something failed, only after all retries will fail, we will get the exception.

Adding a cancellation token

A cancellation token is a mechanism that can stop the execution of an async call. Let’s say that our request shouldn’t take more than 3 seconds, because if it does, we know that something isn’t right and there is no point to wait.

To implement that we need to create a cancellation token and provide that when making a call with an HTTP client.

    public async Task<WeatherStackResponse> GetCurrentWeatherWithAuth(string city)
    {
        try
        {
            using var cancellationTokenSource = new CancellationTokenSource(TimeSpan.FromSeconds(3));

            using var responseStream = await _client.GetStreamAsync(GetWeatherStackUrl(city), cancellationTokenSource.Token);
            var currentForecast = await JsonSerializer.DeserializeAsync<WeatherStackResponse>(responseStream);

            return currentForecast;
        }
        catch (TaskCanceledException ec)
        {
            _logger.LogError(ec, $"Call to WeatherStack.com took longer then 3 seconds and had timed out ");
            return null;
        }
        catch (Exception e)
        {
            _logger.LogError(e, $"Something went wrong when calling WeatherStack.com");
            return null;
        }
    }

If the request takes too long, we will receive a TaskCancelledException, which we can catch and react to it differently, that when getting unexpected exception.

Provide authorization

Basic authorization is definitely the simplest and one of the most popular ones used. The idea is that every request to the specific service needs to be authorized, so that along with our content, we need to send authorization info. With basic authorization, we need to pass a user and password encoded as base64 string and put in a request header. Let’s see how that can be accomplished. 

    private const string ApiKey = "3a1223ae4a4e14277e657f6729cfbdef";
    private const string Username = "Mik";
    private const string Password = "****";

    public WeatherStackClient(HttpClient client, ILogger<WeatherStackClient> logger)
    {
        _client = client;
        _logger = logger;

        var authToken = Encoding.ASCII.GetBytes($"{Username}:{Password}");
        _client.DefaultRequestHeaders.Authorization = new AuthenticationHeaderValue(
            "Basic",
            Convert.ToBase64String(authToken));
    }

In this way every call from WeatherStackClient will have authorization info and we do not need to add anything when we make requests. The only place we need to put additional code is a constructor.

Note that authorization is not needed to call weatherstack.com and is added only to show how it can be done.

This article did not cover all of the possibilities of IHttpClientFactory so if you want to know more, just go to this Microsoft article.

Hope you like this post, all code posted in this article is available at my GitHub account:

https://github.com/mikuam/PrimeHotel


ASP.NET Core in .NET 5 – pass parameters to actions

Passing parameters to actions is an essential part of building RESTful Web API. ASP.NET Core released as a part of .NET 5 offers multiple ways to pass parameters to methods, that represent your endpoints. Let’s see what they are.

Pass parameter as a part of an URL

When passing a parameter in a URL, you need to define a routing that would contain a parameter. Let’s have a look a the example:

    [Route("{daysForward}")]
    [HttpGet]
    public IActionResult Get(int daysForward)
    {
        var rng = new Random();
        return new JsonResult(new WeatherForecast
        {
            Date = DateTime.Now.AddDays(daysForward),
            TemperatureC = rng.Next(-20, 55),
            Summary = Summaries[rng.Next(Summaries.Length)]
        });
    }

This method returns a WeatherForecast for a single day in the future. DaysForward parameter represents how many days in advance weather forecast should be returned. Notice that daysForward is a part of the routing, so a valid URL to this endpoint will look like:

GET: weatherForecast/3

We can also use [FromRoute] attribute before variable type, but it will also work the same way by default.

   public IActionResult Get([FromRoute] int daysForward)

Pass parameter in a query string

This is a very common method for passing additional parameters, because it does not require us to change routing, so it is also backward compatible. It’s important if we were to change an existing solution.

Let’s look at a different method, that would return a collection of weather forecasts with a sorting option.

[HttpGet]
    public IEnumerable<WeatherForecast> Get([FromQuery]bool sortByTemperature = false)
    {
        var rng = new Random();
        var forecasts = Enumerable.Range(1, 5).Select(index => new WeatherForecast
        {
            Date = DateTime.Now.AddDays(index),
            TemperatureC = rng.Next(-20, 55),
            Summary = Summaries[rng.Next(Summaries.Length)]
        });

        if (sortByTemperature)
        {
            forecasts = forecasts.OrderByDescending(f => f.TemperatureC);
        }

        return forecasts;
    }

In this example, we pass on sortByTemperature parameter which is optional. Notice that we use [FromQuery] attribute to indicate, that it’s a variable taken from the query string. A URL to this endpoint would look like this:

GET: weatherForecast?sortByTemperature=true

You can put many parameters like this:

GET: weatherForecast?key1=value1&key2=value2&key3=value3

Remember, that URL needs to be encoded properly to work right. If you were to pass a parameter like this:

https://www.michalbialecki.com/?name=Michał Białecki

It will need to be encoded into:

https://www.michalbialecki.com/?name=Micha%C5%82%20Bia%C5%82ecki

Pass an object in a query string

When you’re passing a lot of query parameters, it might be worth to handle them as an object. Take a look at the code below:

    // GET: weatherForecast/GetFiltered?SortByTemperature=true&City=Poznan
    [HttpGet("GetFiltered")]
    public IEnumerable<WeatherForecast> GetFiltered([FromQuery]WeatherForecastFilters filters)
    {
        var rng = new Random();
        var forecasts = Enumerable.Range(1, 5).Select(index => new WeatherForecast
        {
            Date = DateTime.Now.AddDays(index),
            TemperatureC = rng.Next(-20, 55),
            Summary = Summaries[rng.Next(Summaries.Length)],
            City = filters.City
        });
 
        if (filters.SortByTemperature)
        {
            forecasts = forecasts.OrderByDescending(f => f.TemperatureC);
        }
 
        return forecasts;
    }

As you can see, I’m passing WeatherForecastFilters class as a query parameter. Notice that I’m using [FromQuery] attribute before the class name.

And WeatherForecastFilters class looks like this:

    public class WeatherForecastFilters
    {
        public bool SortByTemperature { get; set; }
 
        public string City { get; set; }
    }

It is a standard class, without any additional attributes. Let’s now make a request to the URL below:

GET: /WeatherForecast/GetFiltered?SortByTemperature=true&City=Poznan

The response would be:

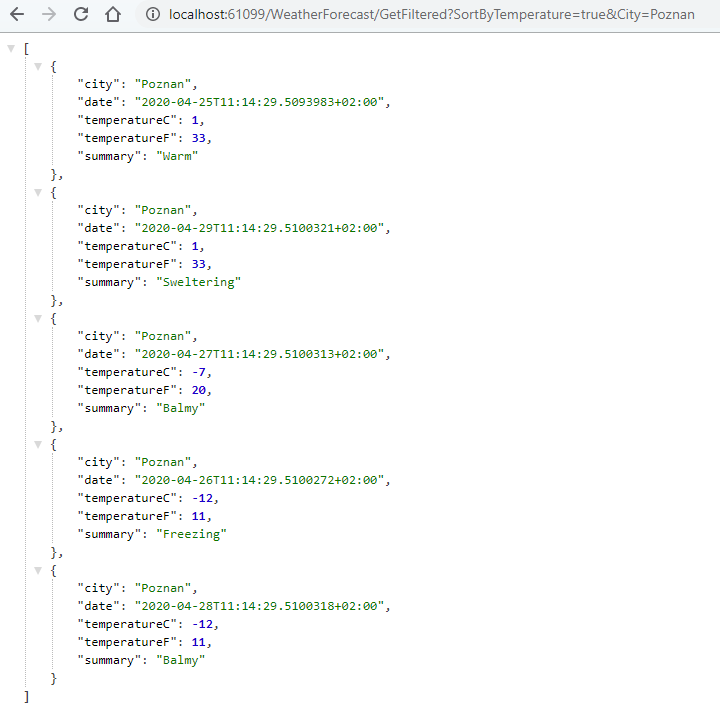
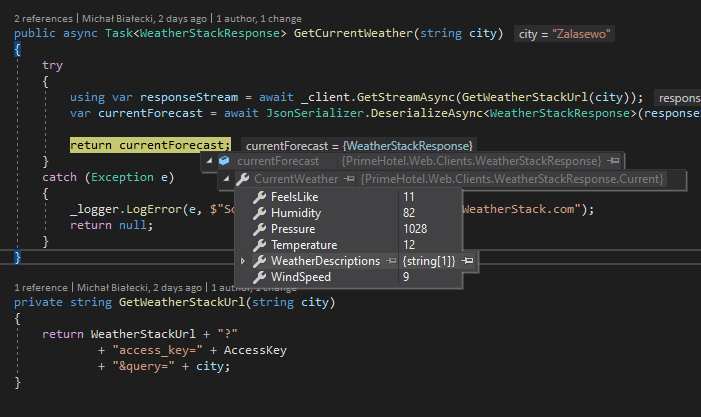
So parameters can be passed-in by their names, even if they are inside the class. What’s more, they are accessible just by their names, without any class prefix and that means that all of the properties must have unique names.

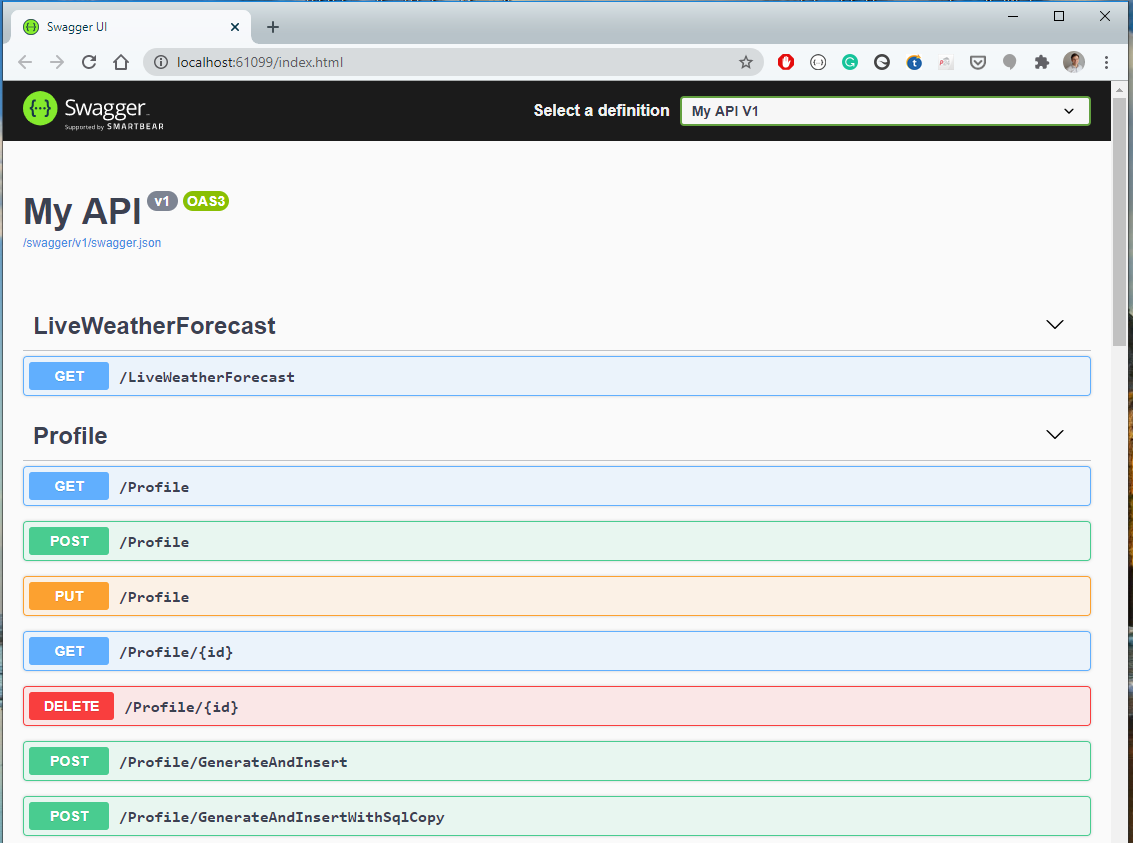
Here is a screenshot from Visual Studio.

Handling query parameters as class properties will work, but only inside this class. It will not work with the nested objects – their properties will not be mapped.

Pass parameters with headers

Passing parameters in a request headers are less popular, but also widely used. It doesn’t show in a URL, so it’s less noticeable by the user. A common scenario for passing parameters in a header would be providing credentials or a parent request id to enable multi-application tracking. Let’s have a look at this example:

    [HttpPost]
    public IActionResult Post([FromHeader] string parentRequestId)
    {
        Console.WriteLine($"Got a header with parentRequestId: {parentRequestId}!");
        return new AcceptedResult();
    }

In order to send a POST request, we would need to use some kind of a tool, I’ll use Postman:

Here you see that I specified headers and parentRequestId is one of them.

Pass parameters in a request body

The most common way to pass the data is to include it in a request body. We can add a header Content-Type with value application/json and inform the receiver how to interpret this body. Let’s have a look at our example:

    [HttpPost]
    public IActionResult Post([FromBody] WeatherForecast forecast)
    {
        Console.WriteLine($"Got a forecast for data: {forecast.Date}!");
        return new AcceptedResult();
    }

We use [FromBody] attribute to indicate, that forecast will be taken from request body. In ASP.NET Core for .NET 5 we don’t need and serialize to deserialize json body to WeatherForecast object, it will work automatically. To send POST request, let’s use Postman once again:

Have in mind, that size of the request body is limited by the server. It can be anywhere between 1MB to 2GB. In ASP.NET Core 5 maximum request body size is around 28MB, but that can be changed. What if I would like to send bigger files than that, over 2GB? Then you should look into sending content as a stream or sending it in chunks.

Pass parameters in a form

Sending content in a form is not very common, but it is the best solution if you want to upload a file. Let’s have a look at the example:

    [HttpPost]
    public IActionResult SaveFile([FromForm] string fileName, [FromForm] IFormFile file)
    {
        Console.WriteLine($"Got a file with name: {fileName} and size: {file.Length}");
        return new AcceptedResult();
    }

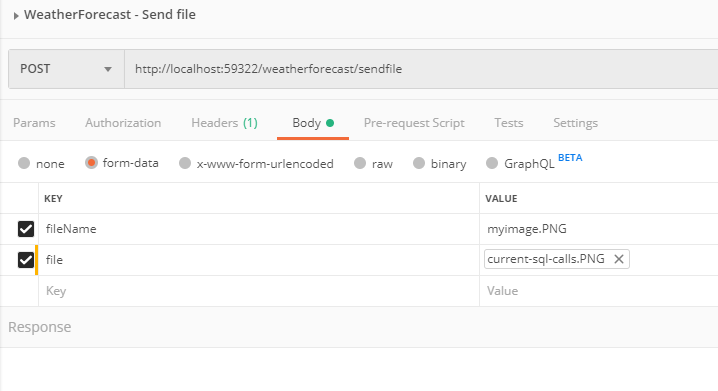
This method doesn’t really send a file, but it will successfully receive a file from the request. The interface IFormFile is used specifically for handling a file.

When sending a request we need to set Content-Type to application/x-www-form-urlencoded and it the Body part, we need to choose a file:

Let’s see what do we get when we debug this code:

And the file is correctly read. An interesting fact is, that with IFormFile we get not only binary data but also a file type and name. So you might ask why I send a file name separately? This is because you might want to name file differently on the server, then the one you are sending.

Hope you enjoyed this post, you can have a look at the code posted here on my Github:

https://github.com/mikuam/PrimeHotel