Generic export of csv files

Once in a while, you get a task, that you need to generate an export file to the 3rd party system. It is popular when communicating with price comparer services, search services, adds services etc. So you need to generate csv file with almost the same data, but in a slightly different format. How to solve it, when you don’t want to write everything separately? How to write you code so that you can make changes very easy?

Let’s start with a simple csv file export

CSV acronym stands for comma separated values, where usually there are column names on the first line. Let’s create a very simple API, that will return products in CSV format. Here is a controller:

[Route("api/Export")]
public class CsvExportController : Controller
{
    private readonly ICsvExport _csvExport;

    public CsvExportController(ICsvExport csvExport)
    {
        _csvExport = csvExport;
    }

    [Route("Products")]
    [HttpGet]
    public IActionResult Products()
    {
        var data = _csvExport.ReturnData();

        var stream = new MemoryStream(Encoding.UTF8.GetBytes(data));
        var result = new FileStreamResult(stream, "text/plain");
        result.FileDownloadName = "export_" + DateTime.Now + ".csv";

        return result;
    }
}

Data here are returned in a string, that is composed of headers in the first line and formatted rows as products.

public class SimpleCsvExport : ICsvExport
{
    private readonly IProductGenerator _productGenerator;

    public SimpleCsvExport(IProductGenerator productGenerator)
    {
        _productGenerator = productGenerator;
    }

    public string ReturnData()
    {
        var columnNames = GetColumnNames();
        var builder = new StringBuilder();

        builder.AppendJoin(";", columnNames);
        builder.AppendLine();

        foreach (var product in _productGenerator.GenerateProducts(100))
        {
            var values = GetValues(product);
            builder.AppendJoin(";", values);
            builder.AppendLine();
        }

        return builder.ToString();
    }

    private string[] GetColumnNames()
    {
        return new[] {
        "Id",
        "Name",
        "ReferenceNumber",
        "ProducerName",
        "QuantityAvailable",
        "QuantitySoldLastMonth",
        "Weight",
        "Price",
        "LastOrderDate"};
    }

    private string[] GetValues(ProductDto product)
    {
        return new[]
        {
            product.Id,
            product.Name,
            product.ReferenceNumber,
            product.ProducerName,
            product.QuantityAvailable.ToString(),
            product.QuantitySoldLastMonth.ToString(),
            product.Weight.ToString(),
            product.Price.ToString(),
            product.LastOrderDate.ToString()
        };
    }

Generating the data

You probably noticed, that there is a part missing, which generates products. I didn’t want to write to much code, but I’d like my data to be rather relevant and similar to the real life scenario. I followed this StackOverflow question: https://stackoverflow.com/questions/6625490/c-sharp-library-to-populate-object-with-random-data and installed Bogus nuget package.

It is a package that is suited for generating test data and it fits perfectly into my scenario. My ProductGenerator looks like this:

public class ProductGenerator : IProductGenerator
{
    public List<ProductDto> GenerateProducts(int count)
    {
        var productGenerator = new Faker<ProductDto>()
            .RuleFor(p => p.Id, v => Guid.NewGuid().ToString())
            .RuleFor(p => p.Name, v => v.Commerce.ProductName())
            .RuleFor(p => p.ReferenceNumber, v => v.IndexGlobal.ToString())
            .RuleFor(p => p.ProducerName, v => v.Company.CompanyName())
            .RuleFor(p => p.QuantityAvailable, v => v.Random.Number(0, 100))
            .RuleFor(p => p.QuantitySoldLastMonth, v => v.Random.Number(0, 20))
            .RuleFor(p => p.Weight, v => Math.Round(v.Random.Decimal(0.1m, 50), 2))
            .RuleFor(p => p.Price, v => Math.Round(v.Random.Decimal(1, 10000), 2))
            .RuleFor(p => p.LastOrderDate, v => v.Date.Recent());

        return productGenerator.Generate(count);
    }
}

Notice that there are numerous of possibilities to generate data, divided into fields, like Random, Date, Commerce or Company. It is fast and easy to use. This is the result I get in return:

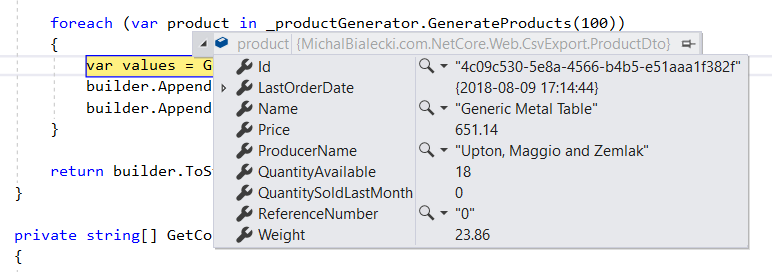
Nice and easy right? I can get relevant data in just a few lines, brilliant!

Making export generic

Let’s imagine that we have to make a couple of exports and they would have the same data, but formatted differently, sorted in a different way. What if we could introduce a series of attributes on a ProductDto class, that would define those custom features?

With a custom ExportAttribute and simple ProductAnalyticsAttribute that looks like this:

[AttributeUsage(AttributeTargets.Property | AttributeTargets.Class, AllowMultiple = true)]
public abstract class ExportAttribute : Attribute
{
    public string ExportName { get; set; }

    public string Format { get; set; }

    public int Order { get; set; }
}

public class ProductAnalyticsAttribute : ExportAttribute
{
}

We can have our ProductDto configured for many exports:

public class ProductDto
{
    [ProductComparerExport(ExportName = "InternalId")]
    [ProductAnalytics(Order = 1)]
    public string Id { get; set; }

    [ProductAnalytics(Order = 3)]
    public string Name { get; set; }

    [ProductComparerExport(ExportName = "Id")]
    [ProductAnalytics(Order = 2)]
    public string ReferenceNumber { get; set; }

    [ProductComparerExport]
    [ProductAnalytics(Order = 4)]
    public string ProducerName { get; set; }

    [ProductAnalytics(Order = 5)]
    public int QuantityAvailable { get; set; }

    [ProductAnalytics(Order = 6)]
    public int QuantitySoldLastMonth { get; set; }

    [ProductComparerExport(Format = "0.0")]
    public decimal Weight { get; set; }

    [ProductComparerExport(Format = "0.00")]
    [ProductAnalytics(Order = 7, Format = "0.00")]
    public decimal Price { get; set; }

    [ProductComparerExport(ExportName = "OrderDate", Format = "yyyy-MM-dd")]
    [ProductAnalytics(Order = 8, Format = "MM-dd-yyyy")]
    public DateTime LastOrderDate { get; set; }
}

Isn’t it perfect? We can mark properties in our ProductDto, that need to appear in the export. We can define, format, specify an order in which they should appear. Configuring is an easy part, but the meat should be generic and exactly the same for every export. Therefore, we need to work with basic ExportAttribute in out generic classes.

Getting custom attributes configuration

First very important line is for getting properties of our type. This code will list every one of them:

typeof(ProductDto).GetProperties()

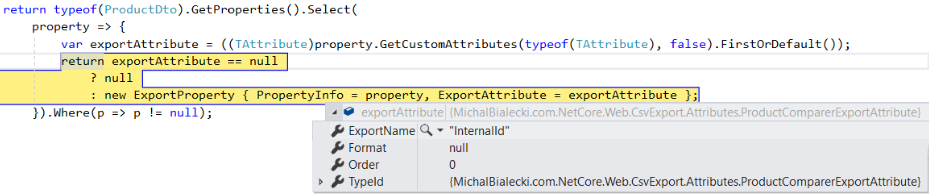
Second important line is code that returns instance of our custom attribute if there is one:

var exportAttribute = ((TAttribute)property.GetCustomAttributes(typeof(TAttribute), false).FirstOrDefault());

So now I can use my custom attribute values to get column names for CSV export:

private IEnumerable<ExportProperty> GetColumns<TAttribute>()
    where TAttribute : ExportAttribute
{
    return typeof(ProductDto).GetProperties().Select(
        property => {
            var exportAttribute = ((TAttribute)property.GetCustomAttributes(typeof(TAttribute), false).FirstOrDefault());
            return exportAttribute == null
                ? null
                : new ExportProperty { PropertyInfo = property, ExportAttribute = exportAttribute };
        }).Where(p => p != null);
}

In PropertyInfo I have data about my property like type, value and attributes – it will help me later to get property value for the next rows. In ExportAttributes I have values of my current attribute, which is ProductComparerExportAttribute.

Getting product values for rows with data is really simple when everything is ready.

private List<string> GetProductValues<TAttribute>(ProductDto product, IEnumerable<ExportProperty> columns)
    where TAttribute : ExportAttribute
{
    var propertyValues = new List<string>();
    foreach (var column in columns)
    {
        propertyValues.Add(GetAttributeValue(product, column.PropertyInfo, column.ExportAttribute));
    }

    return propertyValues;
}

For every product, I need to iterate through its columns (but only those that are marked with my current custom attribute) and fetch values. Fetching could take one line, but I wanted to implement something more. Notice check for IFormattable and formatting code. I can format everything that can format it’s value with simple ToString(“some format”). It is decimal, int, DateTime, etc.

private string GetAttributeValue<TAttribute>(ProductDto product, PropertyInfo propertyInfo, TAttribute attribute)
    where TAttribute : ExportAttribute
{
    object value = propertyInfo.GetValue(product);

    if (value == null || attribute == null)
    {
        return string.Empty;
    }

    if (!string.IsNullOrWhiteSpace(attribute.Format) && value is IFormattable)
    {
        return (value as IFormattable).ToString(attribute.Format, CultureInfo.CurrentCulture);
    }

    if (!string.IsNullOrWhiteSpace(attribute.Format))
    {
        return string.Format(attribute.Format, value);
    }

    return propertyInfo.GetValue(product).ToString();
}

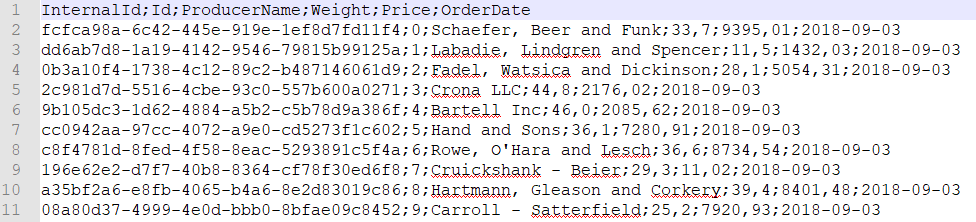
The sample output file looks like this:

Adding new export with that generic implementation requires minimal code changes. It literally took me no more than 10 minutes for testing purposes. It is just creating a new custom attribute, decorate ProductDto with it and a creating service that calls export. This is how code can be written with thinking about future changes. Usage of generics here is a huge benefit – I created one class that works for all exports. It might not be straightforward to read, but surely it is worth implementing.

You can find the whole code on my GitHub – it is a bit too big to quote it all: https://github.com/mikuam/Blog/

If you like deep backend stuff, you can check my post about Microsoft Orleans – an implementation of actor framework: https://www.michalbialecki.com/2018/03/05/getting-started-microsoft-orleans/

Have a good day;)

The urge for refactoring

Recently in my team at work, we focus on maintaining older micro-services. While this might not be the most exciting job to do, it is an opportunity to work on a developer craftsmanship. A micro-service or any code that you write, can be old after a year or even a half, cause our developer habits changes. Not only technology goes forward, but we tend to use different nuget packages and in result write the same code in a different way.

Refactoring, which I’m referring to in this post, can be playful, can be fun, but it needs to be done with caution. And foremost, we cannot go too far with it, cause drawing a line here is not a child’s play.

Simplest application possible

Here is a very simple API that fetches a user from the database and fills in his description from a different REST service. Code is written in .Net Core.

[Route("api/[controller]")]
public class UsersController : Controller
{
    private readonly IConfiguration _configuration;

    public UsersController(IConfiguration configuration)
    {
        _configuration = configuration;
    }

    [HttpGet("{userId}")]
    public async Task<IActionResult> Get(int userId)
    {
        try
        {
            var conf = _configuration.GetSection("ConnectionStrings")["Blog"];
            using (var connection = new SqlConnection(conf))
            {
                var user = await connection.QueryFirstOrDefaultAsync<UserDto>(
                    "SELECT [Id], [Name], [LastUpdatedAt] FROM [Users] WHERE Id = @Id",
                    new { Id = userId }).ConfigureAwait(false);

                var userDesctiption = await GetUserDescription(userId);

                return Json(
                    new {
                        Id = user.Id,
                        Name = user.Name,
                        LastModified = user.LastModified,
                        Description = userDesctiption
                });
            }
        }
        catch (Exception)
        {
            return StatusCode(500);
        }
    }

    private async Task<string> GetUserDescription(int userId)
    {
        var client = new HttpClient();
        var response = await client.GetAsync($"users/{userId}/description");
        return await response.Content.ReadAsStringAsync();
    }
}

As you see it almost looks as a rookie developer might write it, but it’s not that bad – configuration is injected with an interface IConfiguration.

What is bad here?

  • There’s no abstractions – you cannot just swap parts of the code to different implementations. It might be useful for example to use abstraction over HttpClient
  • Everything is in one class – Single Responsibility rule is non-existent
  • One method does multiple things – hard to test
  • It’s not written in a modular way, as an experienced developer might expect it

Have a look at projects structure – it is really minimal:

Those are the most obvious things that should be fixed. Let’s go step by step.

Database and REST calls should have it’s own classes

So I moved that to separate classes and this is how controller looks like:

[Route("api/[controller]")]
public class UsersController : Controller
{
    private readonly IUsersRepository _usersRepository;
    private readonly IUserDescriptionClient _userDescriptionClient;

    public UsersController(IUsersRepository usersRepository, IUserDescriptionClient userDescriptionClient)
    {
        _usersRepository = usersRepository;
        _userDescriptionClient = userDescriptionClient;
    }

    [HttpGet("{userId}")]
    public async Task<IActionResult> Get(int userId)
    {
        try
        {
            var user = await _usersRepository.Get(userId);
            var userDesctiption = await _userDescriptionClient.GetUserDescription(userId);

            return Json(user);
        }
        catch (Exception)
        {
            return StatusCode(500);
        }
    }
}

UsersRepository now looks very decent:

public class UsersRepository : IUsersRepository
{
    private static class SqlQueries {
        internal static string GetUser = "SELECT [Id], [Name], [LastUpdatedAt] FROM [Users] WHERE Id = @Id";
    }

    private readonly IConfiguration _configuration;

    public UsersRepository(IConfiguration configuration)
    {
        _configuration = configuration;
    }

    public async Task<UserDto> Get(int userId)
    {
        var conf = _configuration.GetSection("ConnectionStrings")["Blog"];
        using (var connection = new SqlConnection(conf))
        {
            var user = await connection.QueryFirstOrDefaultAsync<UserDto>(
                SqlQueries.GetUser,
                new { Id = userId }).ConfigureAwait(false);

            return user;
        }
    }
}

UserDescriptionClient is still very minimal:

public class UserDescriptionClient : IUserDescriptionClient
{
    public async Task<string> GetUserDescription(int userId)
    {
        var client = new HttpClient();
        var response = await client.GetAsync($"users/{userId}/description");
        return await response.Content.ReadAsStringAsync();
    }
}

And project structure:

This is a level of refactoring that I feel comfortable with. The code is nicely decoupled, easy to test and read. However, as a project gets larger you can refactor more to have a more shared code. If you then jump to a small project, you might want to do things ‘the right way’, so the code is ready for future. You will use your best approaches from previous projects – but isn’t that going too far?

Let’s go further

First thing I did is create a base class for my UserDescriptionClient:

public abstract class BaseClient<T> where T : class
{
    public async Task<T> Get(string uri)
    {
        var client = new HttpClient();
        var response = await client.GetAsync(uri);

        if (response.IsSuccessStatusCode)
        {
            var contentAsString = await response.Content.ReadAsStringAsync();

            if (typeof(T) == typeof(string))
            {
                return contentAsString as T;
            }

            return JsonConvert.DeserializeObject<T>(contentAsString);
        }

        throw new System.Exception($"Could not fetch data from {uri}");
    }

    public async Task Post(string uri, T data)
    {
        var client = new HttpClient();
        var response = await client.PostAsync(
            uri,
            new StringContent(JsonConvert.SerializeObject(data), System.Text.Encoding.UTF8, "application/json"));

        if (!response.IsSuccessStatusCode)
        {
            throw new System.Exception($"Could not post data to {uri}");
        }
    }
}

And UserDescriptionClient now gets very simple:

public class UserDescriptionClient : BaseClient<string>, IUserDescriptionClient
{
    public async Task<string> GetUserDescription(int userId)
    {
        return await Get($"users/{userId}/description");
    }
}

We can do very similar thing with UsersRepository – create a base class

public abstract class BaseRepository
{
    private readonly IConfiguration _configuration;
        
    public BaseRepository(IConfiguration configuration)
    {
        _configuration = configuration;
    }

    internal IDbConnection GetBlogConnection()
    {
        var conf = _configuration.GetSection("ConnectionStrings")["Blog"];
        return new SqlConnection(conf);
    }
}

And now users repository looks like this:

public class UsersRepository : BaseRepository, IUsersRepository
{
    private static class SqlQueries {
        internal static string GetUser = "SELECT [Id], [Name], [LastUpdatedAt] FROM [Users] WHERE Id = @Id";
    }
        
    public UsersRepository(IConfiguration configuration) : base(configuration) {}

    public async Task<UserDto> Get(int userId)
    {
        using (var connection = GetBlogConnection())
        {
            var user = await connection.QueryFirstOrDefaultAsync<UserDto>(
                SqlQueries.GetUser,
                new { Id = userId }).ConfigureAwait(false);

            return user;
        }
    }
}

We also can add more layers – there has to be a service between controller and repository.

Project tree looks like this:

And I just got started. There is actually much more that you can do:

  • introduce more folders so that interfaces are in a separate directory
  • create factories for everything:
    • preparing controller answer
    • preparing a request to REST service
    • creating url for REST service
    • creation of User instance
  • move folders to separate libraries
  • and much more…

It all depends on your imagination, but notice one thing – it didn’t actually add value to the project.

Is refactoring always good?

My refactored project is better designed and decoupled, but you never know which direction project might go. It is a threat when implementing completely new micro-service. You can implement whatever you want in the beginning, but you want to implement as much as possible so that the next developer will have an easier job to do. But would it be really easier? Trying to figure out why you wrote so much code for such a little value. In fact reading and understanding bigger project just takes more time than it should.

Did I get too far with refactoring? What do you think?


You can find code posted here on my GitHub: https://github.com/mikuam/MichalBialecki.com-refactorings

Buffered sending Service Bus messages

Recently I run into a challenge. I’ working on a micro-service that receives and processes messages one by one. How to send Service Bus messages, not instantly, but when they pile up? The reason for cause it is expensive when it comes to performance. Let’s send messages after 10 piles up or after every 20 seconds.

It is not an obvious task, because Microsoft’s implementation does not support it. However, simple buffering can be done like this:

    public class SimpleBufferMessagesService
    {
        private const string ServiceBusConnectionString = "Endpoint=sb://bialecki.servicebus.windows.net/;SharedAccessKeyName=RootManageSharedAccessKey;SharedAccessKey=[key]";

        private static readonly List<Message> _messages = new List<Message>();

        private static DateTime _lastMessageSent = DateTime.Now;

        private readonly TopicClient _topicClient;

        public SimpleBufferMessagesService()
        {
            _topicClient = new TopicClient(ServiceBusConnectionString, "accountTransferUpdates");
        }

        public async Task AddMessage(string message)
        {
            _messages.Add(new Message(Encoding.UTF8.GetBytes(message)));

            if (_messages.Count >= 10
                || DateTime.Now - _lastMessageSent > TimeSpan.FromSeconds(20))
            {
                await SendMessages(_messages);
                _messages.Clear();
                _lastMessageSent = DateTime.Now;
            }
        }

        private async Task SendMessages(List<Message> messages)
        {
            await _topicClient.SendAsync(messages);
        }
    }

This solution works quite well. Notice that I used static fields, so they would be preserved between requests. On every request instance of SimpleBufferMessagesService will be created anew.

There are a few problems with it:

  • it is not thread-safe. Two instances of SimpleBufferMessagesService can use the same _messages field and mess with it. It is a rather huge risk because sending Service Bus message takes some time
  • some messages can wait a long time to be sent. When messages stay in the queue and 20 seconds pass, there has to be another request to send them. This is a threat of losing messages when service will be restarted. We shouldn’t keep messages longer then we need to

Having that in mind we need to think of something, that executes every 20 seconds, in intervals like… like… like Timer!

Timer solution

Timer needs to be registered in Startup class, I did that in the end of Configure method.

    public void Configure(IApplicationBuilder app, IHostingEnvironment env)
    {
        // many things here

        var timeoutInMiliseconds = 20000;
        new Timer(s => { ServiceBusTimerCallback(); }, null, 0, timeoutInMiliseconds);
    }

    private static void ServiceBusTimerCallback()
    {
        var bufferService = new TimerBufferMessagesService();
        bufferService.SendMessages();
    }

And class that sends messages can be modified like that:

    public class TimerBufferMessagesService
    {
        private const string ServiceBusConnectionString = "Endpoint=sb://bialecki.servicebus.windows.net/;SharedAccessKeyName=RootManageSharedAccessKey;SharedAccessKey=[key]";

        private static readonly ICollection<Message> _messages = new List<Message>();

        private readonly TopicClient _topicClient;

        public TimerBufferMessagesService()
        {
            _topicClient = new TopicClient(ServiceBusConnectionString, "accountTransferUpdates");
        }

        public void AddMessage(string message)
        {
            lock (((ICollection) _messages).SyncRoot)
            {
                _messages.Add(new Message(Encoding.UTF8.GetBytes(message)));
            }
        }

        public void SendMessages()
        {
            if (_messages.Count == 0)
            {
                return;
            }

            List<Message> localMessages;
            lock (((ICollection)_messages).SyncRoot)
            {
                localMessages = new List<Message>(_messages);
                _messages.Clear();
            }

            Task.Run(async () => { await _topicClient.SendAsync(localMessages); });
        }
    }

This implementation is much better. It will run every 20 seconds and it sends messages if there is any. The SendMessages method will be called by one instance and AddMessage will be called by many instances but is written in a safe way.

It was perfect till the moment I realized it wasn’t working.

The thing is that sooner or later timer is destroyed by a garbage collector. Even when I tried to save the reference to timer or use GC.KeepAlive(timer), it always got cleared.


But it can be done right

According to StackOverflow question: https://stackoverflow.com/questions/3635852/system-threading-timer-not-firing-after-some-time/ we can use ThreadPool.RegisterWaitForSingleObject.

That method can be used instead of timer:

    public void Configure(IApplicationBuilder app, IHostingEnvironment env)
    {
        // many lines here

        const int timeoutInMiliseconds = 20000;
        var allTasksWaitHandle = new AutoResetEvent(true);

        ThreadPool.RegisterWaitForSingleObject(
            allTasksWaitHandle,
            (s, b) =>
            {
                ServiceBusTimerCallback();
            },
            null,
            timeoutInMiliseconds,
            false);
    }

    private static void ServiceBusTimerCallback()
    {
        var bufferService = new TimerBufferMessagesService();
        bufferService.SendMessages();
    }

The result is the same, but it will work constantly.

Full code can be found in my github repository: https://github.com/mikuam/Blog/

If you’re more interested in Service Bus, have a look at my post: https://www.michalbialecki.com/2017/12/21/sending-a-azure-service-bus-message-in-asp-net-core/

Or maybe this one: https://www.michalbialecki.com/2018/04/19/how-to-send-many-requests-in-parallel-in-asp-net-core/

Enjoy!

How to make you console app look cool

From time to time everyone needs to write simple console application. It’s a great, simple type of project to test something or write a simple tool. However, most of the times it looks… kind of dull. This is a part of a series of articles about writing a perfect console application in .net core 2. Feel free to read more:

What if it could have an updating percentage value?

Let’s start with something we know. Let’s create a console app, that would show a percentage of the task being done.
    class Program
    {
        static void Main(string[] args)
        {
            Console.WriteLine("Hello World!");
            Console.ReadKey();

            ShowSimplePercentage();

            Console.ReadKey();
        }

        static void ShowSimplePercentage()
        {
            for (int i = 0; i <= 100; i++)
            {
                Console.Write($"\rProgress: {i}%   ");
                Thread.Sleep(25);
            }

            Console.Write("\rDone!          ");
        }
    }
And it produces output like this: There’s one little trick to it. Notice I used \r character, that moves caret back to the beginning of the line, where next write overrides last one. It’s a simple animation!

Let’s create a spinner

With a bit of searching through Internet and a little of code:
    static void ShowSpinner()
    {
        var counter = 0;
        for (int i = 0; i < 50; i++)
        {
            switch (counter % 4)
            {
                case 0: Console.Write("/"); break;
                case 1: Console.Write("-"); break;
                case 2: Console.Write("\\"); break;
                case 3: Console.Write("|"); break;
            }
            Console.SetCursorPosition(Console.CursorLeft - 1, Console.CursorTop);
            counter++;
            Thread.Sleep(100);
        }
    }
We will have something like this:

We need to go bigger!

I searched a bit and came across this post on StackOverflow: https://stackoverflow.com/questions/2685435/cooler-ascii-spinners Here it is an implementation of an “executive desk toy”.
    static void MultiLineAnimation()
    {
        var counter = 0;
        for (int i = 0; i < 30; i++)
        {
            Console.Clear();

            switch (counter % 4)
            {
                case 0: {
                        Console.WriteLine("╔════╤╤╤╤════╗");
                        Console.WriteLine("║    │││ \\   ║");
                        Console.WriteLine("║    │││  O  ║");
                        Console.WriteLine("║    OOO     ║");
                        break;
                    };
                case 1:
                    {
                        Console.WriteLine("╔════╤╤╤╤════╗");
                        Console.WriteLine("║    ││││    ║");
                        Console.WriteLine("║    ││││    ║");
                        Console.WriteLine("║    OOOO    ║");
                        break;
                    };
                case 2:
                    {
                        Console.WriteLine("╔════╤╤╤╤════╗");
                        Console.WriteLine("║   / │││    ║");
                        Console.WriteLine("║  O  │││    ║");
                        Console.WriteLine("║     OOO    ║");
                        break;
                    };
                case 3:
                    {
                        Console.WriteLine("╔════╤╤╤╤════╗");
                        Console.WriteLine("║    ││││    ║");
                        Console.WriteLine("║    ││││    ║");
                        Console.WriteLine("║    OOOO    ║");
                        break;
                    };
            }
                
            counter++;
            Thread.Sleep(200);
        }
    }
And we have multiline ASCII animation: Cool, isn’t it? With your imagination and thousands of Unicode characters possibilities are limitless.

Let’s have some color

Colorful.Console is a fantastic nuget package, that you can use to introduce some color into your console application. With just a few lines of code:
using System.Drawing;
using Console = Colorful.Console;

namespace MichalBialecki.com.ConsoleAppMagic
{
    class Program
    {
        static void Main(string[] args)
        {
            Console.WriteLine("This is a standard info message");
            Console.WriteLine("This is an error!", Color.Red);

            Console.ReadKey();
        }
    }
}
We can see something like this: Colorful.Console overrides original console, so it does have all existing methods, but it extends original object with new possibilities. This is important, because you can start using this console in your old code, but introduce color only where you want it. So let’s do some animation with color. This is super easy and a lot of fun.
    static void ColorfulAnimation()
    {
        for (int i = 0; i < 5; i++)
        {
            for (int j = 0; j < 30; j++)
            {
                Console.Clear();

                // steam
                Console.Write("       . . . . o o o o o o", Color.LightGray);
                for (int s = 0; s < j / 2; s++)
                {
                    Console.Write(" o", Color.LightGray);
                }
                Console.WriteLine();

                var margin = "".PadLeft(j);
                Console.WriteLine(margin + "                _____      o", Color.LightGray);
                Console.WriteLine(margin + "       ____====  ]OO|_n_n__][.", Color.DeepSkyBlue);
                Console.WriteLine(margin + "      [________]_|__|________)< ", Color.DeepSkyBlue);
                Console.WriteLine(margin + "       oo    oo  'oo OOOO-| oo\\_", Color.Blue);
                Console.WriteLine("   +--+--+--+--+--+--+--+--+--+--+--+--+--+--+--+--+--+--+--+--+--+--+--+", Color.Silver);

                Thread.Sleep(200);
            }
        }
    }
This code produces simple, but effective animation. How would it look in your next console tool? Awesome! 
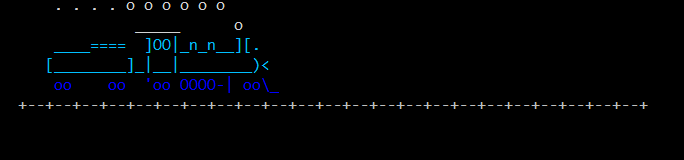
This nuget package offers even more, like colorful text. You can use ASCII fonts to write text. You can download fonts here – there are plenty. With a little code:
    static void AsciiText()
    {
        Console.WriteAscii("MichalBialecki.com", Color.FromArgb(131, 184, 214));

        Console.WriteLine();

        var font = FigletFont.Load("larry3d.flf");
        Figlet figlet = new Figlet(font);
        Console.WriteLine(figlet.ToAscii("MichalBialecki.com"), Color.FromArgb(67, 144, 198));
    }
And downloaded larry3d.flf font file you can see an effect: Full tutorial is available here: http://colorfulconsole.com/ All code posted here is available on my github repository: https://github.com/mikuam/Blog/tree/master/ServiceBusExamples/MichalBialecki.com.ConsoleAppMagic Enjoy and make exciting and amusing code 🙂

Receiving only one message from Azure Service Bus

Some time ago I got a question from Eto: “How would I go about this if I just want to receive one message only?” And I started thinking… is it possible in .Net Core?

I used the newest Microsoft.Azure.ServiceBus package, that is dedicated for .Net Core, but there is no method to receive only one message. So I used regular RegisterMessageHandler with a twist:

    public void ReceiveOne()
    {
        var queueClient = new QueueClient(ServiceBusConnectionString, "go_testing");

        queueClient.RegisterMessageHandler(
            async (message, token) =>
            {
                var messageBody = Encoding.UTF8.GetString(message.Body);
                Console.WriteLine($"Received: {messageBody}, time: {DateTime.Now}");
                await queueClient.CompleteAsync(message.SystemProperties.LockToken);

                await queueClient.CloseAsync();
            },
            new MessageHandlerOptions(async args => Console.WriteLine(args.Exception))
            { MaxConcurrentCalls = 1, AutoComplete = false });
    }

As you can see it is a standard approach, but after successfully processed message, I close queueClient. This works and it receives only one message, but it also gives an error.

I wasn’t fully satisfied with the solution, so I asked a question on StackOverflow: https://stackoverflow.com/questions/50438466/azure-service-bus-in-net-core-how-to-receive-only-one-message

After a few hours, I got an answer, that it is possible and I should just… use different package!

Using the old package

So far I didn’t manage to use old package in .NetCore project. So in order to install package WindowsAzure.ServiceBus, you need to have project referencing full framework.

And here is the code:

    public async Task ReceiveOne()
    {
        var queueClient = QueueClient.CreateFromConnectionString(ServiceBusConnectionString, "go_testing", ReceiveMode.PeekLock);

        var message = await queueClient.ReceiveAsync();
        Console.WriteLine($"Received: {message.GetBody<string>()}, time: {DateTime.Now}");

        await message.CompleteAsync();
    }

So that’s it and it works, but sadly not in .Net Core. However, I’ll keep this post up to date when such thing will be possible.

Sending Service Bus message in Go

Go or GoLang is an open source programming language. It’s a server-side C like language created by Google. I won’t take much or your time to introduce you to the language, but here is a short summary why it’s worth trying.


  • Go is open-source, but backed up by Google and used by big companies (Google, Dropbox, Docker, etc.)
  • It is something we know, it resembles C++ and it is easy to read
  • It’s fast, it compiles directly to machine language, no virtual machine in the middle
  • It’s a modern language, with packages instead of classes
  • Unlike many older languages, Go is designed to work in parallel

The easiest way

I found a package on github: https://github.com/michaelbironneau/asbclient. I needed to modify it a bit to work properly, so I forked that into my repo: https://github.com/mikuam/asbclient.

I found an existing sample and provided my credentials.

package main

import (
	"fmt"
	"log"

	"github.com/michaelbironneau/asbclient"
)

func main() {

	i := 0
	log.Printf("Send: %d", i)

	namespace := "bialecki"
	keyname := "RootManageSharedAccessKey"
	keyvalue := "[SharedAccessKeyValue]"

	client := asbclient.New(asbclient.Topic, namespace, keyname, keyvalue)

	err := client.Send("go_testing", &asbclient.Message{
		Body: []byte(fmt.Sprintf("message %d", i)),
	})

	if err != nil {
		log.Printf("Send error: %s", err)
	} else {
		log.Printf("Sent: %d", i)
	}
}

And result can be seen very fast:

Receiving Service Bus message is also trivial with this package and takes only a few lines of code. It looks like this:

package main

import (
	"log"

	"github.com/mikuam/asbclient"
)

func main() {

	namespace := "bialecki"
	keyname := "RootManageSharedAccessKey"
	keyvalue := "[SharedAccessKeyValue]"

	client := asbclient.New(asbclient.Queue, namespace, keyname, keyvalue)
	log.Printf("Peeking...")

	for {
		msg, err := client.PeekLockMessage("go_testing", 30)

		if err != nil {
			log.Printf("Peek error: %s", err)
		} else {
			log.Printf("Peeked message: '%s'", string(msg.Body))
			err = client.DeleteMessage(msg)
			if err != nil {
				log.Printf("Delete error: %s", err)
			}
		}
	}
}

It works, simple as that. So…

How fast is it?

Let’s say I need to send 1000 messages and receive them. As asbclient package supports only sending messages one by one, I will implement the same logic in .Net Core app. Sending part can look like this:

    public async Task Send1000()
    {
        var queueClient = new QueueClient(ServiceBusConnectionString, "go_testing");
        for (int i = 0; i < 1000; i++)
        {
            await queueClient.SendAsync(new Message(Encoding.UTF8.GetBytes("Message number " + i)));
        }
    }

And receiving part:

    public void ReceiveAll()
    {
        var queueClient = new QueueClient(ServiceBusConnectionString, "go_testing");

        queueClient.RegisterMessageHandler(
            async (message, token) =>
            {
                var messageBody = Encoding.UTF8.GetString(message.Body);

                Console.WriteLine($"Received: {messageBody}, time: {DateTime.Now}");

                await queueClient.CompleteAsync(message.SystemProperties.LockToken);
            },
            new MessageHandlerOptions(async args => Console.WriteLine(args.Exception))
            { MaxConcurrentCalls = 1, AutoComplete = false });
    }

So what are the times for 1000 messages?

Sending messages is faster in .Net Core, but receiving is slightly slower. However sending can be done much faster in .Net Core with batch send. Also receiving in some cases can be done faster, if you can write safe code that can process messages in parallel. Notice that in the last code snippet MaxConcurrentCalls is set to 1, that means reading messages is done synchronously.
Go code can be written faster probably as well. Golang is famous for support for parallel code with its goroutines. Should you go with go for Service Bus? Can’t really say if it’s worth it at this point, but it is definitely possible.


All code posted you can find it my github repo, go code itself is here: https://github.com/mikuam/Blog/tree/master/Go/src

You can read more about Service Bus in .Net Core in my post: Receiving messages from Azure Service Bus in .Net Core.

Accept XML request in ASP.Net MVC Controller

How to receive a request as an XML in ASP.Net MVC Controller?

This is a question that I got at my work when integrating with third-party service. MVC Controller is not ideal for such request handling, but that was the task I got, so let’s get to it. This is an XML that I need to accept:

<document>
	<id>123456</id>
	<content>This is document that I posted...</content>
	<author>Michał Białecki</author>
	<links>
		<link>2345</link>
		<link>5678</link>
	</links>
</document>

I tried a few solutions with built-in parameter deserialization but none seem to work and finally, I went with deserializing a request in a method body. I created a helper generic class for it:

    public static class XmlHelper
    {
        public static T XmlDeserializeFromString<T>(string objectData)
        {
            var serializer = new XmlSerializer(typeof(T));

            using (var reader = new StringReader(objectData))
            {
                return (T)serializer.Deserialize(reader);
            }
        }
    }

I decorated my DTO with xml attributes:

    [XmlRoot(ElementName = "document", Namespace = "")]
    public class DocumentDto
    {
        [XmlElement(DataType = "string", ElementName = "id")]
        public string Id { get; set; }

        [XmlElement(DataType = "string", ElementName = "content")]
        public string Content { get; set; }

        [XmlElement(DataType = "string", ElementName = "author")]
        public string Author { get; set; }

        [XmlElement(ElementName = "links")]
        public LinkDto Links { get; set; }
    }

    public class LinkDto
    {
        [XmlElement(ElementName = "link")]
        public string[] Link { get; set; }
    }

And used all of that in a controller:

    public class DocumentsController : Controller
    {
        // documents/sendDocument
        [HttpPost]
        public ActionResult SendDocument()
        {
            try
            {
                var requestContent = GetRequestContentAsString();
                var document = XmlHelper.XmlDeserializeFromString<DocumentDto>(requestContent);

                return new HttpStatusCodeResult(HttpStatusCode.OK);
            }
            catch (System.Exception)
            {
                // logging
                return new HttpStatusCodeResult(HttpStatusCode.InternalServerError);
            }
        }

        private string GetRequestContentAsString()
        {
            using (var receiveStream = Request.InputStream)
            {
                using (var readStream = new StreamReader(receiveStream, Encoding.UTF8))
                {
                    return readStream.ReadToEnd();
                }
            }
        }
    }

To use it, just send a request using for example Postman. I’m sending POST request to http://localhost:51196/documents/sendDocument endpoint with xml body mentioned above. One detail worth mentioning is a header. Add Content-Type: text/xml, or request to work.

And it works:

.Net Core API solution

While my task is solved I wondered how it should be solved if I could do it differently. My choice is obvious – use controller that has better API support and .Net Core. Document DTO will look the same, but deserialization is way simpler. Everything can be done with the help of the framework.

In Startup class in ConfigureServices method, you should have:

    services
        .AddMvc()
        .AddXmlSerializerFormatters();

And my DocumentsController looks like this:

    [Route("api/Documents")]
    public class DocumentsController : Controller
    {
        [Route("SendDocument")]
        [HttpPost]
        public ActionResult SendDocument([FromBody]DocumentDto document)
        {
            return Ok();
        }
    }

And that’s it! Sending the same document to api/documents/SendDocument endpoint just works.

Can I accept both XML and Json in one endpoint?

Yes, you can. It does not require any change to the code posted above, it’s just a matter of formatting input data correctly. The same XML document from above will look in Json like that:

{
	id: "1234",
	content: "This is document that I posted...",
	author: "Michał Białecki",
	links: {
		link: ["1234", "5678"]
	}
}

I’m not sure why I couldn’t use built-in framework deserialization in MVC Controller class. Maybe I did something wrong or this class is just not made for such a case. Probably WebApi Controller would handle it much smoother.

All code posted here you can find at my GitHub repository: https://github.com/mikuam/Blog

I wrote a nice post about parallel processing in .Net Core, you might want to have a look: https://www.michalbialecki.com/2018/04/19/how-to-send-many-requests-in-parallel-in-asp-net-core/


How to send many requests in parallel in ASP.Net Core

I want to make 1000 requests! How can I make it really fast? Let’s have a look at 4 approaches and compare their speed.

Preparations

In order to test different methods of handling requests, I created a very simple ASP.Net Core API, that return user by his id. It fetches them from plain old MSSQL database.

I deployed it quickly to Azure using App services and it was ready for testing in less than two hours. It’s amazing how quickly a .net core app can be deployed and tested in a real hosting environment. I was also able to debug it remotely and check it’s work in Application Insights.

Here is my post on how to build an app and deploy it to Azure: https://www.michalbialecki.com/2017/12/21/sending-a-azure-service-bus-message-in-asp-net-core/

And a post about custom data source in Application Insights: https://www.michalbialecki.com/2017/09/03/custom-data-source-in-application-insights/

API in a swagger looks like this:

So the task here is to write a method, that would call this endpoint and fetch 1000 users by their ids as fast as possible.

I wrapped a single call in a UsersClient class:

    public class UsersClient
    {
        private HttpClient client;

        public UsersClient()
        {
            client = new HttpClient();
        }

        public async Task<UserDto> GetUser(int id)
        {
            var response = await client.GetAsync(
                "http://michalbialeckicomnetcoreweb20180417060938.azurewebsites.net/api/users/" + id)
                .ConfigureAwait(false);
            var user = JsonConvert.DeserializeObject<UserDto>(await response.Content.ReadAsStringAsync());

            return user;
        }
    }

#1 Let’s use asynchronous programming

Asynchronous programming in C# is very simple, you just use async / await keywords in your methods and magic happens.

    public async Task<IEnumerable<UserDto>> GetUsersSynchrnously(IEnumerable<int> userIds)
    {
        var users = new List<UserDto>();
        foreach (var id in userIds)
        {
            users.Add(await client.GetUser(id));
        }

        return users;
    }

Score: 4 minutes 51 seconds

This is because although it is asynchronous programming, it doesn’t mean requests are done in parallel. Asynchronous means requests will not block the main thread, that can go further with the execution. If you look at how requests are executed in time, you will see something like this:

Let’s run requests in parallel

Running in parallel is the key here because you can make many requests and use the same time that one request takes. The code can look like this:

    public async Task<IEnumerable<UserDto>> GetUsersInParallel(IEnumerable<int> userIds)
    {
        var tasks = userIds.Select(id => client.GetUser(id));
        var users = await Task.WhenAll(tasks);

        return users;
    }

WhenAll is a beautiful creation that waits for tasks with the same type and returns a list of results. A drawback here would be an exception handling because when something goes wrong you will get an AggregatedException with possibly multiple exceptions, but you would not know which task caused it.

Score: 28 seconds

This is way better than before, but it’s not impressive. The thing that slows down the process is thread handling. Executing 1000 requests at the same time will try to create or utilize 1000 threads and managing them is a cost. Timeline looks like this:

Let’s run requests in parallel, but smarter

The idea here is to do parallel requests, but not all at the same time. Let’s do it batches for 100.

    public async Task<IEnumerable<UserDto>> GetUsersInParallelFixed(IEnumerable<int> userIds)
    {
        var users = new List<UserDto>();
        var batchSize = 100;
        int numberOfBatches = (int)Math.Ceiling((double)userIds.Count() / batchSize);

        for(int i = 0; i < numberOfBatches; i++)
        {
            var currentIds = userIds.Skip(i * batchSize).Take(batchSize);
            var tasks = currentIds.Select(id => client.GetUser(id));
            users.AddRange(await Task.WhenAll(tasks));
        }
            
        return users;
    }

Score: 20 seconds

This is the slightly better result because framework needs to handle fewer threads at the same time and therefore it is more effective. You can manipulate the batch size and figure out what is best for you. Timeline looks like this:

The proper solution

The proper solution needs some modifications in the API. You won’t always have the ability to change the API you are calling, but only changes on both sides can get you even further. It is not effective to fetch users one by one when we need to fetch thousands of them. To further enhance performance we need to create a specific endpoint for our use. In this case – fetching many users at once. Now swagger looks like this:

and code for fetching users:

    public async Task<IEnumerable<UserDto>> GetUsers(IEnumerable<int> ids)
    {
        var response = await client
            .PostAsync(
                "http://michalbialeckicomnetcoreweb20180417060938.azurewebsites.net/api/users/GetMany",
                new StringContent(JsonConvert.SerializeObject(ids), Encoding.UTF8, "application/json"))
            .ConfigureAwait(false);

        var users = JsonConvert.DeserializeObject<IEnumerable<UserDto>>(await response.Content.ReadAsStringAsync());

        return users;
    }

Notice that endpoint for getting multiple users is a POST. This is because payload we send can be big and might not fit in a query string, so it is a good practice to use POST in such a case.

Code that would fetch users in batches in parallel looks like this:

    public async Task<IEnumerable<UserDto>> GetUsersInParallelInWithBatches(IEnumerable<int> userIds)
    {
        var tasks = new List<Task<IEnumerable<UserDto>>>();
        var batchSize = 100;
        int numberOfBatches = (int)Math.Ceiling((double)userIds.Count() / batchSize);

        for (int i = 0; i < numberOfBatches; i++)
        {
            var currentIds = userIds.Skip(i * batchSize).Take(batchSize);
            tasks.Add(client.GetUsers(currentIds));
        }
            
        return (await Task.WhenAll(tasks)).SelectMany(u => u);
    }

Score: 0,38 seconds

Yes, less than one second! On a timeline it looks like this:

Comparing to other methods on a chart, it’s not even there:

How to optimize your requests

Have in mind, that every case is different and what works for one service, does not necessarily need to work with the next one. Try different things and approaches, find methods to measure your efforts.

Here are a few tips from me:

  • Remember that the biggest cost is not processor cycles, but rather IO operations. This includes SQL queries, network operations, message handling. Find improvements there.
  • Don’t start with parallel processing in the beginning as it brings complexity. Try to optimize your service by using hashsets or dictionaries instead of lists
  • Use smallest Dtos possible, serialize only those fields you actually use
  • Implement an endpoint suited to your needs
  • Use caching if applicable
  • Try different serializers instead of Json, for example ProfoBuf
  • When it is still not enough… – try different architecture, like push model architecture or maybe actor-model programming, like Microsoft Orleans: https://www.michalbialecki.com/2018/03/05/getting-started-microsoft-orleans/

You can find all code posted here in my github repo: https://github.com/mikuam/Blog.

Optimize and enjoy 🙂

Add CosmosDB persistent storage to Microsoft Orleans in .Net Core

Microsoft Orleans is a developer-friendly framework for building distributed, high-scale computing applications. It is a perfect solution for processing a large amount of data quickly. It shows it strengths especially when you need to use a storage while processing the data because it keeps a state in memory so save or update state operations are very fast.

If you want to know more about Microsoft Orleans, read my previous post about it: https://www.michalbialecki.com/2018/03/05/getting-started-microsoft-orleans/

Getting started with Microsoft Orleans for .Net Core

Microsoft Orleans 2.0 is the version written in .Net Standard, that can be used by applications targeting both .Net Core and the full framework. You can have a look at its github repo here: https://github.com/dotnet/orleans.

There is also a very good Microsoft page with an updated documentation: https://dotnet.github.io/orleans/Documentation/2.0/New.html

Regular Orleans solution consists of 4 projects: Grains – library with Orleans actor classes, Interfaces – abstraction for Grains to use in other libraries, Host – a project that runs a silos and a Client – project that connect to Host and execute clients code.

Have a look at the project structure, thanks to .Net Core it is simple and minimal.

Persistent storage in Microsoft Orleans

Microsoft Orleans offers a variety of options to save grain state. With one of the provided mechanisms, you can save grain state without writing any code, just providing proper configuration. You can also implement your own provider by implementing low-level interfaces. Here are some storage provider methods you can use when configuring silo host:

  • AddMemoryGrainStorage – grain state will be kept in memory and probably will be lost when the machine is down or new version is deployed
  • AddAzureBlobGrainStorage – Azure Blob storage will be used
  • AddAzureTableGrainStorage – Azure Table API will be used, Cosmos DB Table API is also compatible
  • AddAdoNetGrainStorage – ADO.Net storage in MSSQL database
  • AddDynamoDBGrainStorage – Amazon AWS DynamoDB storage

Note that adding Blob and Azure Table extension methods is possible when Microsoft.Orleans.Persistence.AzureStorage package is installed. ADO.Net extension method is in the Microsoft.Orleans.Persistence.AdoNet package and DynamoDB extension method is in Microsoft.Orleans.Persistence.DynamoDB package.

If you want to save grain state, in a grain class you need to extend Grain<T> instead of Grain, where T is an application data type, that will be persistent. You also can set a storage provider name in a grain class like this, but if you don’t, then a default provider will be used.

[StorageProvider(ProviderName="AzureTable")]
public class AccountGrain : Grain<Balance>, IAccountGrain

Read and write state in the grain

Grain state will be read automatically from storage provider when grain is activated and before OnActivateAsync() method is called. The grain is responsible for saving it’s state by calling base.WriteStateAsync() method. Orleans may perform performance optimizations and it is not guaranteed that state will be saved right after WriteStateAsync method is called. To be sure that grain uses the latest data from persistent storage, you can manually read data with base.ReadStateAsync() method.

Configuring CosmosDB Table API persistent storage

First I’ll extend an AccountGrain base class with Balance class, that will represent my state.

namespace MichalBialecki.com.OrleansCore.AccountTransfer.Grains
{
    [Serializable]
    public class Balance
    {
        public decimal Value { get; set; } = 0;
    }
    
    public class AccountGrain : Grain<Balance>, IAccountGrain
    {
        private readonly IServiceBusClient serviceBusClient;

        public AccountGrain(IServiceBusClient serviceBusClient)
        {
            this.serviceBusClient = serviceBusClient;
        }

        async Task IAccountGrain.Deposit(decimal amount)
        {
            this.State.Value += amount;
            await this.WriteStateAsync();

            await NotifyBalanceUpdate();
        }

        async Task IAccountGrain.Withdraw(decimal amount)
        {
            this.State.Value -= amount;
            await this.WriteStateAsync();

            await NotifyBalanceUpdate();
        }

        Task<decimal> IAccountGrain.GetBalance()
        {
            return Task.FromResult(this.State.Value);
        }

        private async Task NotifyBalanceUpdate()
        {
            var balanceUpdate = new BalanceUpdateMessage
            {
                AccountNumber = (int)this.GetPrimaryKeyLong(),
                Balance = this.State.Value
            };

            var message = new Message(Encoding.UTF8.GetBytes(JsonConvert.SerializeObject(balanceUpdate)));
            await serviceBusClient.SendMessageAsync(message);
        }
    }
}

I’m using a NotifyBalanceUpdate method to send Service Bus message with an updated state. Notice that I save a state with this.WriteStateAsync() method after I update it.

Next thing to do is set a right configuration in Host project Program.cs file.

    private static async Task<ISiloHost> StartSilo()
    {
        var builder = new SiloHostBuilder()
            .UseLocalhostClustering()
            .Configure<EndpointOptions>(options => options.AdvertisedIPAddress = IPAddress.Loopback)
            .ConfigureServices(context => ConfigureDI(context))
            .ConfigureLogging(logging => logging.AddConsole())
            .AddAzureTableGrainStorageAsDefault(
                (options) => {
                    options.ConnectionString = CosmosBDConnectionString;
                    options.UseJson = true;
                });

        var host = builder.Build();
        await host.StartAsync();
        return host;
    }

This is a very simple configuration, where I use AddAzureTableGrainStorageAsDefault extensions method and provide a connection string to CosmosDB Table API storage and a flag that I’d like data to be saved as json.

After running my application in Azure Portal I can see OrleansGrainState table, that was automatically created and this is what it contains:

You can read more about grain persistence in this Microsoft page: https://dotnet.github.io/orleans/Documentation/Core-Features/Grain-Persistence.html

All code that you saw is available at my GitHub repository: https://github.com/mikuam/orleans-core-example.

Azure Cosmos DB – key-value database in the cloud

Azure CosmosDB table API is a key-value storage hosted in the cloud. It’s a part of Azure Cosmos DB, that is Microsoft’s multi-model database. It’s a globally distributed, low latency, high throughput solution with client SDKs available for .NET, Java, Python, and Node.js.

Interesting thing is that Microsoft guarantees that for a typical 1KB item read will take under 10ms and indexed writes under 15ms, where’s median is under 5ms with 99.99% availability SLA.

azure-cosmos-db

Image from https://docs.microsoft.com/en-us/azure/cosmos-db/media/introduction/

Why NoSQL?

First of all, if you’re not that familiar with the differences between relational and non-relational databases, go have a look at my short article about it: https://www.michalbialecki.com/2018/03/16/relational-vs-non-relational-databases/

NoSQL databases are databases where data are kept without taking care of relations, consistency, and transactions. The most important thing here is scalability and performance. They gained it’s popularity thanks to Web 2.0 companies like Facebook, Google, and Amazon.

Different data organization – data can be kept is a few different forms, like key-value pairs, columns, documents or graphs.

No data consistency – there are no triggers, foreign keys, relations to guard data consistency, an application needs to be prepared for that.

Horizontal scaling – easily scaling by adding more machines, not by adding more power to an existing machine.

What is a key-value database

It is a data storage designed for storing simple key-value pairs, where a key is a unique identifier, that has a value assigned to it. Is it a storage similar in concept to dictionary or hashmap. On the contrary from relational databases, key-value databases don’t have predefined structure and every row can have a different collection of fields.

Using CosmosDB Table API

To start using CosmosDB Table API go to Azure Portal and create a CosmosDB account for table storage. Create a table – in my example it’s name is accounts. Then you need to copy the primary connection string – this is all you need.

Now let’s have a look at the simple retrieve operation.

// Create a retrieve operation that takes a customer entity.
TableOperation retrieveOperation = TableOperation.Retrieve<CustomerEntity>("Smith", "Ben");

// Execute the retrieve operation.
TableResult retrievedResult = table.Execute(retrieveOperation);

Notice, that in order to get an entity you needed to provide two keys: Smith and Ben. This is because every table entity have a PartitionKey and RowKey property. RowKey is unique among one PartitionKey and the combination of both is unique per table. This gives you a great opportunity to partition data inside of one table, without a need to build your own thing.

Before starting coding install: Microsoft.Azure.CosmosDB.Table, Microsoft.Azure.DozumentDB and Microsoft.Azure.KeyValue.Core. The last one is Microsoft.Azure.Storage.Common that I installed with v8.6.0-preview version(you need to check include prerelease in nuget package manager to see it). It might work with the newer one, but it is not available when I write this text.

You can create a table client in such a way:

    var storageAccount = CloudStorageAccount.Parse(CosmosBDConnectionString);
    var tableClient = storageAccount.CreateCloudTableClient();
    var accountsTable = tableClient.GetTableReference("accounts");

An entity that I use for my accounts table looks like this:

using Microsoft.Azure.CosmosDB.Table;

namespace MichalBialecki.com.ServiceBus.Examples
{
    public class AccountEntity : TableEntity
    {
        public AccountEntity() { }

        public AccountEntity(string partition, string accountNumber)
        {
            PartitionKey = partition;
            RowKey = accountNumber;
        }

        public double Balance { get; set; }
    }
}

Notice that there is a constructor with PartitionKey and RowKey as parameters – it has to be there in order for entity class to work.

In an example that I wrote, I need to update account balance by the amount I’m given. In order to do that, I need to retrieve an entity and update it if it exists or add it if it doesn’t. The code might look like this:

    private static readonly object _lock = new object();

    public double UpdateAccount(int accountNumber, double amount)
    {
        lock(_lock)
        {
            return UpdateAccountThreadSafe(accountNumber, amount);
        }
    }

    private double UpdateAccountThreadSafe(int accountNumber, double amount)
    {
        var getOperation = TableOperation.Retrieve<AccountEntity>(PartitionKey, accountNumber.ToString());
        var result = accountsTable.Execute(getOperation);
        if (result.Result != null)
        {
            var account = result.Result as AccountEntity;
            account.Balance += amount;
            var replaceOperation = TableOperation.Replace(account);
            accountsTable.Execute(replaceOperation);

            return account.Balance;
        }
        else
        {
            var account = new AccountEntity
            {
                PartitionKey = PartitionKey,
                RowKey = accountNumber.ToString(),
                Balance = amount
            };
            accountsTable.Execute(TableOperation.Insert(account));

            return amount;
        }
    }

I used a locking mechanism so that I’m sure that this operation is atomic. It is because I made this class as a singleton that I want to use in parallel while processing service bus messages.

After reading bunch of messages, my table looks like this. Also Balance is saved there without a need to define it in any schema.

If you’re interested in more simple examples, you can find it at this Microsoft page: https://docs.microsoft.com/en-us/azure/cosmos-db/tutorial-develop-table-dotnet.

If you’re interested in CosmosDB document storage, go to my article about it: https://www.michalbialecki.com/2017/12/30/getting-started-with-cosmosdb-in-azure-with-net-core/