Relational vs non-relational databases

Both relational and non-relational databases represent rather wide variety of possibilities and implementations but I’ll focus on the main differences between the two. First of all, it is about how data is managed. In relational databases you can use SQL, that is simple and lightweight language for writing database scripts. Non-relational databases do not support it, so you might refer to them as NoSQL databases.

The second big difference is structure how data are stored. In relational databases data are divided into tables, that may have relations between them. With the support of primary keys, triggers and functions you are capable creating complex dependencies between tables. This most likely will represent business model and logic inside of the database. NoSQL databases are based on the very simple structures like key-value storage or a graph, that does not support such relations.

Image from: https://codewave.com/insights/nagesh-on-when-to-use-mongodb-and-why/

Short summary

Knowing that upfront lets have a short summary of the two:

[table id=1 /]

What should I use?

If you’re starting with a new project and you’re wondering what to use, it’s a good opportunity to consider using NoSQL database. I would especially encourage you to try it for small and pet projects, because the best known like MongoDB and Couchbase works as SaaS. NoSQL is also relevant for big projects because it offers great scaling and is very easy to set up. On the other hand, non-relational databases may seem too simple or even limited, because of lack of triggers, stored procedures and joins. It may also be a threat to use another data management system, because it brings overhead for the team, to get accustomed to it. However, I strongly recommend trying it.

If you’re interested in NoSQL databases, check out my post about document storage – Azure Cosmos DB: Getting started with CosmosDB in Azure with .NET Core

Getting started with Microsoft Orleans

Microsoft Orleans is a developer-friendly framework for building distributed, high-scale computing applications. It does not require from developer to implement concurrency and data storage model. It requires developer to use predefined code blocks and enforces application to be build in a certain way. As a result Microsoft Orleans empowers developer with a framework with an exceptional performance.

Orleans proved its strengths in many scenarios, where the most recognizable ones are cloud services for Halo 4 and 5 games.

The framework

Microsoft Orleans is a framework that is build as an actor model. It it not a new idea in computer science, thus it originated in 1973. It is a concept of a concurrent model that treats actors as universal primitives. As everything is an object in object oriented programming, here everything is an actor.  An actor is a entity, that when received a message, and can:

  • send finite numer of messages to other actors
  • create finite number of new actors
  • designate the behavior to be used for the next message it receives

Every operation is asynchronous, so that it returns a Task and operations on actors can be handled simultaneously. In Orleans actors are called grains and they are almost singletons, so that it is almost impossible to execute work on the same actor in parallel. Grains can hold and persist it’s state, so that every actor can have it’s own data that it manage. I mentioned that every operation can be executed in parallel and that means, that we are not sure if certain operations will be executed before others. This means that we also cannot be sure, that application state is consistent, so Microsoft assures eventual consistency. We are not sure that application state is correct, but we know it will be eventually. Orleans also handles errors gracefully and if a grain fails, it will be created anew and it’s state will be recovered.

An example

Let’s assume, that e-mail accounts are grains and an operation on an actor is just sending and removing e-mails. Model of an actor can look like this:

Now sending an e-mail will mean, that we need to have at least two e-mail accounts involved.

Every grain is managing it’s own state and no one else can access it. When grain receives a message to send and e-mail, it sends messages to all recipient actors that should be notified and they update their state. Very simple scenario with clear responsibilities. Now if we follow the rule, that everything is an actor, then we can say that e-mail message is also an actor and handles it’s own state and every property of an account can be an actor. It can go as deep as we need to, however simpler solutions are just easier to maintain.

Where can I use it?

Actor model is best suited for data that is well grained, so that actors can be easily identified and their state can be easily decoupled. Accessing data by an actor is instant, because it holds it in memory and the same goes to notifying other actors. Taking that into account, Microsoft Orleans will be most beneficial where application needs to handle many small operations that changes application state. In a traditional storage, in example SQL database, application needs to handle concurrency when accessing the data, where in Orleans data are well divided. You may think that there have to be data updates that changes shared storage, but that’s a matter of changing the way the architecture is planned.

You can think of an actor as a micro-service with it’s own database and message bus to other micro-services. There can be millions of micro-services, but all of them will be unique and will hold it’s own state.

If you’re interested into an introduction by one of an Orleans creator, have a look at this: https://youtu.be/7CWEc8dBH38?t=412

There’s also very good example of usage by NCR company here: https://www.youtube.com/watch?v=hI9hjwwaWBw

Receiving messages from Azure Service Bus in .Net Core

For some time now we can observe how new .Net Core framework is growing and become more mature. Version 2.0 was released in August 2017 and it is more capable and supports more platforms then it’s previous releases. But the biggest feature of this brand new Microsoft framework is its performance and it’s ability to handle http requests much faster then it’s bigger brother.

However introduction of new creation is only the beginning as more and more packages are being ported or rewritten to new, lighter framework. This is a natural opportunity for developers to implement some additional changes,  refactor existing code or maybe slightly simplify existing API. It also means that porting existing solutions to .Net Core might not be straightforward and in this article I’ll check how receiving messages from Service Bus looks like.

First things first

In order to start receiving messages, we need to have:

After all of this, my topic looks like this:

Receiving messages

To demonstrate how to receive messages I created a console application in .Net Core 2.0 framework. Then I installed Microsoft.Azure.ServiceBus (v2.0) nuget package and also Newtonsoft.Json to parse messages body. My ProductRatingUpdateMessage message class looks like this:

    public class ProductRatingUpdateMessage
    {
        public int ProductId { get; set; }

        public int SellerId { get; set; }

        public int RatingSum { get; set; }

        public int RatingCount { get; set; }
    }

All of the logic is inside MessageReceiver class:

    public class MessageReceiver
    {
        private const string ServiceBusConnectionString = "Endpoint=sb://bialecki.servicebus.windows.net/;SharedAccessKeyName=RootManageSharedAccessKey;SharedAccessKey=[privateKey]";

        public void Receive()
        {
            var subscriptionClient = new SubscriptionClient(ServiceBusConnectionString, "productRatingUpdates", "sampleSubscription");

            try
            {
                subscriptionClient.RegisterMessageHandler(
                    async (message, token) =>
                    {
                        var messageJson = Encoding.UTF8.GetString(message.Body);
                        var updateMessage = JsonConvert.DeserializeObject<ProductRatingUpdateMessage>(messageJson);

                        Console.WriteLine($"Received message with productId: {updateMessage.ProductId}");

                        await subscriptionClient.CompleteAsync(message.SystemProperties.LockToken);
                    },
                    new MessageHandlerOptions(async args => Console.WriteLine(args.Exception))
                    { MaxConcurrentCalls = 1, AutoComplete = false });
            }
            catch (Exception e)
            {
                Console.WriteLine("Exception: " + e.Message);
            }
        }
    }


Notice that creating a SubscriptionClient is very simple, it takes just one line and handles all the work. Next up is RegisterMessageHandler which handles messages one by one and completes them in the end. If something goes wrong message will not be completed and after lock on it will be removed – it will be available for processing again. If you set AutoComplete option to true, then message will be automatically completed after returning from User Callback. This message pump approach won’t let you handle incoming messages in batches, but parameter MaxConcurrentCalls can be set to handle multiple messages in parallel.

Is it ready?

Microsoft.Azure.ServiceBus nuget package in version 2.0 offers most desirable functionality. It should be enough for most cases but it also has huge gaps:

  • Cannot receive messages in batches
  • Cannot manage entities – create topics, queues and subscriptions
  • Cannot check if queue, topic or subscription exist

Especially entities management features are important. It is reasonable that when scaling-up a service that read from topic, it creates it’s own subscription and handles it on it’s own. Currently developer needs to go to Azure Portal to create subscriptions for each micro-service manually.

Update! 

Version 3.1 supports entities management – have a look at my post about it: Managing ServiceBus queues, topics and subscriptions in .Net Core

If you liked code posted here, you can find it (and a lot more) in my github blog repo: https://github.com/mikuam/Blog.


Sending and receiving big files using Egnyte.API nuget package

Handling big files can be a problem when sending it through web. Simple REST calls are enough for small or medium files, but it’s limitation is a size of a request, that cannot be larger then 2GB. For files larger than that, you have to send or download file in chunks or as a stream.

In this post I’ll describe how to send and download really big files, bigger then 2GB connecting to Egnyte cloud storage with Egnyte.Api nuget package. I have written an introduction to Egnyte api here and wrote about using Egnyte.Api nuget package here.

Sending big files in chunks.

Egnyte API exposes dedicated method for sending big files, which is described here: Egnyte file chunked upload. First you need to install Egnyte.Api nuget package. Simple code can look like this:

    var client = new EgnyteClient(Token, Domain);

    var fileStream = new MemoryStream(File.ReadAllBytes("C:/test/big-file.zip"));
    var response = await ChunkUploadFile(client, "Shared/MikTests/Blog/big-file.zip", fileStream);

And ChunkUploadFile asynchronous helper method looks like this:

    private async Task<UploadedFileMetadata> ChunkUploadFile(
        EgnyteClient client,
        string serverFilePath,
        MemoryStream fileStream)
    {
        // first chunk
        var defaultChunkLength = 10485760;
        var firstChunkLength = defaultChunkLength;
        if (fileStream.Length < firstChunkLength)
        {
            firstChunkLength = (int)fileStream.Length;
        }

        var bytesRead = firstChunkLength;
        var buffer = new byte[firstChunkLength];
        fileStream.Read(buffer, 0, firstChunkLength);

        var response = await client.Files.ChunkedUploadFirstChunk(serverFilePath, new MemoryStream(buffer))
            .ConfigureAwait(false);
        int number = 2;

        while (bytesRead < fileStream.Length)
        {
            var nextChunkLength = defaultChunkLength;
            bool isLastChunk = false;
            if (bytesRead + nextChunkLength >= fileStream.Length)
            {
                nextChunkLength = (int)fileStream.Length - bytesRead;
                isLastChunk = true;
            }

            buffer = new byte[nextChunkLength];
            fileStream.Read(buffer, 0, nextChunkLength);

            if (!isLastChunk)
            {
                await client.Files.ChunkedUploadNextChunk(
                    serverFilePath,
                    number,
                    response.UploadId,
                    new MemoryStream(buffer)).ConfigureAwait(false);
            }
            else
            {
                return await client.Files.ChunkedUploadLastChunk(
                    serverFilePath,
                    number,
                    response.UploadId,
                    new MemoryStream(buffer)).ConfigureAwait(false);
            }
            number++;
            bytesRead += nextChunkLength;
        }

        throw new Exception("Something went wrong - unable to enumerate to next chunk.");
    }

Notice, that this code uses three methods that are reflected to three web requests and they are used for sending firs, next and last data chunk. Response of ChunkedUploadFirstChunk gives you UploadId that will identify upload and must be provided in other two methods. Buffer size I used is 10485760 bytes, that is 10 Megabytes, but you can use whatever suites you between 10 MB and 1 GB. Memory usage of sample console application looks like this:

Downloading big files

Downloading is much simpler then uploading. Important thing is to use streams the right way, so that application would not allocate to much memory.

    var client = new EgnyteClient(Token, Domain);

    var responseStream = await client.Files.DownloadFileAsStream("Shared/MikTests/Blog/big-file.zip");

    using (FileStream file = new FileStream("C:/test/big-file01.zip", FileMode.OpenOrCreate, FileAccess.Write))
    {
        CopyStream(responseStream.Data, file);
    }

And CopyStream helper method looks like this:

    /// <summary>
    /// Copies the contents of input to output. Doesn't close either stream.
    /// </summary>
    public static void CopyStream(Stream input, Stream output)
    {
        byte[] buffer = new byte[8 * 1024];
        int len;
        while ((len = input.Read(buffer, 0, buffer.Length)) > 0)
        {
            output.Write(buffer, 0, len);
        }
    }

I tested this code by sending and downloading 2.5GB files and many smaller ones and it works great.

All posted code is available in my public github repository: https://github.com/mikuam/Blog.

If you’d like to see other examples of usage Egnyte.Api, let me know.

How to handle error 0x800703E3, when user cancells file download

Recently at work I came across a difficult error, that gives an error message, that would lead me nowhere.

The remote host closed the connection. The error code is 0x800703E3.

I’ll give you more context – error occurs in the micro-service that serves big files across the web with REST interface. Service was working perfectly and none of our clients rose issues. But something was wrong. After some hours I finally managed to reproduce it. The error occurred when client was downloading file, but intentionally canceled it. How to handle such situation? Exception did not have any distinct type that can be handled separately.

In odrer to handle it in ASP.NET MVC properly I added an exception logger:

public static class RegisterFilters
{
    public static void Execute(HttpConfiguration configuration)
    {
        configuration.Services.Add(typeof(IExceptionLogger), new WebExceptionLogger());
    }
}

And WebExceptionLogger class implementation:

public class WebExceptionLogger : ExceptionLogger
{
    private const int RequestCancelledByUserExceptionCode = -2147023901;

    public override void Log(ExceptionLoggerContext context)
    {
        var dependencyScope = context.Request.GetDependencyScope();
        var loggerFactory = dependencyScope.GetService(typeof(ILoggerFactory)) as ILoggerFactory;
        if (loggerFactory == null)
        {
            throw new IoCResolutionException<ILoggerFactory>();
        }

        var logger = loggerFactory.GetTechnicalLogger<WebExceptionLogger>();
        if (context.Exception.HResult == RequestCancelledByUserExceptionCode)
        {
            logger.Info($"Request to url {context.Request.RequestUri} was cancelled by user.");
        }
        else
        {
            logger.Error("An unhandled exception has occured", context.Exception);
        }
    }
}

I noticed that this specific error type has HResult = -2147023901, so this is what I’m filtering by.

Hope this helps you.

Using Egnyte.API package for connecting to Egnyte cloud storage

Egnyte is a company, that offers secure and fast file storage in the cloud for business customers. I have written more about getting started with Egnyte API in my previous post.

Egnyte.API is a nuget package, that I’ve written in .Net and it supports:

  • .Net Framework 4.5
  • Windows Phone 8.1
  • Xamarin

It contains support for most of the functionalities that Egnyte API offers and helps to manage:

  • Files system
  • Permissions
  • Users
  • Groups
  • Search
  • Links
  • Audit reporting

However, if you’d like to improve it, feel free to contribute to it’s github repository.

Obtaining OAuth 2.0 token

First this is obtaining a token, that later can be used for authenticating each request. Egnyte offers three OAuth 2.0 authorization flows: Resource Owner, Authorization Code and Implicit Grant, however Authorization Code flow is the most common. To ease implementation of obtaining the token, Egnyte.API offers helpers methods for all three of those.

[HttpPost]
public void RequestTokenCode()
{
    var authorizeUrl = OAuthHelper.GetAuthorizeUri(
        OAuthAuthorizationFlow.Code,
        Domain,
        PrivateKey,
        RedirecrUri);

    Response.Redirect(authorizeUrl.ToString());
}

[HttpPost]
public void RequestTokenImplicitGrant()
{
    var authorizeUrl = OAuthHelper.GetAuthorizeUri(
        OAuthAuthorizationFlow.ImplicitGrant,
        Domain,
        PrivateKey,
        RedirecrUri);

    Response.Redirect(authorizeUrl.ToString());
}

[HttpGet]
public async Task<ActionResult> AuthorizeCode(string code)
{
    var token = await EgnyteClientHelper.GetTokenFromCode(
        Domain,
        PrivateKey,
        Secret,
        RedirecrUri,
        code);

    return Json(JsonConvert.SerializeObject(token), JsonRequestBehavior.AllowGet);
}

After you have a token, it’s time to use it.

Usage and structure of Egnyte.API package

The simplest usage is just one line – creating a client.

var client = new EgnyteClient(Token, Domain);

However, you can use optional parameters and pass your own HttpClient if you need to set some specific configuration. After creating a client you are ready to go. Inside a client you will find child clients that will help you use options mentioned above.

egnyte-api-clients

Each method is properly named and contains description of it’s usage and purpose of it’s parameters.

egnyte-api-list-files

Sample usages

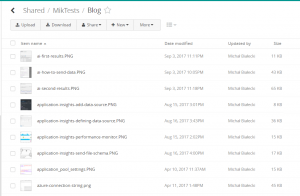
This is how folder looks like on the Egnyte web view:
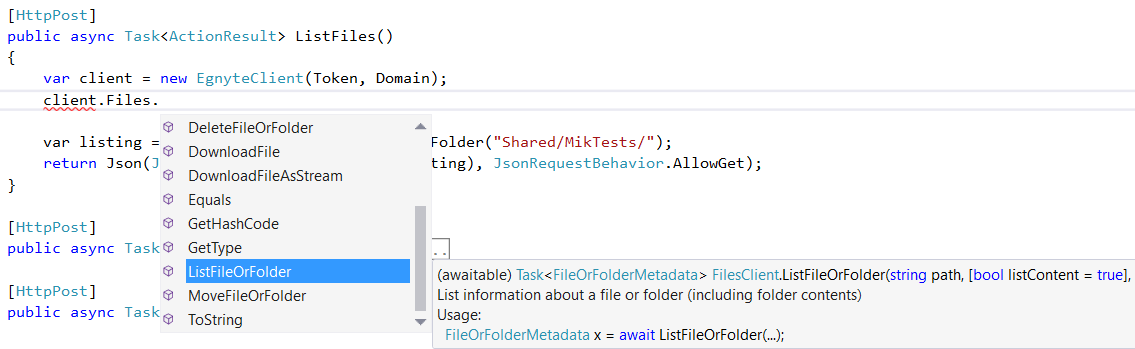
List files

Listing is super easy, code like this:

var client = new EgnyteClient(Token, Domain);
var listing = await client.Files.ListFileOrFolder("Shared/MikTests/Blog");

Returns object, that can be serialized as Json to:

{"IsFolder":true,"AsFolder":{"Count":0,"Offset":0,"TotalCount":9,"RestrictMoveDelete":false,"PublicLinks":"files_folders","Folders":[],"Files":[{"Checksum":"896e4ea21d4a0c692cc5729186ca547a9c80dd0261d22fee2ad6a65642f144712f2d61efc5b5d478b1094153d687afb26db19a10b4eabcf894c534356500cb3c","Size":11706,"Path":"/Shared/MikTests/Blog/ai-first-results.PNG","Name":"ai-first-results.PNG","Locked":false,"EntryId":"a971e61c-dc02-44f9-aba3-ad0d23ee25bd","GroupId":"692602c0-3270-41ab-9b95-f1942724c3b5","LastModified":"2017-09-03T21:11:46Z","UploadedBy":"mik","NumberOfVersions":1},{"Checksum":"cb3d2a1709556cfe460261eb41fe74dcd07468c9af55f352feb024d76001109f191b9b829540305b6888f1ea43d9d23b188b96ccd7f59c29a739f72a79829794","Size":43699,"Path":"/Shared/MikTests/Blog/ai-how-to-send-data.PNG","Name":"ai-how-to-send-data.PNG","Locked":false,"EntryId":"3fbd6acf-c36b-4440-ad37-4ddc5f19bc14","GroupId":"586308a7-49e8-4b54-b5e2-ae4b113330f8","LastModified":"2017-09-03T20:05:08Z","UploadedBy":"mik","NumberOfVersions":1},{"Checksum":"184c4f201d9e3083b5f28913b1c19a8cc14fee378fac9d2bfcfb3940c19b2a8a901da045ac1b5a1af61ffd681698d797265f25e1087b3313dc9e5cc1e8085912","Size":66954,"Path":"/Shared/MikTests/Blog/ai-second-results.PNG","Name":"ai-second-results.PNG","Locked":false,"EntryId":"1e66e057-0e52-4b5d-a289-b56922a185a4","GroupId":"d464292a-7ccd-43e2-add9-983cf342a9f5","LastModified":"2017-09-03T21:18:46Z","UploadedBy":"mik","NumberOfVersions":1},{"Checksum":"10004c02792a22f97d89e22a47f97bb9ebb65def491b7b66a8cda1da7560c010d971a02ec43b6148526275d72c6c4a0ffc19aa79a7f67458ef912d0d949b4d22","Size":8642,"Path":"/Shared/MikTests/Blog/application-insights-add-data-source.PNG","Name":"application-insights-add-data-source.PNG","Locked":false,"EntryId":"0ef8ee1e-3a69-41a6-b2e1-ae25d14be8fa","GroupId":"5bdea173-e195-4f0a-a5cb-7b6a51a32b87","LastModified":"2017-08-15T13:01:42Z","UploadedBy":"mik","NumberOfVersions":1},{"Checksum":"4acd351077e97157e8badbff49d892bbe51f80d7043272231676b753d2b1576d0d7acebb49506bf9c40fda0894e80e87c2255e4fb28381c88bd5ea309cb62fde","Size":36501,"Path":"/Shared/MikTests/Blog/application-insights-defining-data-source.PNG","Name":"application-insights-defining-data-source.PNG","Locked":false,"EntryId":"20ba9b7d-eba0-4499-9fbc-84b00ce95ac0","GroupId":"1df2518e-b123-47fb-a725-9837222b4017","LastModified":"2017-08-16T13:43:39Z","UploadedBy":"mik","NumberOfVersions":1},{"Checksum":"781419db9514cee18ddb92d106e35ae8dc5998b5b10987ceaec069c8791babffbc4e526d98e2a662a5176f1e9e67a627b60873d307c47009b965f48fe76570b5","Size":15410,"Path":"/Shared/MikTests/Blog/application-insights-performance-monitor.PNG","Name":"application-insights-performance-monitor.PNG","Locked":false,"EntryId":"d985893b-e414-4258-b009-6cf299800993","GroupId":"503e569b-481f-4a0a-b389-06c075713f17","LastModified":"2017-08-15T12:02:56Z","UploadedBy":"mik","NumberOfVersions":1},{"Checksum":"74a0f551d27ebe61b5c3b92ee0de4b1c48c60f7bbbfb0e1b9ef917c1f8ee9f7d30f0e8cd35b7579d6b40c020900db2eb8e75bc9c97855d2d49bc3e38c30146fe","Size":16935,"Path":"/Shared/MikTests/Blog/application-insights-send-file-schema.PNG","Name":"application-insights-send-file-schema.PNG","Locked":false,"EntryId":"09186e55-f629-40c7-a377-8a1a504a13e3","GroupId":"f99aef8f-e2d7-4365-9369-dbb6339038cd","LastModified":"2017-08-16T14:00:36Z","UploadedBy":"mik","NumberOfVersions":1},{"Checksum":"88c0c9416c2f75fc0b98d33dc240a7e771c4dd6dd7aa70342901134ef3eb90838e3de3facd73e12b8510c916e1a2c60c082cc664e77cea3572994ef774ef3e5c","Size":14911,"Path":"/Shared/MikTests/Blog/application_pool_settings.PNG","Name":"application_pool_settings.PNG","Locked":false,"EntryId":"cadab05d-8029-42cf-857c-dcedad8bb979","GroupId":"d692e745-0682-4c47-9fda-8a8675572bff","LastModified":"2017-04-10T09:37:52Z","UploadedBy":"mik","NumberOfVersions":1},{"Checksum":"b9b02a5b7b5149c50477d3fd9c14d4aebb96ceb268bfa105fa4b7507cc6306f9c5d20e67817444be39a94ef38c06d83423570a641c28506f00aa23770ade4fdf","Size":46298,"Path":"/Shared/MikTests/Blog/azure-connection-string.png","Name":"azure-connection-string.png","Locked":false,"EntryId":"5b84c1b3-03b2-4076-8eae-b23e0ff0b68f","GroupId":"d85bbf46-cb92-461a-bb69-d5fa712ddd64","LastModified":"2017-04-11T11:48:58Z","UploadedBy":"mik","NumberOfVersions":1}],"Name":"Blog","Path":"/Shared/MikTests/Blog","FolderId":"9c23d12c-5b91-40e3-bc81-4fb71fcf491a","AllowedFileLinkTypes":[],"AllowedFolderLinkTypes":[]},"AsFile":null}

Creating new folder

var listing = await client.Files.CreateFolder("Shared/MikTests/Blog/NewFolder");

Sending a file

var filePath = Server.MapPath("~/Content/myPhoto.jpg");
var stream = new MemoryStream(System.IO.File.ReadAllBytes(filePath));
var listing = await client.Files.CreateOrUpdateFile("Shared/MikTests/Blog/myPhoto.jpg", stream);

Deleting file or folder

var path = "Shared/MikTests/Blog/myPhoto.jpg";
var listing = await client.Files.DeleteFileOrFolder(path, entryId: "9355165a-e599-4148-88c5-0d3552493e2f");

Downloading file

var path = "Shared/MikTests/Blog/myPhoto.zip";
var responseStream = await client.Files.DownloadFileAsStream(path);

Creating a user

var listing = await client.Users.CreateUser(
    new Users.NewUser {
        UserName = "mikTest100",
        ExternalId = Guid.NewGuid().ToString(),
        Email = "mik.bialecki+test100@gmail.com",
        FamilyName = "Michał",
        GivenName = "Białecki",
        Active = true,
        AuthType = Users.UserAuthType.SAML_SSO,
        UserType = Users.UserType.StandardUser,
        IdpUserId = "mbialeckiTest100",
        UserPrincipalName = "mik.bialecki+testp100@gmail.com"
    });

Updating a user

var listing = await client.Users.UpdateUser(
    new Users.UserUpdate
    {
        Id = 12824215695,
        Email = "mik.bialecki+test100@gmail.com",
        FamilyName = "Michał",
        GivenName = "Białecki II"
    });

Conclusion

As you see using Egnyte.API nuget package is very simple. I presented only some of it’s capabilities, but if you want more, feel free to contribute to a public repository: https://github.com/egnyte/egnyte-dotnet. And if you have any questions, just let me know 🙂
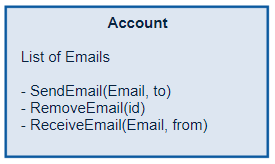
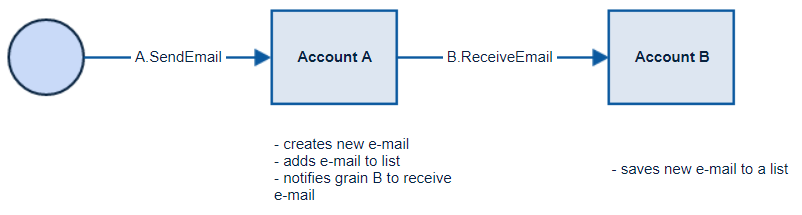


Getting started with Egnyte API in .Net

Egnyte is a company that provides software for enterprise file synchronization and sharing. Egnyte offers a cloud storage for business users to securely access and share data across the company. API offers RESTful interface, all request and responses are formated as JSON, strings are encoded as UTF-8 and all calls must be done over HTTPS.

First thing you need to have is your domain and API Key for authorization, you can find whole registration process described here.

Egnyte Api uses OAuth 2.0 for authentication and it supports Resource Owner flow (for internal application, that will be used only by your business internally) and Authorization Code and Implicit Grant for publicly available applications. Once you get the OAuth 2.0 token, you should cache it to use for multiple requests, instead of asking for a key every time you use API. Every subseqent API call would need to add a authorization header with generated token.

Authorization: Bearer 2v8q2bc6uvxtgghwmwvnvcp4

Getting token with Authorization Code flow

Whole process of obtaining token with Authorization Code flow is described here.

I have created a helper method to handle this process.

using Newtonsoft.Json;
public static async Task<TokenResponse> GetTokenFromCode(
    string userDomain,
    string clientId,
    string clientSecret,
    Uri redirectUri,
    string authorizationCode,
    HttpClient httpClient = null)
{
    var disposeClient = httpClient == null;
    try
    {
        httpClient = httpClient ?? new HttpClient();
        var requestParameters = OAuthHelper.GetTokenRequestParameters(
            userDomain,
            clientId,
            clientSecret,
            redirectUri,
            authorizationCode);
        var content = new FormUrlEncodedContent(requestParameters.QueryParameters);
        var result = await httpClient.PostAsync(requestParameters.BaseAddress, content).ConfigureAwait(false);

        var rawContent = await result.Content.ReadAsStringAsync().ConfigureAwait(false);

        return JsonConvert.DeserializeObject<TokenResponse>(rawContent);
    }
    finally
    {
        if (disposeClient)
        {
            httpClient.Dispose();
        }
    }
}

Here is a GetTokenRequestParameters method in OAuthHelper class. All it’s parameters are required.

public static class OAuthHelper
{
    private const string EgnyteBaseUrl = "https://{0}.egnyte.com/puboauth/token";

    public static TokenRequestParameters GetTokenRequestParameters(
        string userDomain,
        string clientId,
        string clientSecret,
        Uri redirectUri,
        string authorizationCode)
    {
        var queryParameters = new Dictionary<string, string>
            {
                { "client_id", clientId },
                { "client_secret", clientSecret },
                { "redirect_uri", redirectUri.ToString() },
                { "code", authorizationCode },
                { "grant_type", "authorization_code" }
            };

        return new TokenRequestParameters
            {
                BaseAddress = new Uri(string.Format(EgnyteBaseUrl, userDomain)),
                QueryParameters = queryParameters
            };
    }
}

All code posted here is a part of Egnyte.Api nuget package, that you can download and use yourself. If you’re interested in looking into code, it’s available in github public repository.

Implementing OData in ASP.Net API

OData is a protocol that allows creating custom queries to simple REST services. Using OData query parameters you can filter, sort or transform output you’re getting to fit your needs without any implementation changes on the API side. It sounds groundbreaking and innovative and it actually is, but it’s not a new thing – Microsoft introduced it in 2007.

Is it a lot of work to introduce OData to existing API?

No! It is surprisingly easy. Let’s try it on a simple WebApi controller in a ASP.NET framework. First you need to install nuget package: Microsoft.Data.OData. Let’s say we have a such REST api controller:

public class FoldersController : ApiController
{
    private IFoldersAndFilesProvider _provider;

    public FoldersController(IFoldersAndFilesProvider provider)
    {
        _provider = provider;
    }

    [Route("api/Folders")]
    public IHttpActionResult GetFolders()
    {
        var folders = _provider.GetFolders();
        return Ok(folders);
    }
}

This is a very simple controller that returns a list of folders in a tree structure. All there is need to be done to make this endpoint OData friendly, we need to change endpoints attributes and return IQueryable result.

[Route("odata/Folders")]
[EnableQuery]
public IQueryable<Folder> GetFolders()
{
    var folders = _provider.GetFolders();
    return folders.AsQueryable();
}

And this is it! So…

Let’s see some magic

Plain old REST endpoint would return all folders, but with OData we can query that output.

http://localhost:51196/odata/Folders

Will return the same full result.

http://localhost:51196/odata/Folders?$orderby=Size

This query will sort the output by folders size.

http://localhost:51196/odata/Folders?$top=5

There is a way to return only few results.

http://localhost:51196/odata/Folders?$skip=10&$top=5

Or use for returning partial result or even paging.

http://localhost:51196/odata/Folders?$filter=Folders/all(folder: folder/Size ge 10000)

More complex query can get folders only above certain size.

http://localhost:51196/odata/Folders?$filter=Folders/all(f: f/Hidden eq false)

Or only those that are not hidden.

You can find more examples like this here.

Not only getting data

OData is perfect for querying data, but it also can be used for adding, updating, patching and deleting entities. In Visual Studio you can add a ODataController and it will prepare a controller for you with pre-generated CRUD operations that you can use.

odata-add-controller

There are good developer articles about OData here.

This post is just scratching the surface and Microsoft implementation offers a lot, but it offers only a subset of OData features. Works on this subject seems to stop a few years ago, but there’s a new hope on the horizon. Microsoft is working on OData support for .Net Core APIs. You can track progress in this gitub repository. And here you can find some guidelines how to start using this new package.

What can I use it for

OData offers query options for simple REST APIs, that would normally require a lot of developers work to handle all the cases. In my opinion OData is perfect for scenarios where you serve data for many clients that needs different data. It could be a perfect API for automatition tests, that can fetch data that they need at the moment, without hardcoding them. Also it can be a nice addon for APIs that you don’t intend to maintain actively.

All code posted here is also available in my github repo here.

Getting started with CosmosDB in Azure with .NET Core

CosmosDB is Microsoft’s new way of storing data in the cloud, comparing to good old MSSQL Server. It offers globally distributed, multi-model database. Interesting fact is that it offers multiple model of storing data: key-value, column-family, documents and graph as shown in this picture:

azure-cosmos-db

Image from https://docs.microsoft.com/en-us/azure/cosmos-db/media/introduction/

First you need a Cosmos DB account

Create a Cosmos DB account, then go to Keys tab – you will need PrimaryKey and EndpointUri.

cosmos-db-keys

Now go to Data Explorer and create a database and collection. I created Documents database and Messages collection.

cosmos-db-data-explorer

Connecting to Cosmos DB

I’m developing my app in .NET Core and for that I need to install Microsoft.Azure.DocumentDB.Core nuget package. Then I created a DocumentDbService class, that will connect to application to Cosmos DB api.

public class DocumentDbService
{
    private const string DatabaseName = "Documents";

    private const string CollectionName = "Messages";

    public async Task SaveDocumentAsync(DocumentDto document)
    {
        try
        {
            var client = new DocumentClient(new Uri(ConfigurationHelper.GetCosmosDbEndpointUri()), ConfigurationHelper.GetCosmosDbPrimaryKey());
            await client.UpsertDocumentAsync(UriFactory.CreateDocumentCollectionUri(DatabaseName, CollectionName), document);
        }
        catch (Exception e)
        {
            Console.WriteLine("Error: {0}, Message: {1}", e.Message, e.GetBaseException().Message);
        }
    }
}

ConfigurationHelper class is just a static class that gets EndpointUri and PrimaryKey as strings, so you can just paste them here directly. The code above will create a new document in Documents database and Messages collection.

DocumentDto is just a simple object that will be saved as json:

public class DocumentDto
{
    public string StockId { get; set; }

    public string Name { get; set; }

    public float Price { get; set; }

    public DateTime UpdatedAt { get; set; }
}

In order do use it in ASP.NET Core I created a controller:

public class MessagesController : Controller
{
    [HttpPost]
    public async Task<IActionResult> Save([FromBody]SendMessageDto message)
    {
        try
        {
            var document = new DocumentDto
            {
                StockId = message.StockId,
                Name = message.Name,
                Price = message.Price,
                UpdatedAt = DateTime.UtcNow
            };

            await new DocumentDbService().SaveDocumentAsync(document);

            return StatusCode(200);
        }
        catch (Exception e)
        {
            Console.WriteLine(e);
            return StatusCode(500, e.Message);
        }
    }
}

Usage of it is very simple – it creates DocumentDto and store it in Cosmos DB database. To see the result you need to go to Azure’s Data Explorer and fetch for Messages like in a screen above.

Getting data from Cosmos DB with SQL api

Microsoft’s new storage api has ability to store data in a multiple formats. Let’s try getting the latest updates from Messages collection. In DocumentDbService class we need a part of code to get data:

public IQueryable<DocumentDto> GetLatestDocuments()
{
    try
    {
        var client = new DocumentClient(new Uri(ConfigurationHelper.GetCosmosDbEndpointUri()), ConfigurationHelper.GetCosmosDbPrimaryKey());
        return client.CreateDocumentQuery<DocumentDto>(
            UriFactory.CreateDocumentCollectionUri(DatabaseName, CollectionName),
            "SELECT * FROM Messages ORDER BY Messages.UpdatedAt desc",
            new FeedOptions { MaxItemCount = 10 });
    }
    catch (Exception e)
    {
        Console.WriteLine("Error: {0}, Message: {1}", e.Message, e.GetBaseException().Message);
        return null;
    }
}

This is where magic happens. As you can see I used plain old SQL query as it would be Messages table, but instead I queried json objects that does not necessary need to have UpdatedAt field.

Code in the controller is very simple.

[HttpGet]
public IQueryable<DocumentDto> GetTenLatestUpdates()
{
    try
    {
        var documents = new DocumentDbService().GetLatestDocuments();

        return documents;
    }
    catch (Exception e)
    {
        Console.WriteLine(e);
        return null;
    }
}

Notice that GetTenLatestUpdates controller method returns IQueryable interface that on web will be presented as json, but there is also a way to efficiently filter data with OData.

Sending a Azure Service Bus message in ASP.NET core

ASP.NET Core is a open-source web framework that everyone are so excited about recently. There are some good arguments to be excited about it: ability to run on Windows, macOS and Linux, ability to host website in IIS, Nginx, Apache and Docker and it’s fast.

Can it be used for Service Bus scenarios?

Yes, it certainly can. Let’s create a project, that will send service bus message triggered by web request. I’ll create the simplest ASP.NET Core Web Application in .Net Core 2.0 framework.

net-core-create-new-api

Now lets create a helper class to connect to Service Bus.

IMPORTANT: Install Microsoft.Azure.ServiceBus nuget package instead of WindowsAzure.ServiceBus, which will not work with .NET Core.

My ServiceBusHelper class looks like this:

public class ServiceBusHelper
{
    public static QueueClient GetQueueClient(ReceiveMode receiveMode = ReceiveMode.ReceiveAndDelete)
    {
        const string queueName = "stockchangerequest";
        var queueClient = new QueueClient(ConfigurationHelper.ServiceBusConnectionString(), queueName, receiveMode, GetRetryPolicy());
        return queueClient;
    }

    public static TopicClient GetTopicClient(string topicName = "stockupdated")
    {
        var topicClient = new TopicClient(ConfigurationHelper.ServiceBusConnectionString(), topicName, GetRetryPolicy());
        return topicClient;
    }

    private static RetryExponential GetRetryPolicy()
    {
        return new RetryExponential(TimeSpan.FromSeconds(5), TimeSpan.FromSeconds(30), 10);
    }
}

Microsoft.Azure.ServiceBus nuget package differs just a bit from WindowsAzure.ServiceBus so for creating topic you won’t use QueueClient.CreateFromConnectionString method, but rather TopicClient constructor, where you can directly pass custom retry policy.

You probably noticed that I created a ConfigurationHelper class to read vales from config. To have a connection string to your bus in a file, add appsettings.json file your peoject. Also set it’s properties to Content and Copy if newer. This way it will be copied to server when project is deployed. My configuration file looks like this:

{
    "ServiceBusConnectionString":
      "Endpoint=sb://bialecki.servicebus.windows.net/;SharedAccessKeyName=RootManageSharedAccessKey;SharedAccessKey=[removedForSafety]"
}

And ConfigurationHelper class looks like this:

public static class ConfigurationHelper
{
    private static string connection;

    public static string ServiceBusConnectionString()
    {
        if (string.IsNullOrWhiteSpace(connection))
        {
            connection = GetServiceBusConnectionString();
        }

        return connection;
    }

    private static string GetServiceBusConnectionString()
    {
        var builder = new ConfigurationBuilder()
            .SetBasePath(Directory.GetCurrentDirectory())
            .AddJsonFile("appsettings.json");

        var config = builder.Build();

        var value = config.GetValue<string>("ServiceBusConnectionString");
        return value;
    }
}

All code needed to connect to service bus is complete – congrats:)

However our job is not yet done. I mentioned earlier that I want to send messages to the bus triggered by web request. Do achieve it I need to have a controller:

public class MessagesController : Controller
{
    [HttpPost]
    public async Task<IActionResult> Send([FromBody]SendMessageDto mesaage)
    {
        try
        {
            var topicClent = ServiceBusHelper.GetTopicClient();
            await topicClent.SendAsync(new Message(Encoding.UTF8.GetBytes(mesaage.Value)));

            return StatusCode(200);
        }
        catch (Exception e)
        {
            Console.WriteLine(e);
            return StatusCode(500, e.Message);
        }
    }
}

public class SendMessageDto
{
    public string Value { get; set; }
}

Notice that there is no ApiController. In .NET Core there is only one Controller that can be used both to handle api logic and return json, or serve views for a web page.

In order for routing to work I also added some code in Startup class.

public void Configure(IApplicationBuilder app, IHostingEnvironment env)
{
    if (env.IsDevelopment())
    {
        app.UseDeveloperExceptionPage();
    }

    app.UseMvc(routes =>
    {
        routes.MapRoute("default", "api/{controller=Home}/{action=Index}/{id?}");
    });
}

Publishing to Azure App Service

Since it is much better to test an app online instead of locally, I published it with Azure App Service. It’s a powerful tool for deploying and scaling web, mobile and api apps running on any platform. Microsoft also says that it ensures performance, scalability and security, but the most important for me is that you can deploy your app within couple of clicks from Visual Studio.

net-core-publish-to-azure-service-app

Now I can test my app by making POST request like this:

net-core-sending-request-to-app-service

And the response is 200! To sum up:

  • there is no problem with writing code in .Net Core or .Net Standard using Azure Service Bus
  • Core already written for regular .Net Framework will not work, but it’s not a big job to make it compatible
  • Working with event hubs and relays will require to install separate nuget packages

To read more about Azure Service Bus nuget package go to this accoucement.

All code published here can be found in my public github repo.