Custom data source in Application Insights

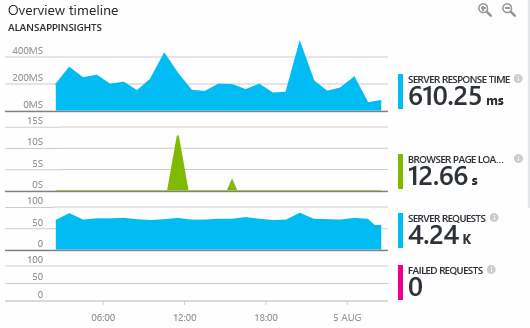
Application Insights(AI) is a park of Azure clous services, that gathers application telemetry data and is able to show it with nice charts. User can also query gathered data to create custom reports.

application-insights-performance-monitor

To gather telemetry data user must only enable it in Visual Studio. Detailed instructions can be found here: https://docs.microsoft.com/en-us/azure/application-insights/app-insights-asp-net

Creating custom data source

Underneath pretty charts and fancy numbers there are powerful mechanisms that can fast analize and query gigabytes of data. There is a way to use it with your own data. Firt thing what need to ba done, is to have data, that we will be providing. In this example I will just copy generated file to a separate blob storage, where it can be fetched from AI. My file looks like this:

{"ProductId": "P1", "Stock": "110", "UpdatedAt": "2017-08-13T14:50:28Z"}
{"ProductId": "P1", "Stock": "109", "UpdatedAt": "2017-08-13T14:50:48Z"}
{"ProductId": "P1", "Stock": "112", "UpdatedAt": "2017-08-13T14:51:08Z"}
{"ProductId": "P1", "Stock": "114", "UpdatedAt": "2017-08-13T14:51:28Z"}

Notice that separate lines are valid json, but whole file is not. Also one item of data should take exactly one line. Second option is to provide json table with brackets.

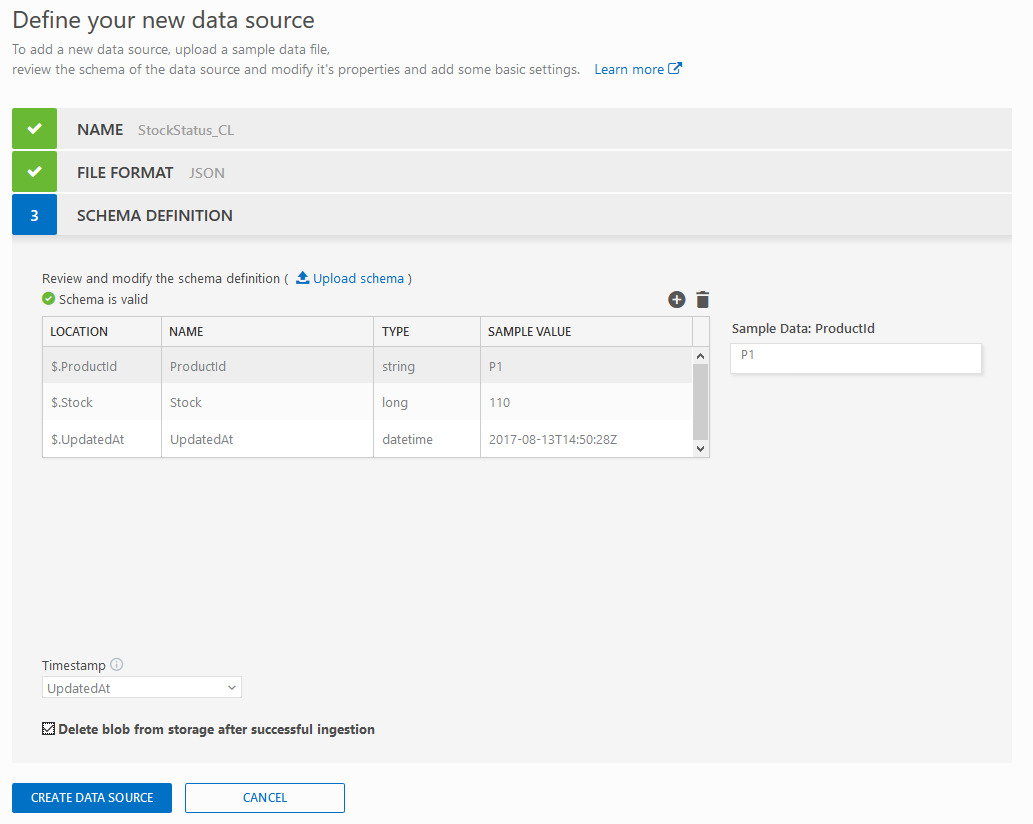
To add new data source go to Application Insights page and use button on the left side:

application-insights-add-data-source

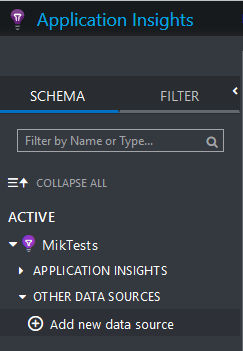
If you don’t have this option – you probably do not have permissions to do so.

As a file format you can specify either CSV or Json. You can also provide a part of the file you will be importing, but it has to have at least 10 rows.

application-insights-defining-data-source

Transfer file to Application Insights

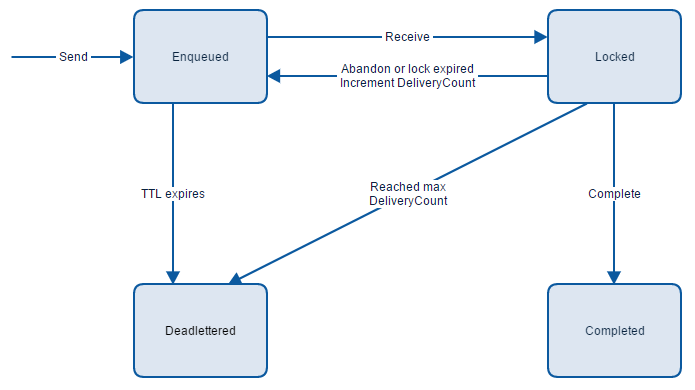
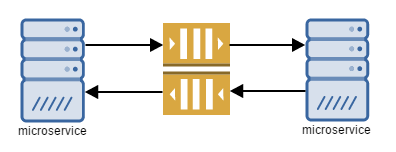
To transfer file to AI, file has to be copied to blob storage and then AI needs to be notified, what file to download. Like in this schema:

application-insights-send-file-schema

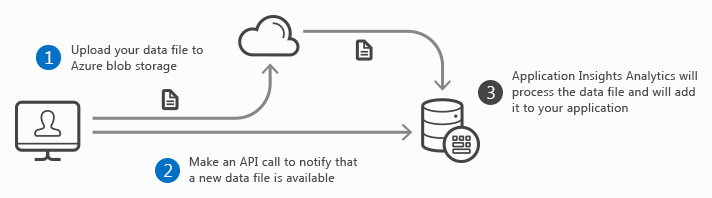
Number 1 is quite obvious, just copy your file to blob storage. Second step is a bit tricky, because you will need couple of information. After creating a custom data source, there is a “How to send data?” link of the right, that might help you.

ai-how-to-send-data

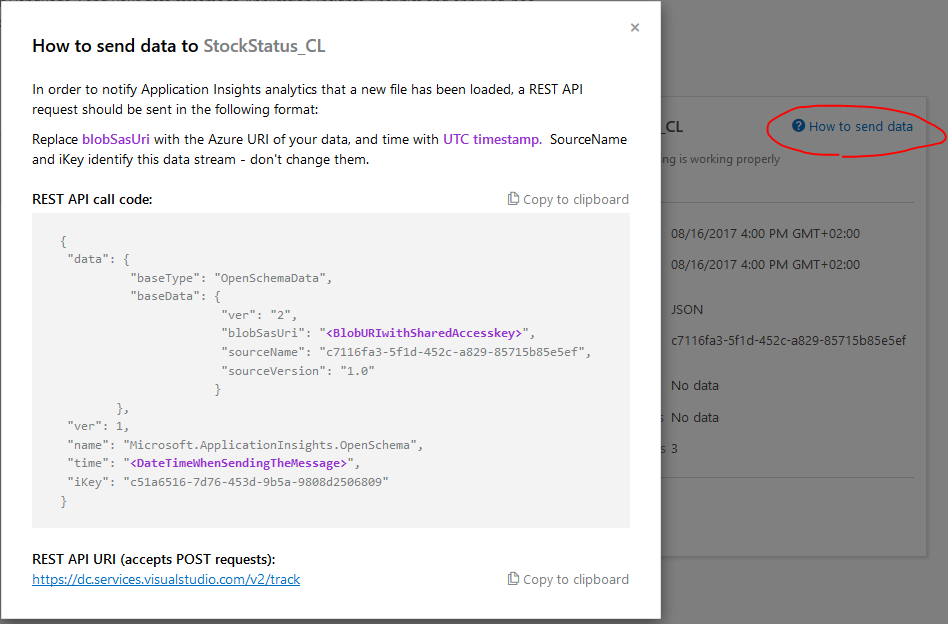
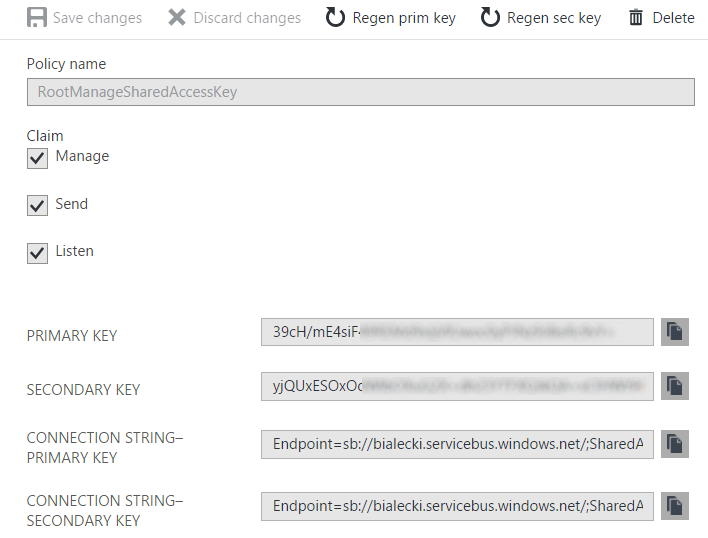
To get “blobSasUri” go to your blob storage and then to Shared Access Signature – you can generate it there. In time just format current time in ISO format. Full query should resamble something like this:

{  
   "data":{  
      "baseType":"OpenSchemaData",
      "baseData":{  
         "ver":"2",
         "blobSasUri":"https://miktests.blob.core.windows.net/mikai/stockData.json?sv=2017-04-17&ss=b&srt=sco&sp=rwdlac&se=2019-09-04T06:08:37Z&st=2017-09-03T22:08:37Z&spr=https&sig=#############",
         "sourceName":"########-####-####-####-############",
         "sourceVersion":"1.0"
      }
   },
   "ver":1,
   "name":"Microsoft.ApplicationInsights.OpenSchema",
   "time":"2017-09-03T22:13:01Z",
   "iKey":"########-####-####-####-############"
}

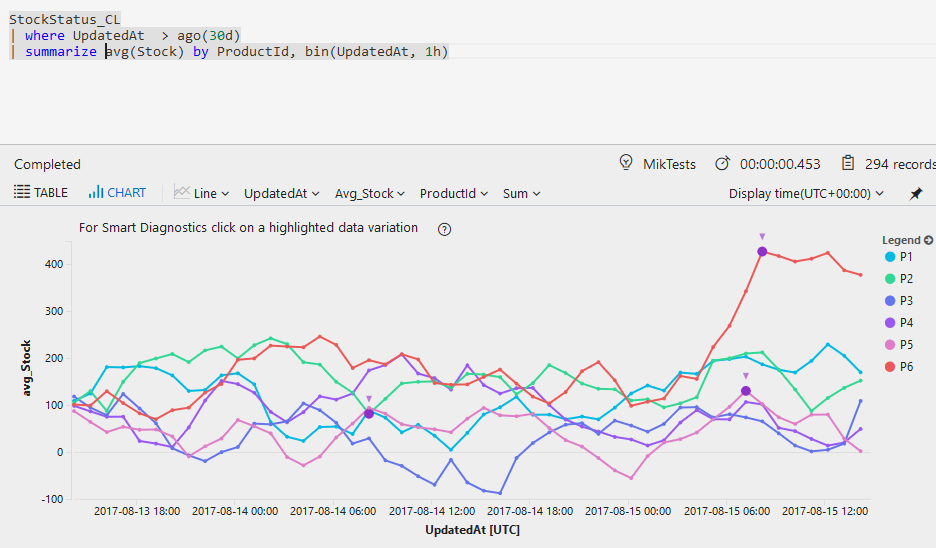
After sending a POST request with correct body – it should return 200 response and in couple of minutes data should be pulled in to Application Insights. So you should be able to do something like this:
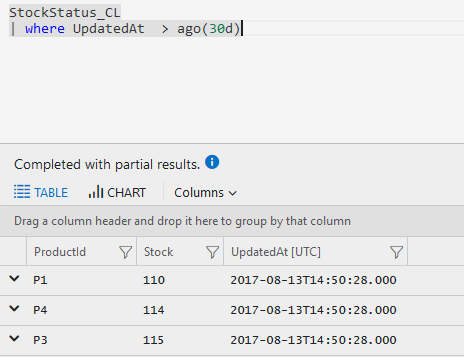
ai-first-results

Or even like this:

ai-second-results


Send messages in batch without exceeding a limit

Service Bus allows user to send messages in batches, which is great what it comes to performance. Differences sending messages in batches and separately can be huge. Actually, lets look at an example. This is a very simple send:

private static void SimpleSendBatch()
{
    var client = GetQueueClient();
    client.SendBatch(GetALotOfMessages());
}

If we compare it to sending messages sequential, we get:

batch_sending_times

So sending 200 messages sequential can take up to 20 seconds, but that will differ depending on a cpu, internet connection, etc. However, from chart above you get the point – when we send one message – use Send, when sending more then one – use SendBatch.

When collection of messages is too big

However when you attempt to send a rather huge batch, you might exceed a limit, that is 256KB per batch, not only per message itself. If you exceed this limit, you can get an error like this:

A request from the client instance has exceeded the maximum message size, and the underlying channel will be recreated. Validate the content size before retrying.

So what can we check to chop messages into smaller chunks? There is a Size property in the BrokeredMessage object, but that relates only to content and there are still standard and custom properties. If we don’t use it that much, we can implement a simple solution of checking batch size:

private static void SimpleAndSmartSendBatch()
{
    var client = GetQueueClient();
    var messages = GetALotOfMessages();

    const int maxBatchSizeInBytes = 230000;
    var i = 0;
    long currentBatchSize = 0;
    var listToSend = new List<BrokeredMessage>();
    while (i < messages.Count)
    {
        if (currentBatchSize + messages[i].Size < maxBatchSizeInBytes)
        {
            listToSend.Add(messages[i]);
            currentBatchSize += messages[i].Size;
        }
        else
        {
            client.SendBatch(listToSend);
            listToSend.Clear();
            listToSend.Add(messages[i]);
            currentBatchSize = messages[i].Size;
        }

        i++;
    }

    if (listToSend.Any())
    {
        client.SendBatch(listToSend);
    }
}

In the code above I set 230000 bytes as a limit instead of 256000. This is just a small margin that can prevent errors in the future. That solution should be sufficient for most of the scenarios.

The best way to calculate message size

First of all – there is no way to know for sure how big is the message. However, if you really want to use sending batch to maximum, you need to calculate message size more precisely.

While investigating the topic I came across a github discussion and a post from Sean Feldman – explains it very good and there’s code as well:

https://weblogs.asp.net/sfeldman/asb-batching-brokered-messages

Based on that solution I created my own that uses BrokeredMessage.

public static long GetEstimatedMessageSize(BrokeredMessage message)
{
    var standardPropertiesSize =
        GetStringSizeInBytes(message.MessageId) + // MessageId
        GetStringSizeInBytes(message.ContentType) + // ContentType
        GetStringSizeInBytes(message.CorrelationId) + // CorrelationId
        4 + // DeliveryCount
        8 + // EnqueuedSequenceNumber
        8 + // EnqueuedTimeUtc
        8 + // ExpiresAtUtc
        1 + // ForcePersistence
        1 + // IsBodyConsumed
        GetStringSizeInBytes(message.Label) + // Label
        8 + // LockedUntilUtc
        16 + // LockToken
        GetStringSizeInBytes(message.PartitionKey) + // PartitionKey
        8 + // ScheduledEnqueueTimeUtc
        8 + // SequenceNumber
        GetStringSizeInBytes(message.SessionId) + // SessionId
        4 + // State
        8 + // TimeToLive
        GetStringSizeInBytes(message.To) + // To
        GetStringSizeInBytes(message.ViaPartitionKey);  // ViaPartitionKey;

    var customPropertiesSize = message.Properties.Sum(p => GetStringSizeInBytes(p.Key) + GetObjectSize(p.Value));

    return message.Size + customPropertiesSize + standardPropertiesSize;
}

private static int GetStringSizeInBytes(string value) => value != null ? Encoding.UTF8.GetByteCount(value) : 0;

private static long GetObjectSize(object o)
{
    using (Stream s = new MemoryStream())
    {
        var formatter = new BinaryFormatter();
        formatter.Serialize(s, o);
        return s.Length;
    }
}

We can calculate how big are standard properties and custom properties, but there are still properties inside of BrokeredMessage like dates and timespans. To be safe it’s better to keep 5-10% of margin.

Implementing deferral mechanism in ServiceBus

Deferral is a method to leave a message in a queue or subscription when you cannot process it at the moment. When using PeekLock read mode you read a message but leave it in a queue. When processing of a message is done, you call Complete and message is removed from queue, but when something goes wrong, you can call Abandon and message will be available in a queue for next read. Important thing to remember is that there is a time interval for locking the message in a queue, it’s LockDuration. If message will not be processed and completed during that time, it will be again available in the queue and you will get MessageLockLostException when trying to do anything with it. When message is losing it’s lock and stays in a queue, either by being abandoned or lock has expired, it will get it’s DeliveryCount incremented. After reaching limit, which is by default 10, message will be moved to dead-letter queue.

message-lifecycle

It is a great life-cycle, where message that we just cannot process, will go to dead-letter queue. With retry policy all transient errors that occurs while connecting to Service Bus will be handled internally – you do not have to worry about it. Problems may occur when you would like to handle connection problems not related to Service Bus. Solution that Microsoft is proposing is to defer a message that you cannot process, leave it in the queue, but hide it from receivers. This message will be available only when asking for it with it’s sequence number. Whole loop can look like this:

private static async Task StartListenLoopWithDeferral()
{
    var client = GetQueueClient(ReceiveMode.PeekLock);
    var deferredMessages = new List<KeyValuePair>();

    while (true)
    {
        var messages = Enumerable.Empty();

        try
        {
            messages = await client.ReceiveBatchAsync(50, TimeSpan.FromSeconds(10));
            messages = messages ?? Enumerable.Empty();
            if (!messages.Any())
            {
                continue;
            }

            foreach (var message in messages)
            {
                Console.WriteLine("Received a message: " + message.GetBody());
            }
            await client.CompleteBatchAsync(messages.Select(m => m.LockToken));

            // handling dererred messages
            var messagesToProcessAgain = deferredMessages.Where(d => d.Value < DateTime.Now).Take(10).ToList();
            foreach (var messageToProcess in messagesToProcessAgain)
            {
                BrokeredMessage message = null;
                try
                {
                    deferredMessages.Remove(messageToProcess);
                    message = await client.ReceiveAsync(messageToProcess.Key);

                    if (message != null)
                    {
                        // processing
                        Console.WriteLine("Received a message: " + message.GetBody());

                        await client.CompleteAsync(message.LockToken);
                    }
                }
                catch (MessageNotFoundException) { }
                catch (Exception e)
                {
                    Console.WriteLine(e);
                    deferredMessages.Add(new KeyValuePair(
                        message.SequenceNumber,
                        DateTimeOffset.Now + TimeSpan.FromMinutes(2)));
                }
            }
        }
        catch (MessageLockLostException e)
        {
            Console.WriteLine(e);

            foreach (var message in messages)
            {
                await message.AbandonAsync();
            }
        }
        catch  (Exception e)
        {
            Console.WriteLine(e);

            // defer messages
            foreach (var message in messages)
            {
                deferredMessages.Add(new KeyValuePair(
                    message.SequenceNumber,
                    DateTimeOffset.Now + TimeSpan.FromMinutes(2)));
                await message.DeferAsync();
            }
        }
    }
}

Code contains of endless loop, that ReceiveBatchAsync messages and process them. If something goes wrong, messages are added to deferredMessages list with 2 minutes time span. After completing messages successfully, program checks if there are any messages that should be processed again. If there would be any problem again,  message will be added to deferredMessages list again. There is also a check for MessageLockLostException, that might occur when message went to dead-letter queue and we should no longer ask for it. Message ids are kept in memory and that is obvious potential issue, cause when program will be restarted, this list will be wpied and there will be no way to get those messages from the queue.

Deferral pros and cons

Deferral mechanism can be useful, because it basis on original Azure infrastructure and handling messages this way keeps messages DeliveryCount property incrementing and eventually moves message to dead-letter queue. It is also a way to handle one message and make it available again after a custom time.

However, algorithm itself is not easy and needs to handle many edge cases, that makes it error prone. Second thing is that it breaks the order of messages, where in some cases it is essential to keep FIFO. I wouldn’t recommend it to in every scenario. Maybe a better approach would be to add a simple wait, when something goes wrong and try again after a while.

Receive message from queue in push model

Push and pull models are in general approaches of distributing the data between services. In the context of messaging it mean how messages are received by the client. In the previous post I showed how to receive messages by waiting for them to come – this is pull model. Receive method will wait some amount of time for messages to come, not necessarily blocking thread. In push model time of code execution is steered by data coming to the client, in this case – messages appearing in the queue. User can register a method to be executed when messages comes and when error occurs. Let’s see some code:

static void GetMessagesBySubscribing()
{
    var queueClient = GetQueueClient();
    queueClient.OnMessage(OnMessage);
}

private static void OnMessage(BrokeredMessage brokeredMessage)
{
    Console.WriteLine("Received a message: " + brokeredMessage.GetBody&lt;string&gt;());
}

Code just could not look simpler. All handling of message life is inside OnMessage method even if we specify different ReceiveMode. Let’s add error handling:

static void GetMessagesBySubscribing()
{
    var queueClient = GetQueueClient();
    var options = new OnMessageOptions
    {
        AutoComplete = true,
        MaxConcurrentCalls = 5
    };
    options.ExceptionReceived += OptionsOnExceptionReceived;
    queueClient.OnMessage(OnMessage, options);
}

private static void OptionsOnExceptionReceived(object sender, ExceptionReceivedEventArgs exceptionReceivedEventArgs)
{
    if (exceptionReceivedEventArgs?.Exception != null)
    {
        Console.WriteLine("Exception occured: " + exceptionReceivedEventArgs.Exception.Message);
    }
}

private static void OnMessage(BrokeredMessage brokeredMessage)
{
    try
    {
        Console.WriteLine("Received a message: " + brokeredMessage.GetBody&lt;string&gt;());
    }
    catch (Exception e)
    {
        Console.WriteLine("Exception occured while processing: " + e.Message);
    }
}

A method that logs errors can be registered to ExceptionReceived in OnMessageOptions class. It will log every error that happens while handlind connection to queue and messages handling. I also added a try-catch block to catch all exceptions that may occur during message processing. If an error occurs while processing message that we would not catch, it will appear in ExceptionReceived metod, but it’s better to have it separated.

There are two more options that specified in OnMessageOptions. AutoComplete is set to true, then queue client will try to complete a message after it is processed and abandon it on error. However, there might be a scenario, when we would like to decide if message should be completed or abandoned during the processing. It could be accomplished with AutoComplete set to false. MaxConcurrentCalls defines how many threads should work in parallel processing messages in the queue. For example if set to 5, when many messages appears in a queue, queue client will create up to 5 different threads processing consecutive messages. Each thread will work on a separate message and will handle it’s life-cycle. If it is important that only one thread should work on processing messages, then MaxConcurrentCalls should be set to 0.

Proper error handling in ExceptionReceived

In ExceptionReceived method you will get all kinds of errors, but you shouldn’t worry about any transient errors. Don’t be surprised that you can get MessagingException even if you define a retry policy – those errors are bubbled up for monitoring purposes. So it is up to you if you log them or not. After having a problem with connecting, client should recreate itself and try to receive messages again. Code can look like this:

private static void OptionsOnExceptionReceived(object sender, ExceptionReceivedEventArgs exceptionReceivedEventArgs)
{
    if (exceptionReceivedEventArgs?.Exception != null)
    {
        if (!(exceptionReceivedEventArgs.Exception is MessagingException && ((MessagingException)exceptionReceivedEventArgs.Exception).IsTransient))
        {
            Console.WriteLine("Exception occured: " + exceptionReceivedEventArgs.Exception.Message);
        }
    }
}

Getting messages from Service Bus queue

In the previous post I discussed how to implement sending messages. In this post I will show how to receive messages. The simplest code looks like this:

static void GetMessage()
{
    try
    {
        var queueClient = GetQueueClient();
        var message = queueClient.Receive();

        Console.WriteLine("Received a message: " + message.GetBody<string>());
    }
    catch (Exception ex)
    {
        Console.WriteLine("An exception occured: " + ex.Message);
    }
}

private static QueueClient GetQueueClient(ReceiveMode receiveMode = ReceiveMode.ReceiveAndDelete)
{
    const string queueName = "stockchangerequest";
    var connectionString = ConfigurationManager.AppSettings["Microsoft.ServiceBus.ConnectionString"];
    var queueClient = QueueClient.CreateFromConnectionString(connectionString, queueName, receiveMode);
    queueClient.RetryPolicy = new RetryExponential(TimeSpan.FromSeconds(5), TimeSpan.FromSeconds(30), 10);
    return queueClient;
}

Program will now receive a message, parse body as string and output it on console. But messages should be read as they appear, so there need to be some kind of a loop. It will be also nice if it wouldn’t block the main thread.

static async Task GetMessage()
{
    var queueClient = GetQueueClient();

    while (true)
    {
        try
        {
            var message = await queueClient.ReceiveAsync();

            Console.WriteLine("Received a message: " + message.GetBody<string>());
        }
        catch (Exception ex)
        {
            Console.WriteLine("An exception occured: " + ex.Message);
        }
    }
}

Now GetMessage can be run in a separate thread and will read messages endlessly even if an error occurs. This is ok, but in order to process large amount of messages it’s better to handle messages in batches with ReceiveBatchAsync method.

Why choosing right receive mode is important

getting-messages-ReceiveAndDelete

You may have noticed, that when creating a queue client I set receive mode to ReceiveAndDelete. This is a receiving mode that is faster, but less safe. In this mode when message is received by the client it is instantly taken out of the queue and it doesn’t exists there any more. This is now up to the client to process it properly so that in case of error or system shut down, no data will be lost. In distributed systems there is always a risk, that a server will temporary lost connection to any resource and message will not be processed, therefore it should somehow be recreated in a queue. This can be done with ScheduleMessageAsync method, that will put a brokered message on a queue with a delay, but system should know, that this message is in the queue for the second time. There is a message property called DeliveryCount that basically says that, but it cannot be set manually and will not be incremented when putting a message with ScheduleMessageAsync. When DeliveryCount will reach 10, message will be moved to dead letter queue by default. This is useful, cause message such as that will not be hanging in a queue for ever. So to have the same functionality you will have to implement your custom old messages handling mechanism.

PeekLock to the rescue

There is a simpler way to do it – PeelLock receive mode. This receive mode is slower, but provides safety and persistence. In this mode when message is retrieved be a client it stays in a queue, but is locked for others client to read. When the lock expires, the message will become available for other consumers. When client successfully processed the message it has to notify the queue that processing is completed and when it fails, it should abandon the messages. Abandoned messages goes back to the queue with incremented DeliveryCount.

getting-messages-PeekLock

This is what the code looks like:

static async Task GetMessagesWithPeekLock()
{
    var queueClient = GetQueueClient(ReceiveMode.PeekLock);

    while (true)
    {
        try
        {
            var messages = await queueClient.ReceiveBatchAsync(50);

            try
            {
                // processing
                foreach (var message in messages)
                {
                    Console.WriteLine("Received a message: " + message.GetBody<string>());
                }

                await queueClient.CompleteBatchAsync(messages.Select(m => m.LockToken));
            }
            catch (Exception e)
            {
                Console.WriteLine("An exception occured while processing: " + e.Message);
                foreach (var message in messages)
                {
                    await queueClient.AbandonAsync(message.LockToken);
                }
            }
        }
        catch (Exception ex)
        {
            Console.WriteLine("An exception occured: " + ex.Message);
        }
    }
}

This code is a bit slower then using ReceiveBatch with ReceiveAndDelete mode, but it’s much much faster then receiving message one by one. You probably noticed that there are to try-catch blocks. This is because first ensures as that there is a inifinite loop even if a connection problem occurs and second one is to catch exceptions while processing. When something goes wrong there, all messages will be abandoned and will return to the queue, regardless if they were processed or not. This of course can be improved when we can process messages one by one and abandon only those, that were not processed. The most important thing here is that this implementation is safe and no data will be lost.

Sending messages to Azure Service Bus queue

To connect to Azure Service Bus you need to import nuget package: WindowsAzure.ServiceBus. Next step would be getting a connection string to your resource group. It can be found in Azure Portal, in Service Bus section.

It should look like this:

azure-connection-string

Copy connection string – primary key and paste it in App.config file. A key like this:

should already be generated when you imported the package.

    using Microsoft.ServiceBus.Messaging;
    using System.Configuration;

    class Program
    {
        static void Main(string[] args)
        {
            var queueName = "stockchangerequest";
            var connectionString = ConfigurationManager.AppSettings["Microsoft.ServiceBus.ConnectionString"];
            var queueClient = QueueClient.CreateFromConnectionString(connectionString, queueName);

            queueClient.Send(new BrokeredMessage("This is a test message content"));
        }
    }

Only few lines of code let you send  message to a queue. However, what if something goes wrong? This code can also be written asynchronous, so that sending a message would not block current thread. I’ll also add a try catch block with logging.

    using Microsoft.ServiceBus.Messaging;
    using System;
    using System.Configuration;
    using System.Threading.Tasks;

    class Program
    {
        static void Main(string[] args)
        {
            Task.Run(SendMessageAsync).GetAwaiter().GetResult();
        }

        static async Task SendMessageAsync()
        {
            try
            {
                var queueName = "stockchangerequest";
                var connectionString = ConfigurationManager.AppSettings["Microsoft.ServiceBus.ConnectionString"];
                var queueClient = QueueClient.CreateFromConnectionString(connectionString, queueName);

                await queueClient.SendAsync(new BrokeredMessage("This is a test message content"));
            }
            catch (Exception ex)
            {
                Console.WriteLine("An exception occured: " + ex.Message);
            }
        }
    }

Transient error and retry policy

This is an OK code. However, connecting to remote server such as Azure Service Bus will fail from time to time. Those situations are called transient, because they last for a very small amount of time. No matter how rarely it may occur or how fast it will be up, code have to prepared for that. In Azure Service Bus there is a mechanism implemented to cope with those problems – a retry policy.

Retry policies allows you to execute some operations repeatedly if an error occured. There are two types of retry policy: linear and exponential. Linear retry policy retries an operation periodically with same backoff period. An exponential retry policy execute operations again typically multiplying previous waiting time. Let’s see how it can be implemented.

queueClient.RetryPolicy = new RetryExponential(TimeSpan.FromSeconds(5), TimeSpan.FromSeconds(30), 10);

This line meas that if there will be any problems with connection to Azure Service Bus queue client will seamlessly try again after waiting between 5 and 30 seconds and that wait time will grow exponentially.

More about good practices and patterns you can find in this amazing Microsoft article.

.Net Framework also provides NoRetry policy and gives you RetryPolicy base class to implement your own policy.

One thing also need mentioning. For sending large amount of messages, you can use SendBatch and SendBatchAsync.

How to prevent ASP.Net api from going to sleep

Web Api is a framework to build HTTP based services, especially RESTful apis. It is designed to build request triggered action, where system will be ready to do some work when receiving a request. If it’s not asked, it shouldn’t do anything and in a while it will go to sleep.

Problem starts when you’re planning to execute some background jobs. Even if you start a background thread on application start it will go asleep along with application. When planning actions executed in pre-scheduled intervals I would strongly suggest to use an external tool, like Hangfire. For other things like listening messages you can configure your asp.net application properly.

What you need to set in IIS:

  • In Application Pool for your app, set startMode to AlwaysRunning
  • In Application Pool for your app, set idleTimeout to 0
  • In you app, set preloadEnabled to True

This of course can also be set in applicationHost.config.

You can find your applicationHost.config file in C:\Windows\System32\inetsrv\config\ directory. Then you need to edit:

<applicationPools>
	<add name="StockExample" autoStart="true" managedRuntimeVersion="v4.0" startMode="AlwaysRunning">
		<processModel idleTimeout="00:00:00" />
    </add>
</applicationPools>

<site name="StockExample.Api" id="12006" serverAutoStart="true">
    <application path="/" applicationPool="StockExample">
		<virtualDirectory path="/" physicalPath="C:\sources\blog\StockExample" />
    </application>
    <applicationDefaults preloadEnabled="true" />
</site>

Azure Service Bus – introduction

Azure Service Bus is a Microsoft implementation of a messaging system, that works seamlessly in the cloud and does not require to set up a server of any kind. Messaging is a good alternative for communication between micro-services. Let’s compare the two.

REST communication

service-bus-communication

  • contract constrains may be a risk
  • synchronous model be default
  • load balancing is harder

Messaging communication

REST-communication

  • asynchronous
  • easy for load balancing, can have multiple competing readers
  • fire and forget

Using messages for communication is much more elastic in planning architecture. You can add move receivers and more senders at will. It’s a fire and forget model, when you do not care when message will be processed and you don’t need to worry how it will reach the receiver – your messaging system will care about it for you.

Azure Service Bus

To explore Service Bus options, go to your Azure portal and search for Service Bus.

service-bus-search


Go inside and you’ll need to create of choose a namespace. Namespaces can be useful when you would like to group multiple queries or topics for example by different contexts. It’s much easier to browse through them when you have for example all orders related queues in a orders namespace. Inside the namespace you’ll see list of your queues and topics.

topics-and-queues


Queues

Queue is a FIFO (First In, First out) is a messages delivery to one or more competing consumers.  Each message is received and processed by only one consumer and messaging system centrally manage this process,  so no deadlock will occur.

queue

It is expected that messages are processed in the same order which they arrived. Messages however do not have to be processed right away when they arrived. They can wait safely in the queue for first free consumer. With possibility of having multiple consumers is in very easy to balance load and add new consumers in the infrastructure, so messages will be processed faster. This is of course with an assumption that messages can be processed independently and do not relate to one another. Another key feature is that work of consumers do not affect work done by publisher. During heavy load or high usage of the system messages will be stored in the queue and consumers will not be overloaded with multiple call as it is in REST services, but continue to work and process messages with the same speed as usual.

In Azure Service Bus queues size of a queue can be huge, even up to 16GB. Message size limit is rather small – maximum of 256KB. However sessions support allows creation of unlimited-size sequences of related messages.

Topics

topic


Comparing to queue where only one consumer is processing a message, in topics messages are cloned in to subscriptions, which contains the same messages. This represents one-to-many form of communication in a publish/subscribe pattern. The subscriptions can use additional filters to restrict the messages that they want to receive. Messages can be filtered by their attributes, where published can for example set recipient who should receive that message. Consumers instead of connecting directly to topic, connects to a subscriptions, that can be understood as a virtual queue. The same way as queues, subscriptions can have multiple competing consumers and this gives even more possibilities to plan services architecture.

An example usage a topic can be for example notifications about product stock status changed. Topic where messages are sent can have multiple subscriptions each filtering messages according to their needs. One may need all updates but other may be interested only in digital products like games. With SqlFilterExpression class filter rule can look like this:

ProductType = ‘Digital’ AND QuantityForSale > 0

Queues, topics and subscriptions gives a lot possibilities and are easier to scale and adapt in the future. Comparing to REST services they are slightly more complicated to implement, needs centralized system but offers much more in return.

Getting Azure subscription

There are a couple of ways you can get access to Azure services. You might get it from work or with BizSpark program. However, if you want to get it for free, just go to Azure website and start a trial.


azure-getting-started

After couple of minutes of configuration you will have full functional Azure environment with vast variety of options, overwhelming at first. Feel free to browse and explore what you can do with it. In the next blog posts I’ll try to bring up closer some of the options.

azure-dashboard-net