I want to make 1000 requests! How can I make it really fast? Let’s have a look at 4 approaches and compare their speed.
Preparations
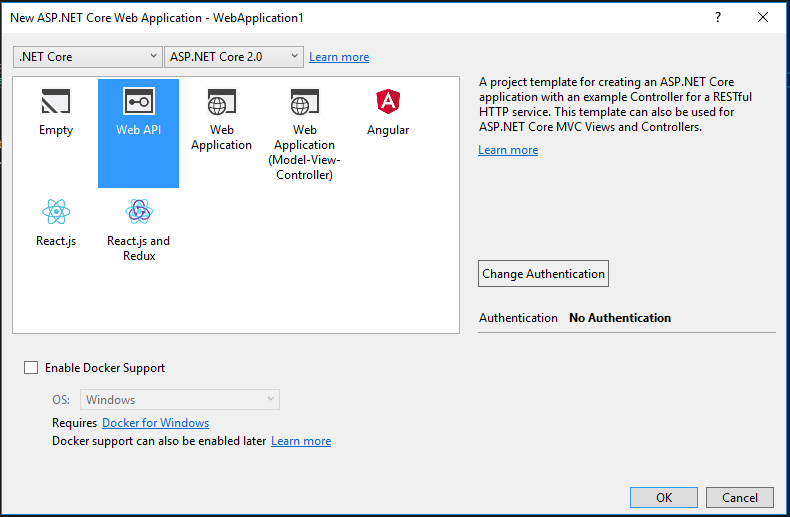
In order to test different methods of handling requests, I created a very simple ASP.Net Core API, that return user by his id. It fetches them from plain old MSSQL database.

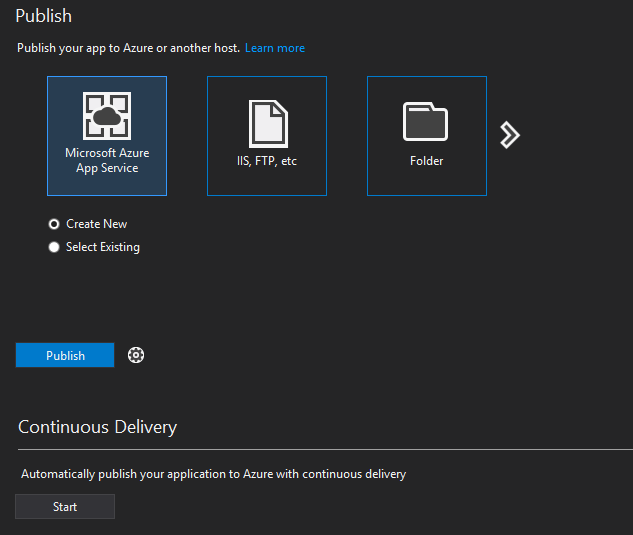
I deployed it quickly to Azure using App services and it was ready for testing in less than two hours. It’s amazing how quickly a .net core app can be deployed and tested in a real hosting environment. I was also able to debug it remotely and check it’s work in Application Insights.
Here is my post on how to build an app and deploy it to Azure: https://www.michalbialecki.com/2017/12/21/sending-a-azure-service-bus-message-in-asp-net-core/
And a post about custom data source in Application Insights: https://www.michalbialecki.com/2017/09/03/custom-data-source-in-application-insights/
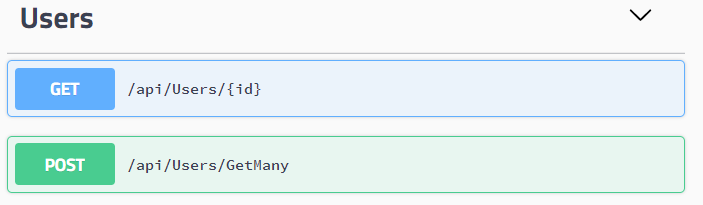
API in a swagger looks like this:

So the task here is to write a method, that would call this endpoint and fetch 1000 users by their ids as fast as possible.
I wrapped a single call in a UsersClient class:
    public class UsersClient
    {
        private HttpClient client;

        public UsersClient()
        {
            client = new HttpClient();
        }

        public async Task<UserDto> GetUser(int id)
        {
            var response = await client.GetAsync(
                "http://michalbialeckicomnetcoreweb20180417060938.azurewebsites.net/api/users/" + id)
                .ConfigureAwait(false);
            var user = JsonConvert.DeserializeObject<UserDto>(await response.Content.ReadAsStringAsync());

            return user;
        }
    }
#1 Let’s use asynchronous programming
Asynchronous programming in C# is very simple, you just use async / await keywords in your methods and magic happens.
    public async Task<IEnumerable<UserDto>> GetUsersSynchrnously(IEnumerable<int> userIds)
    {
        var users = new List<UserDto>();
        foreach (var id in userIds)
        {
            users.Add(await client.GetUser(id));
        }

        return users;
    }
Score: 4 minutes 51 seconds
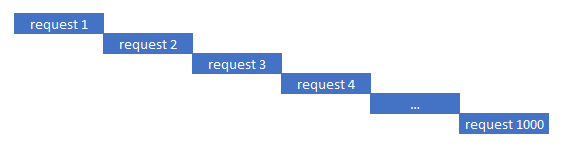
This is because although it is asynchronous programming, it doesn’t mean requests are done in parallel. Asynchronous means requests will not block the main thread, that can go further with the execution. If you look at how requests are executed in time, you will see something like this:
Let’s run requests in parallel
Running in parallel is the key here because you can make many requests and use the same time that one request takes. The code can look like this:
    public async Task<IEnumerable<UserDto>> GetUsersInParallel(IEnumerable<int> userIds)
    {
        var tasks = userIds.Select(id => client.GetUser(id));
        var users = await Task.WhenAll(tasks);

        return users;
    }
WhenAll is a beautiful creation that waits for tasks with the same type and returns a list of results. A drawback here would be an exception handling because when something goes wrong you will get an AggregatedException with possibly multiple exceptions, but you would not know which task caused it.
Score: 28 seconds
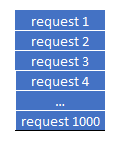
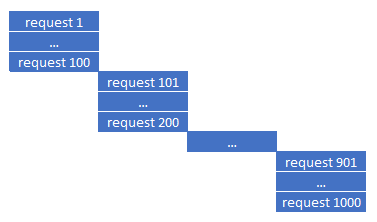
This is way better than before, but it’s not impressive. The thing that slows down the process is thread handling. Executing 1000 requests at the same time will try to create or utilize 1000 threads and managing them is a cost. Timeline looks like this:
Let’s run requests in parallel, but smarter
The idea here is to do parallel requests, but not all at the same time. Let’s do it batches for 100.
    public async Task<IEnumerable<UserDto>> GetUsersInParallelFixed(IEnumerable<int> userIds)
    {
        var users = new List<UserDto>();
        var batchSize = 100;
        int numberOfBatches = (int)Math.Ceiling((double)userIds.Count() / batchSize);

        for(int i = 0; i < numberOfBatches; i++)
        {
            var currentIds = userIds.Skip(i * batchSize).Take(batchSize);
            var tasks = currentIds.Select(id => client.GetUser(id));
            users.AddRange(await Task.WhenAll(tasks));
        }

        return users;
    }
Score: 20 seconds
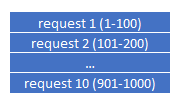
This is the slightly better result because framework needs to handle fewer threads at the same time and therefore it is more effective. You can manipulate the batch size and figure out what is best for you. Timeline looks like this:
The proper solution
The proper solution needs some modifications in the API. You won’t always have the ability to change the API you are calling, but only changes on both sides can get you even further. It is not effective to fetch users one by one when we need to fetch thousands of them. To further enhance performance we need to create a specific endpoint for our use. In this case – fetching many users at once. Now swagger looks like this:
and code for fetching users:
    public async Task<IEnumerable<UserDto>> GetUsers(IEnumerable<int> ids)
    {
        var response = await client
            .PostAsync(
                "http://michalbialeckicomnetcoreweb20180417060938.azurewebsites.net/api/users/GetMany",
                new StringContent(JsonConvert.SerializeObject(ids), Encoding.UTF8, "application/json"))
            .ConfigureAwait(false);

        var users = JsonConvert.DeserializeObject<IEnumerable<UserDto>>(await response.Content.ReadAsStringAsync());

        return users;
    }
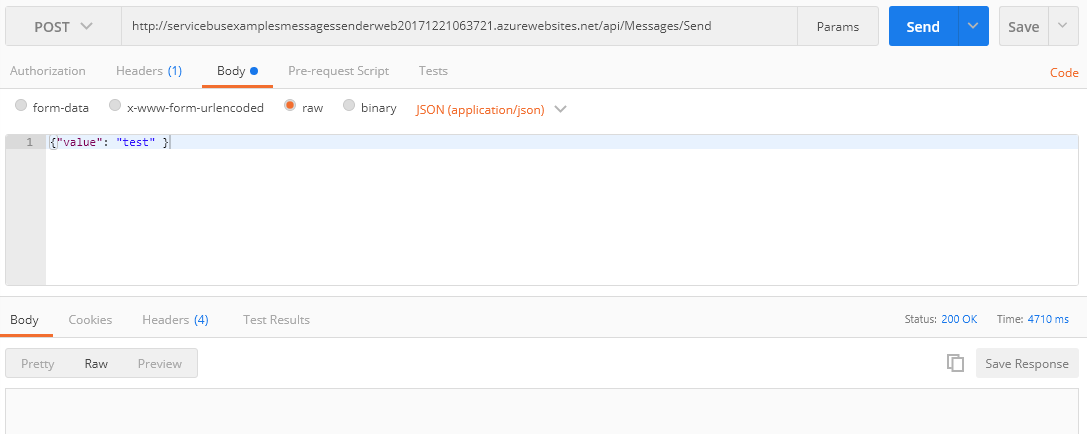
Notice that endpoint for getting multiple users is a POST. This is because payload we send can be big and might not fit in a query string, so it is a good practice to use POST in such a case.
Code that would fetch users in batches in parallel looks like this:
    public async Task<IEnumerable<UserDto>> GetUsersInParallelInWithBatches(IEnumerable<int> userIds)
    {
        var tasks = new List<Task<IEnumerable<UserDto>>>();
        var batchSize = 100;
        int numberOfBatches = (int)Math.Ceiling((double)userIds.Count() / batchSize);

        for (int i = 0; i < numberOfBatches; i++)
        {
            var currentIds = userIds.Skip(i * batchSize).Take(batchSize);
            tasks.Add(client.GetUsers(currentIds));
        }

        return (await Task.WhenAll(tasks)).SelectMany(u => u);
    }
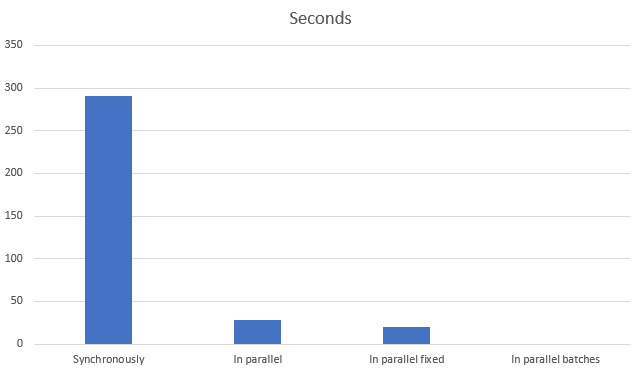
Score: 0,38 seconds
Yes, less than one second! On a timeline it looks like this:
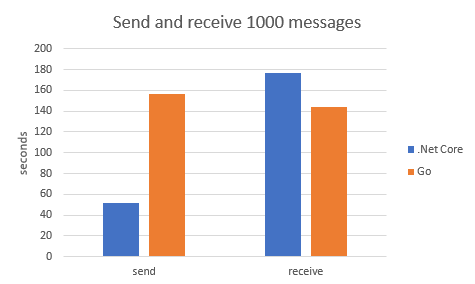
Comparing to other methods on a chart, it’s not even there:
How to optimize your requests
Have in mind, that every case is different and what works for one service, does not necessarily need to work with the next one. Try different things and approaches, find methods to measure your efforts.
Here are a few tips from me:
- Remember that the biggest cost is not processor cycles, but rather IO operations. This includes SQL queries, network operations, message handling. Find improvements there.
- Don’t start with parallel processing in the beginning as it brings complexity. Try to optimize your service by using hashsets or dictionaries instead of lists
- Use smallest Dtos possible, serialize only those fields you actually use
- Implement an endpoint suited to your needs
- Use caching if applicable
- Try different serializers instead of Json, for example ProfoBuf
- When it is still not enough… – try different architecture, like push model architecture or maybe actor-model programming, like Microsoft Orleans: https://www.michalbialecki.com/2018/03/05/getting-started-microsoft-orleans/
You can find all code posted here in my github repo: https://github.com/mikuam/Blog.
Optimize and enjoy 🙂
 There’s one little trick to it. Notice I used \r character, that moves caret back to the beginning of the line, where next write overrides last one. It’s a simple animation!

 Cool, isn’t it? With your imagination and thousands of Unicode characters possibilities are limitless.
 Colorful.Console overrides original console, so it does have all existing methods, but it extends original object with new possibilities. This is important, because you can start using this console in your old code, but introduce color only where you want it.
So let’s do some animation with color. This is super easy and a lot of fun.
Colorful.Console overrides original console, so it does have all existing methods, but it extends original object with new possibilities. This is important, because you can start using this console in your old code, but introduce color only where you want it.
So let’s do some animation with color. This is super easy and a lot of fun.
 This nuget package offers even more, like colorful text. You can use ASCII fonts to write text. You can download fonts here – there are plenty.
With a little code:
This nuget package offers even more, like colorful text. You can use ASCII fonts to write text. You can download fonts here – there are plenty.
With a little code:
 Full tutorial is available here: http://colorfulconsole.com/
All code posted here is available on my github repository: https://github.com/mikuam/Blog/tree/master/ServiceBusExamples/MichalBialecki.com.ConsoleAppMagic
Enjoy and make exciting and amusing code 🙂
Full tutorial is available here: http://colorfulconsole.com/
All code posted here is available on my github repository: https://github.com/mikuam/Blog/tree/master/ServiceBusExamples/MichalBialecki.com.ConsoleAppMagic
Enjoy and make exciting and amusing code 🙂