Unit test are crucial part in software development process. In late 1990s Kent Beck stated that writing tests is the most important part of writing software in ExtremeProgramming metodology. You can read a bit more about it in Martins Fowler article.
This is a part of a series of articles about writing a perfect console application in .net core 2. Feel free to read more:
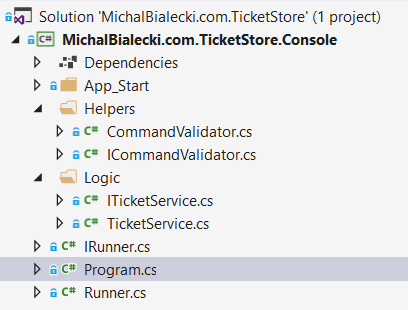
To have a simple example how to add tests to .net core console application I created a TicketStore app. It is a console app to reserve tickets in cinema. It’s structure looks like this:
Here is how command handling looks like:
    command = Console.ReadLine();
    if (!_commandValidator.IsValid(command))
    {
        Console.WriteLine($"Sorry, command: '{command}' not recognized.");
    }
And CommandValidator looks like this:
As you noticed validator contains regular expression and parsing logic, that can always be faulty. We only allow a column to be from A to H and seat to be between 1 and 15. Let’s add unit test to be sure that it works that way.
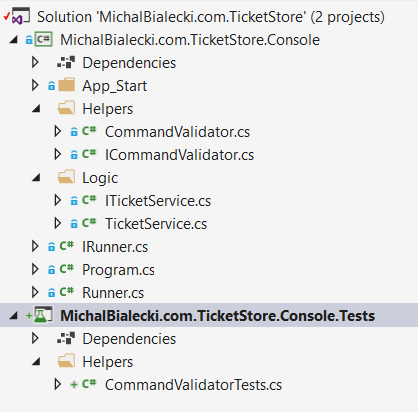
Adding tests project
Adding a test project
Project name that I would like to test is MichalBialecki.com.TicketStore.Console so I need to add a class library with name MichalBialecki.com.TicketStore.Console.Tests.
Adding unit tests packages
To write unit tests I’m adding my favourite packages:
NUnit – unit test framework
NUnit3TestAdapter – package to run tests
NSubstitute – mocking framework
Microsoft.NET.Test.Sdk – it’s important to remember about this one, tests would not run without it
Now we can start writing tests.
First test
I added a CommandValidatorTests and now my project structure looks like this:
And test looks like this.
    using MichalBialecki.com.TicketStore.Console.Helpers;
    using NUnit.Framework;

    [TestFixture]
    public class CommandValidatorTests
    {
        private CommandValidator _commandValidator;

        [SetUp]
        public void SetUp()
        {
            _commandValidator = new CommandValidator();
        }

        [TestCase("A1", true)]
        [TestCase("A15", true)]
        [TestCase("A11", true)]
        [TestCase("H15", true)]
        [TestCase("H16", false)]
        [TestCase("K15", false)]
        [TestCase("I4", false)]
        [TestCase("K.", false)]
        [TestCase("", false)]
        [TestCase(null, false)]
        public void IsValid_GivenCommand_ReturnsExpectedResult(string command, bool expectedResult)
        {
            // Arrange & Act
            var result = _commandValidator.IsValid(command);

            // Assert
            Assert.AreEqual(expectedResult, result);
        }
    }
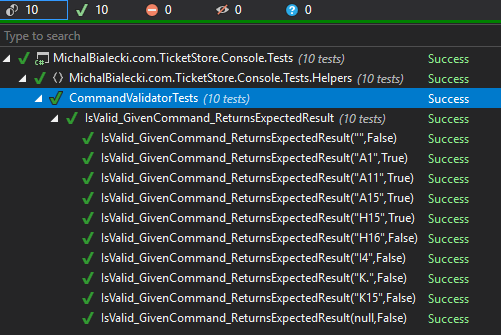
In Resharper unit tests sessions window all tests passed.
Notice how test results are shown – everything is clear from the first sight. You can immidiately see what method is tested and with what conditions.
It may seem that when creating a console application we are doomed to use statics all over the code. Well.. we’re not! I’ll show you how to set up dependency injection and use it.
This is a part of a series of articles about writing a perfect console application in .net core 2. Feel free to read more:
There are many packages that can provide dependency injection, but I chose SimpleInjector, because I know it well. It’s also quite fast, according to Daniel Palme’s article. Here is how whole calss looks like:
    using System.Linq;

    using SimpleInjector;

    public static class ContainerConfig
    {
        private static Container Container;

        public static void Init()
        {
            Container = new Container();

            RegisterAllTypesWithConvention();

            Container.Verify();
        }

        public static TService GetInstance<TService>() where TService : class
        {
            return Container.GetInstance<TService>();
        }

        private static void RegisterAllTypesWithConvention()
        {
            var typesWithInterfaces = typeof(Program).Assembly.GetExportedTypes()
                .Where(t => t.Namespace.StartsWith("MichalBialecki.com.TicketStore"))
                .Where(ts => ts.GetInterfaces().Any() && ts.IsClass).ToList();
            var registrations = typesWithInterfaces.Select(ti => new
                {
                    Service = ti.GetInterfaces().Single(), Implementation = ti
                });

            foreach (var reg in registrations)
            {
                Container.Register(reg.Service, reg.Implementation, Lifestyle.Singleton);
            }
        }
    }
Notice RegisterAllTypesWithConvention method – it is the way to register all interface implementations, that follows a simple naming convention. When interface will have an additional I in the name comparing to it’s class implementation, then it will be automatically registered. No need to remember about such silly things now!
This is one of the proof of concent that I did at work. The idea was to add another Service Bus application to an existing solution, instead of starting a whole new micro-service. It was a lot faster just to add another .net core console application, but setting up Service Fabric cluster always brings some unexpected experiences.
What are my requirements:
everything has to be written in .Net Core
reading Service Bus messages is placed in a new console application
logging has to be configured
dependency injection needs to be configured
reading Service Bus messages needs to be registered in stateless service
Let’s get to work!
The entry point in console application
Console application are a bit specific. In most cases, we write console applications that are small and doesn’t require dependency injection or logging, apart from that to the console. But here I want to build a professional console application, that is not run once, but is a decent part of a bigger thing that we would need to maintain in the future.
The specific thing about console applications is that they have Main method and this method is run instantly after the execution and everything that you’d like to do, has to be there. That means, that both configuration and execution of an app needs to be in this one method. Let’s see how the code looks like:
Here is a place where I configure IoC container. It has to be done here, cause only when registering a Service Fabric service, we have an instance of StatelessServiceContext, that we need later.
Configuring IoC container
In order to have container implementation provided by the framework, just install Microsoft.Extensions.DependencyInjection nuget package. ContainerConfig class, in this case, looks like this:
    public static class ContainerConfig
    {
        private static ServiceProvider ServiceProvider;

        public static void Init(
            StatelessServiceContext context,
            IConfigurationRoot configuration)
        {
            ServiceProvider = new ServiceCollection()
                .AddLogging()
                .AddSingleton(context)
                .AddSingleton<ServiceBusStatelessService>()
                .AddSingleton<IServiceBusCommunicationListener, ServiceBusCommunicationListener>()
                .AddSingleton<IConfigurationRoot>(configuration)
                .BuildServiceProvider();
        }

        public static TService GetInstance<TService>() where TService : class
        {
            return ServiceProvider.GetService<TService>();
        }
    }
Adding a stateless service
In Program class I registered ServiceBusStatelessService class, that looks like this:
    public class ServiceBusStatelessService : StatelessService
    {
        private readonly IServiceBusCommunicationListener _serviceBusCommunicationListener;

        public ServiceBusStatelessService(StatelessServiceContext serviceContext, IServiceBusCommunicationListener serviceBusCommunicationListener)
            : base(serviceContext)
        {
            _serviceBusCommunicationListener = serviceBusCommunicationListener;
        }

        protected override IEnumerable<ServiceInstanceListener> CreateServiceInstanceListeners()
        {
            yield return new ServiceInstanceListener(context => _serviceBusCommunicationListener);
        }
    }
ServiceBusStatelessService inherits from StatelessService and provides an instance of Service Bus listener. It looks like this:
    public class ServiceBusCommunicationListener : IServiceBusCommunicationListener
    {
        private readonly IConfigurationRoot _configurationRoot;
        private readonly ILogger _logger;

        private SubscriptionClient subscriptionClient;

        public ServiceBusCommunicationListener(IConfigurationRoot configurationRoot, ILoggerFactory loggerFactory)
        {
            _logger = loggerFactory.CreateLogger(nameof(ServiceBusCommunicationListener));
            _configurationRoot = configurationRoot;
        }

        public Task<string> OpenAsync(CancellationToken cancellationToken)
        {
            var sbConnectionString = _configurationRoot.GetConnectionString("ServiceBusConnectionString");
            var topicName = _configurationRoot.GetValue<string>("Settings:TopicName");
            var subscriptionName = _configurationRoot.GetValue<string>("Settings:SubscriptionName");

            subscriptionClient = new SubscriptionClient(sbConnectionString, topicName, subscriptionName);
            subscriptionClient.RegisterMessageHandler(
                async (message, token) =>
                {
                    var messageJson = Encoding.UTF8.GetString(message.Body);
                    // process here

                    Console.WriteLine($"Received message: {messageJson}");

                    await subscriptionClient.CompleteAsync(message.SystemProperties.LockToken);
                },
                new MessageHandlerOptions(LogException)
                    { MaxConcurrentCalls = 1, AutoComplete = false });

            return Task.FromResult(string.Empty);
        }

        public Task CloseAsync(CancellationToken cancellationToken)
        {
            Stop();

            return Task.CompletedTask;
        }

        public void Abort()
        {
            Stop();
        }

        private void Stop()
        {
            subscriptionClient?.CloseAsync().GetAwaiter().GetResult();
        }

        private Task LogException(ExceptionReceivedEventArgs args)
        {
            _logger.LogError(args.Exception, args.Exception.Message);

            return Task.CompletedTask;
        }
    }
Notice, that all the work is done in OpenAsync method, that is run only once. In here I just register standard message handler, that reads from a Service Bus Subscription.
Configure Service Fabric cluster
All Service Fabric configuration is done in xml files. This can cause a huge headache when trying to debug and find errors, cause the only place you can find fairly useful information is console window.
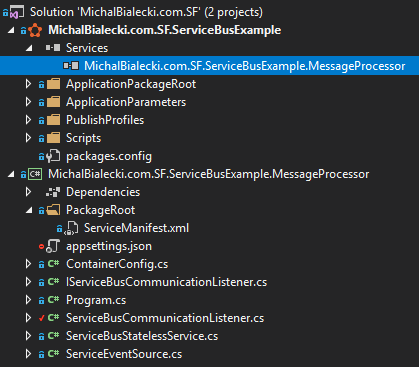
It starts with adding a reference in SF project to a console application.
Next this is to have right name in console application ServiceManifest.xml
<?xml version="1.0" encoding="utf-8"?>
<ServiceManifest Name="MichalBialecki.com.SF.ServiceBusExample.MessageProcessorPkg"
                 Version="1.0.0"
                 xmlns="http://schemas.microsoft.com/2011/01/fabric"
                 xmlns:xsd="http://www.w3.org/2001/XMLSchema"
                 xmlns:xsi="http://www.w3.org/2001/XMLSchema-instance">
  <ServiceTypes>
    <!-- This is the name of your ServiceType.
         This name must match the string used in the RegisterServiceAsync call in Program.cs. -->
    <StatelessServiceType ServiceTypeName="MichalBialecki.com.SF.ServiceBusExample.MessageProcessorType" />
  </ServiceTypes>

  <!-- Code package is your service executable. -->
  <CodePackage Name="Code" Version="1.0.0">
    <EntryPoint>
      <ExeHost>
        <Program>MichalBialecki.com.SF.ServiceBusExample.MessageProcessor.exe</Program>
        <WorkingFolder>CodePackage</WorkingFolder>
      </ExeHost>
    </EntryPoint>
  </CodePackage>
</ServiceManifest>
Notice that ServiceTypeName has the same value as provided when registering a service in Program class.
Next place to set-up things is ApplicationManifest.xml in SF project.
<?xml version="1.0" encoding="utf-8"?>
<ApplicationManifest xmlns:xsd="http://www.w3.org/2001/XMLSchema" xmlns:xsi="http://www.w3.org/2001/XMLSchema-instance" ApplicationTypeName="MichalBialecki.com.SF.ServiceBusExampleType" ApplicationTypeVersion="1.0.0" xmlns="http://schemas.microsoft.com/2011/01/fabric">
  <Parameters>
    <Parameter Name="InstanceCount" DefaultValue="1" />
  </Parameters>
  <!-- Import the ServiceManifest from the ServicePackage. The ServiceManifestName and ServiceManifestVersion
       should match the Name and Version attributes of the ServiceManifest element defined in the
       ServiceManifest.xml file. -->
  <ServiceManifestImport>
    <ServiceManifestRef ServiceManifestName="MichalBialecki.com.SF.ServiceBusExample.MessageProcessorPkg" ServiceManifestVersion="1.0.0" />
    <ConfigOverrides />
  </ServiceManifestImport>
  <DefaultServices>
    <!-- The section below creates instances of service types, when an instance of this
         application type is created. You can also create one or more instances of service type using the
         ServiceFabric PowerShell module.

         The attribute ServiceTypeName below must match the name defined in the imported ServiceManifest.xml file. -->
    <Service Name="MichalBialecki.com.SF.ServiceBusExample.MessageProcessor" ServicePackageActivationMode="ExclusiveProcess">
      <StatelessService ServiceTypeName="MichalBialecki.com.SF.ServiceBusExample.MessageProcessorType" InstanceCount="[InstanceCount]">
        <SingletonPartition />
      </StatelessService>
    </Service>
  </DefaultServices>
</ApplicationManifest>
There are a few things you need to remember:
ServiceManifestName has the same value as ServiceManifest in ServiceManifest.xml in console app
ServiceTypeName type is the same as ServiceTypeName in ServiceManifest.xml in console app
MichalBialecki.com.SF.ServiceBusExample.MessageProcessor service has to be configured as StatelessService
Here is a proof that it really works:
That’s it, it should work. And remember that when it doesn’t, starting the whole thing again and build every small code change isn’t crazy idea 🙂
Imagine you are a Junior .Net Developer and you just started your development career. You got your first job and you are given a task – write unit tests!
Nothing to worry about, since you got me. I’ll show you how things are done and what are the best practices to follow.
Introduction
Writing unit tests is crucial to develop high-quality software and maintain it according to business requirements. Tests are the tool for developer to quickly check a small portion of code and ensure that it does what it should. In many cases tests can be unnecessary, requiring maintenance, without any gained value. However, writing tests is a standard and art that every developer should master.
Note, that writing unit tests is easy only when the code to test is written in a correct way. When methods are short, do a single thing and don’t have many dependencies, they are easy to test.
To write unit tests in this post I’ll use NUnit and NSubstitute. Those are two very popular nuget packages, that you can easily find. All code will be written in .Net Core.
Following the AAA pattern
The AAA (Arrange, Act, Assert) unit test writing pattern divides every test into 3 parts:
Arrange – in this part, you prepare data and mocks for a test scenario
Act – executing a single action that we want to test
Assert – checking whether expectations are met and mocks were triggered
Let’s have a look at a simple code, that we will test:
    public class ProductNameProvider : IProductNameProvider
    {
        public string GetProductName(string id)
        {
            return "Product " + id;
        }
    }
And a simple test would look like this:
    [TestFixture]
    public class ProductNameProviderTests
    {
        [Test]
        public void GetProductName_GivenProductId_ReturnsProductName()
        {
            // Arrange
            var productId = "1";
            var productNameProvider = new ProductNameProvider();

            // Act
            var result = productNameProvider.GetProductName(productId);

            // Assert
            Assert.AreEqual("Product " + productId, result);
        }
    }
This is a simple test, that checks whether the result is correct. There is a TestFixture attribute, that indicates, that this class contains a group of tests. a Test attribute marks a single test scenario.
in Arrange part we prepare productNameProvider and parameters
in Act there is only a single line where we execute GetProductName, which is a testing method
in Assert we use Assert.AreEqual to check the result. Every test needs to have at least one assertion. If any of the assertions fails, the whole test will fail
Test edge-cases
What you could see in an example above is a happy-path test. It tests only an obvious scenario. You should test code when a given parameter is not quite what you expect. The idea of that kind of tests is perfectly described in this tweet:
Let’s see an example with a REST API controller method. First, let’s see code that we would test:
    [Route("api/[controller]")]
    [ApiController]
    public class ProductsController : ControllerBase
    {
        private readonly IProductService _productService;
        private readonly ILogger _logger;

        public ProductsController(IProductService productService, ILoggerFactory loggerFactory)
        {
            _productService = productService;
            _logger = loggerFactory.CreateLogger(nameof(ProductsController));
        }

        [HttpPost]
        public string Post([FromBody] ProductDto product)
        {
            _logger.Log(LogLevel.Information, $"Adding a products with an id {product.ProductId}");

            var productGuid = _productService.SaveProduct(product);

            return productGuid;
        }
    }
This is a standard Post method, that adds a product. There are some edge-cases though, that we should test, but first let’s see how happy-path test would look like.
    [TestFixture]
    public class ProductsControllerTests
    {
        private IProductService _productService;
        private ILogger _logger;

        private ProductsController _productsController;

        [SetUp]
        public void SetUp()
        {
            _productService = Substitute.For<IProductService>();
            _logger = Substitute.For<ILogger>();
            var loggerFactory = Substitute.For<ILoggerFactory>();
            loggerFactory.CreateLogger(Arg.Any<string>()).Returns(_logger);

            _productsController = new ProductsController(_productService, loggerFactory);
        }

        [Test]
        public void Post_GivenCorrectProduct_ReturnsProductGuid()
        {
            // Arrange
            var guid = "af95003e-b31c-4904-bfe8-c315c1d2b805";
            var product = new ProductDto { ProductId = "1", ProductName = "Oven", QuantityAvailable = 3 };
            _productService.SaveProduct(product).Returns(guid);

            // Act
            var result = _productsController.Post(product);

            // Assert
            Assert.AreEqual(result, guid);
            _productService.Received(1).SaveProduct(product);
            _logger
                .Received(1)
                .Log(LogLevel.Information, 0, Arg.Is<FormattedLogValues>(v => v.First().Value.ToString().Contains(product.ProductId)), Arg.Any<Exception>(), Arg.Any<Func<object, Exception, string>>());
        }
    }
Notice that I added:
[SetUp]
public void SetUp()
SetUp method will be run before every test and can contain code that we would need to execute for every test. In my case, it is creating mocks and setting up some mocks as well. For example, I set up a logger in order to be able to test it later. I also specify, that my ILogger mock will be returned whenever I create a logger.
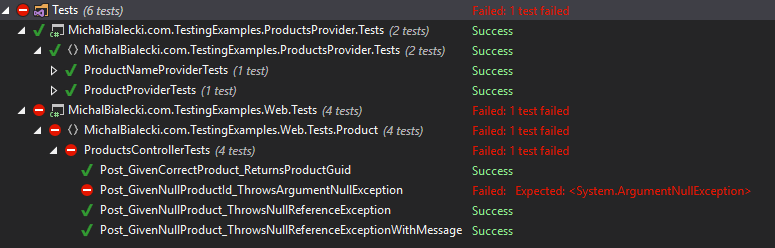
In one line we both act and assert. We can also check exception fields in next checks:
    [Test]
    public void Post_GivenNullProduct_ThrowsNullReferenceExceptionWithMessage()
    {
        // Act &  Assert
        var exception = Assert.Throws<NullReferenceException>(() => _productsController.Post(null));
        Assert.AreEqual("Object reference not set to an instance of an object.", exception.Message);
    }
The important part is to set Returns values for mocks in Arrange and check mocks in Assert with Received.
Test Driven Development
To be fair with you I need to admit that this controller method ist’s written in the best way. It should be async, have parameters validation and try-catch block. We could turn our process around a bit and write tests first, that would ensure how the method should behave. This concept is called Test Driven Development – TDD. It requires from developer to write tests first and sets acceptance criteria for code that needs to be implemented.
This isn’t the easiest approach. It also expects that we know all interfaces and contracts in advance. In my opinion, it’s not useful in real-life work, maybe with one exception. The only scenario I’d like to have tests first would be a refactoring of an old code, where we write one part of it anew. In this scenario, I would copy or write tests to ensure that new code works exactly the same as the old one.
Naming things
Important thing is to follow patterns that are visible in your project and stick to it. Naming things correctly might sound obvious and silly, but it’s crucial for code organization and it’s visibility.
First, let’s have a look at the project structure. Notice that all test projects are in Tests directory and names of those projects are same as projects they test plus “Tests”. Directories that tests are in are corresponding to those that we test, so that directory structure in both projects is the same. Test classes names are also the same.
Next thing is naming test scenarios. Have a look test results in Resharper window:
In this project, every class has its corresponding test class. Each test scenario is named in such pattern: [method name]_[input]_[expected result]. Only looking at the test structure I already know what method is tested and what this test scenario is about. Remember that the test scenario should be small and should test a separate thing if that’s possible. It doesn’t mean that when you test a mapper, you should have a separate scenario for every property mapped, but you might consider dividing those tests to have: happy-path test and all the edge cases.
That’s it! You are ready for work, so go and write your own tests:)
You can play with a code a bit, write more classes and tests. If you like this topic or you’d like to have some practical test assignment prepared to test yourself, please let me know:)
I recently was developing a console application in .net core, where I had to use log4net logging.
In the standard asp.net core approach we can use:
    public void Configure(IApplicationBuilder app, Microsoft.Extensions.Logging.ILoggerFactory loggerFactory)
    {
        loggerFactory.AddLog4Net();
    }
But this is .net core console application, where I’m creating LoggerFactory on my own, so it would not work.
In order to solve it, I had to implement my own Log4NetProvider, that would implement ILoggerProvider.
    public class Log4NetProvider : ILoggerProvider
    {
        private readonly string _log4NetConfigFile;

        private readonly bool _skipDiagnosticLogs;

        private readonly ConcurrentDictionary<string, ILogger> _loggers =
            new ConcurrentDictionary<string, ILogger>();

        public Log4NetProvider(string log4NetConfigFile, bool skipDiagnosticLogs)
        {
            _log4NetConfigFile = log4NetConfigFile;
            _skipDiagnosticLogs = skipDiagnosticLogs;
        }

        public ILogger CreateLogger(string categoryName)
        {
            return _loggers.GetOrAdd(categoryName, CreateLoggerImplementation);
        }

        public void Dispose()
        {
            _loggers.Clear();
        }

        private ILogger CreateLoggerImplementation(string name)
        {
            return new Log4NetLogger(name, new FileInfo(_log4NetConfigFile), _skipDiagnosticLogs);
        }
    }
And the implementation of an actual logger:
    public class Log4NetLogger : ILogger
    {
        private readonly string _name;

        private readonly ILog _log;

        private readonly bool _skipDiagnosticLogs;

        private ILoggerRepository _loggerRepository;

        public Log4NetLogger(string name, FileInfo fileInfo, bool skipDiagnosticLogs)
        {
            _name = name;
            _loggerRepository = LogManager.GetRepository(Assembly.GetEntryAssembly());
            _log = LogManager.GetLogger(_loggerRepository.Name, name);
            _skipDiagnosticLogs = skipDiagnosticLogs;

            log4net.Config.XmlConfigurator.Configure(_loggerRepository, fileInfo);
        }

        public IDisposable BeginScope<TState>(TState state)
        {
            return null;
        }

        public bool IsEnabled(LogLevel logLevel)
        {
            switch (logLevel)
            {
                case LogLevel.Critical:
                    return _log.IsFatalEnabled;
                case LogLevel.Debug:
                case LogLevel.Trace:
                    return _log.IsDebugEnabled && AllowDiagnostics();
                case LogLevel.Error:
                    return _log.IsErrorEnabled;
                case LogLevel.Information:
                    return _log.IsInfoEnabled && AllowDiagnostics();
                case LogLevel.Warning:
                    return _log.IsWarnEnabled;
                default:
                    throw new ArgumentOutOfRangeException(nameof(logLevel));
            }
        }

        public void Log<TState>(
            LogLevel logLevel,
            EventId eventId,
            TState state,
            Exception exception,
            Func<TState, Exception, string> formatter)
        {
            if (!IsEnabled(logLevel))
            {
                return;
            }

            if (formatter == null)
            {
                throw new ArgumentNullException(nameof(formatter));
            }

            string message = $"{formatter(state, exception)} {exception}";

            if (!string.IsNullOrEmpty(message) || exception != null)
            {
                switch (logLevel)
                {
                    case LogLevel.Critical:
                        _log.Fatal(message);
                        break;
                    case LogLevel.Debug:
                    case LogLevel.Trace:
                        _log.Debug(message);
                        break;
                    case LogLevel.Error:
                        _log.Error(message);
                        break;
                    case LogLevel.Information:
                        _log.Info(message);
                        break;
                    case LogLevel.Warning:
                        _log.Warn(message);
                        break;
                    default:
                        _log.Warn($"Encountered unknown log level {logLevel}, writing out as Info.");
                        _log.Info(message, exception);
                        break;
                }
            }
        }

        private bool AllowDiagnostics()
        {
            if (!_skipDiagnosticLogs)
            {
                return true;
            }

            return !(_name.ToLower().StartsWith("microsoft")
                || _name == "IdentityServer4.AccessTokenValidation.Infrastructure.NopAuthenticationMiddleware");
        }
    }
One last touch is adding an extension for ILoggerFactory to be able to use AddLog4Net.
    public static class Log4netExtensions
    {
        public static ILoggerFactory AddLog4Net(this ILoggerFactory factory, bool skipDiagnosticLogs)
        {
            factory.AddProvider(new Log4NetProvider("log4net.config", skipDiagnosticLogs));
            return factory;
        }
    }
In my DI container registration, I added code:
var loggerFactory = new Microsoft.Extensions.Logging.LoggerFactory();
loggerFactory.AddLog4Net(true);
Container.RegisterInstance<Microsoft.Extensions.Logging.ILoggerFactory>(loggerFactory);
Recently I’m diving into Microsoft actor model implementation – Service Fabric Reliable Actors. Apart from Microsoft Orleans, is another one worth looking into. Let’s start from the beginning.
What is Service Fabric? It is many things and can be compared to Kubernetes:
Simplify microservices development and application lifecycle management
Reliably scale and orchestrate containers and microservices
Data-aware platform for low-latency, high-throughput workloads with stateful containers or microservices
Run anything – your choice of languages and programming models
Run anywhere – supports Windows/Linux in Azure, on-premises, or other clouds
From my perspective, it is just another way to manage micro-services. It can be set up on Azure or on-premise. Its biggest disadvantage is it’s dashboard, that does not offer much, comparing to IIS or Azure.
What are Reliable Actors? It is a Service Fabric implementation of an actor pattern, that is great for handling many small parallel operations. Actor, in this case, is a small piece of business logic, that can hold state and all actors can work simultaneously and independently, no matter if there is a hundred or hundred thousand of them.
If you’re new to actor model, you can have a look at an introduction to Microsoft Orleans. It covers all the basics: Getting started with Microsoft Orleans
Scenario
Let’s have an example to understand how all of this can be used in practice.
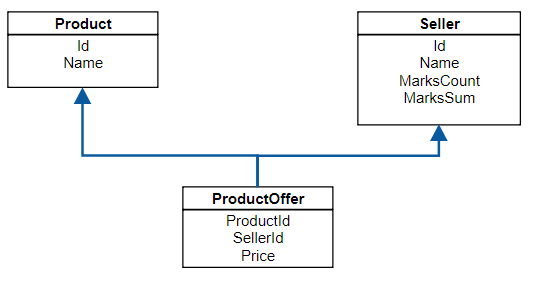
Let’s build price comparer micro-service, that will maintain sellers, products and offers for products. Every seller can have many offers for many products and every product will have many offers from many sellers. Something that in DB will look like this:
The main features of this service are:
it is a REST micro-service, so all communication will go through it’s API
it needs to persist its state
when getting a product, it needs to respond with json, where offers are sorted by seller rating descending
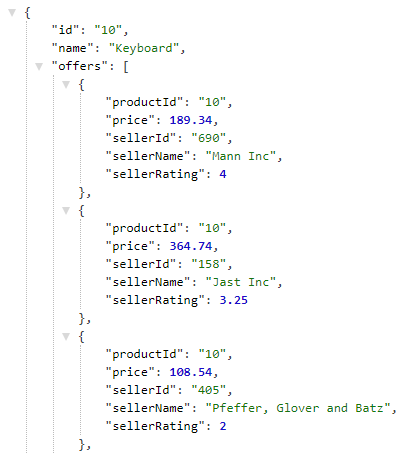
The last requirement forces us to update product offers whenever seller rating changes. Whenever seller rating changes, all its product offers need to be reordered. It sounds complicated, but it’s easier than it seems. API looks like this:
And Json that we would like to get in return, looks like this:
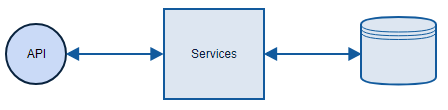
Simple micro-service approach
I already showed you how DB model can look like and this is precisely the way I’m going to implement it. Every operation will go to DB and take data from there. The architecture will be simple:
Of course I might keep my state in memory and update it whenever something changes, but this is rather difficult. In fact, cache invalidation is told to be one of the two hardest problems in software development. Right after naming things.
Let’s have a look how SellerController is built, it’s rather simple:
    public class SellerRepository : ISellerRepository
    {
        private const string RemoveSeller = @"DELETE FROM Seller WHERE Id = @Id";

        private const string InsertSeller = @"INSERT INTO Seller (Id, Name, MarksCount, MarksSum) VALUES (@Id, @Name, @MarksCount, @MarksSum)";

        private const string UpdateSellerRating = @"UPDATE Seller SET MarksCount = @MarksCount, MarksSum = @MarksSum WHERE Id = @Id";

        private const string GetSeller = @"SELECT Id, Name, MarksCount, MarksSum FROM Seller WHERE Id = @id";

        private const string GetSellerOffers = @"SELECT ProductId, Price FROM ProductOffer WHERE SellerId = @id";

        private readonly IConfigurationRoot _configuration;

        public SellerRepository(IConfigurationRoot configuration)
        {
            _configuration = configuration;
        }

        public async Task Save(Seller seller)
        {
            using (var connection = new SqlConnection(_configuration.GetConnectionString("DbConnectionString")))
            {
                await connection.ExecuteAsync(RemoveSeller, new { seller.Id });

                await connection.ExecuteAsync(InsertSeller, seller);
            }
        }

        public async Task<Seller> Get(string id)
        {
            using (var connection = new SqlConnection(_configuration.GetConnectionString("DbConnectionString")))
            {
                var sellerOffers = await connection.QueryAsync<Offer>(GetSellerOffers, new { id });
                var seller = await connection.QuerySingleAsync<Seller>(GetSeller, new { id });

                seller.Offers = sellerOffers.ToList();

                return seller;
            }
        }

        public async Task Update(Seller seller)
        {
            using (var connection = new SqlConnection(_configuration.GetConnectionString("DbConnectionString")))
            {
                await connection.ExecuteAsync(UpdateSellerRating, seller);
            }
        }
    }
To be able to use code like this:
connection.QuerySingleAsync<Seller>(GetSeller, new { id })
I used Dapper nuget package – very handy tool that enriches simple IDbConnection with new features.
Service Fabric approach
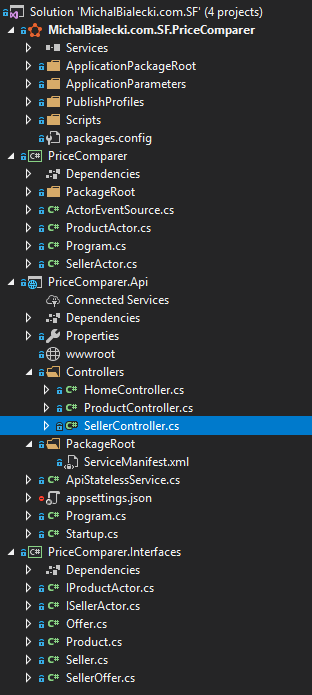
The functionality of Service Fabric implementation will be exactly the same. Small micro-service that exposes REST API and ensures that state is persistent. And this is where similarities end. First, let’s have a look at the project structure:
From the top:
MichalBialecki.com.SF.PriceComparer – have you noticed Service Fabric icon? It contains configuration how to set up SF cluster and what application should be hosted. It also defines how they will be scaled
PriceComparer – Business logic for API project, it contains actor implementation
PriceComparer.Api – REST API that we expose. Notice that we also have ServiceManifest.xml that is a definition of our service in Service Fabric
PriceComparer.Interfaces – the name speaks for itself, just interfaces and dtos
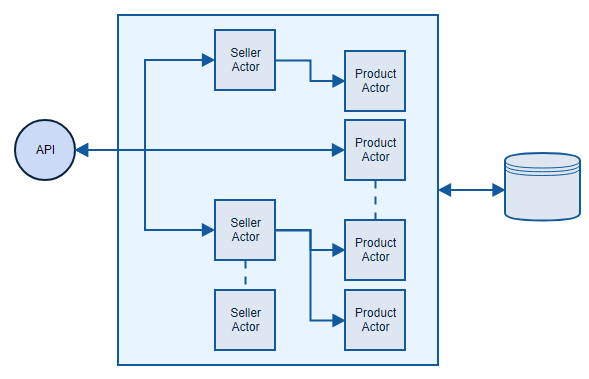
Controller implementation is almost the same as in the previous approach. Instead of using repository it uses actors.
ActorProxy.Create<ISellerActor> is the way we instantiate an actor, it is provided by the framework. Implementation of SellerActor needs to inherit Actor class. It also defines on top of the class how the state will be maintained. In our case it will be persisted, that means it will be saved as a file on a disk on the machine where the cluster is located.
    [StatePersistence(StatePersistence.Persisted)]
    internal class SellerActor : Actor, ISellerActor
    {
        private const string StateName = nameof(SellerActor);

        public SellerActor(ActorService actorService, ActorId actorId)
            : base(actorService, actorId)
        {
        }

        public async Task AddSeller(Seller seller, CancellationToken cancellationToken)
        {
            await StateManager.AddOrUpdateStateAsync(StateName, seller, (key, value) => value, cancellationToken);
        }

        public async Task<Seller> GetState(CancellationToken cancellationToken)
        {
            return await StateManager.GetOrAddStateAsync(StateName, new Seller(), cancellationToken);
        }

        public async Task AddOffer(Offer offer, CancellationToken cancellationToken)
        {
            var seller = await StateManager.GetOrAddStateAsync(StateName, new Seller(), cancellationToken);

            var existingOffer = seller.Offers.FirstOrDefault(o => o.ProductId == offer.ProductId);
            if (existingOffer != null)
            {
                seller.Offers.Remove(existingOffer);
            }

            seller.Offers.Add(offer);
            var sellerOffer = new SellerOffer
            {
                ProductId = offer.ProductId,
                Price = offer.Price,
                SellerId = seller.Id,
                SellerRating = seller.Rating,
                SellerName = seller.Name
            };

            var productActor = ActorProxy.Create<IProductActor>(new ActorId(offer.ProductId));
            await productActor.UpdateSellerOffer(sellerOffer, cancellationToken);

            await StateManager.SetStateAsync(StateName, seller, cancellationToken);
        }

        public async Task Mark(decimal value, CancellationToken cancellationToken)
        {
            var seller = await StateManager.GetOrAddStateAsync(StateName, new Seller(), cancellationToken);
            seller.MarksCount += 1;
            seller.MarksSum += value;

            await StateManager.SetStateAsync(StateName, seller, cancellationToken);

            foreach (var offer in seller.Offers)
            {
                var productActor = ActorProxy.Create<IProductActor>(new ActorId(offer.ProductId));
                await productActor.UpdateSellerRating(seller.Id, seller.Rating, cancellationToken);
            }
        }
    }
Notice that in order to use state, we use StateManager, also provided by the framework. The safest way is to either user GetOrAddStateAsync or SetStateAsync. Fun fact – all methods are asynchronous, there are no sync ones. There is a good emphasis on making code async, so that it can be run better in parallel with other jobs.
Take a look at Mark method. In order to mark a seller, we need to get its state, increment counters and save state. Then we need to update all product offers that seller has. Let’s take a look at how updating product looks like:
    public async Task UpdateSellerRating(string sellerId, decimal sellerRating, CancellationToken cancellationToken)
    {
        var product = await StateManager.GetOrAddStateAsync(StateName, new Product(), cancellationToken);

        var existingMatchingOffer = product.Offers.FirstOrDefault(o => o.SellerId == sellerId);
        if (existingMatchingOffer != null)
        {
            existingMatchingOffer.SellerRating = sellerRating;
            product.Offers = product.Offers.OrderByDescending(o => o.SellerRating).ToList();

            await StateManager.SetStateAsync(StateName, product, cancellationToken);
        }
    }
We are updating seller rating in his offer inside a product. That can happen for thousands of products, but since this job is done in different actors, it can be done in parallel. Architecture for this approach is way different when compared to simple micro-service.
Comparison
To compare both approaches I assumed I need a lot of data, so I prepared:
1000 sellers having
10000 products with
100000 offers combined
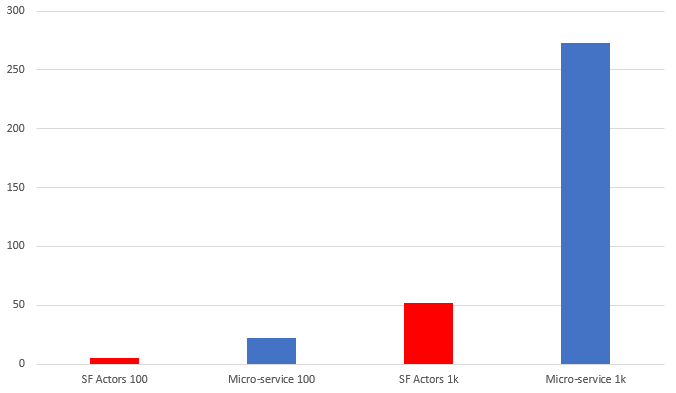
It sounds a lot, but in a real-life price comparer, this could be just a start. A good starting point for my test, though. The first thing that hit me was loading this data into both services. Since both approaches exposed the same API, I just needed to make 11000 requests to initialize everything. With Service Fabric it all went well, after around 1 minute everything was initialized. However with simple DB approach… it throws SQL timeout exceptions. It turned out, that it couldn’t handle so many requests, even when I extended DB connection timeout. I needed to implement batch init, and after a few tries, I did it. However, the time that I needed to initialize all the data wasn’t so optimistic.
First two columns stand for initializing everything divided by 10, and second two stands for full initialization. Notice that a simple DB approach took around 5 times more than Service Fabric implementation!
To test the performance of my services I needed to send a lot of requests at the same time. In order to do that I used Locust – a performance load tool. It can be easily installed and set up. After preparing a small file that represents a testing scenario, I just run it from the terminal and then I can go to its dashboard, that is accessible via a browser.
Let’s have a look at how the performance of the first approach looks like. In this case, Locust will simulate 200 users, that grows from 0 to 200, 20 users per second. It will handle around 30 requests per second with an average response time 40 ms. When I update that value to 400 users, it will handle around 50 requests per minute, but response time will go to around 3 seconds. That, of course, is not acceptable in micro-service development.
The second video shows the same test, but hitting Service Fabric app. This time I’d like to go bold and start off with 1000 users. It will handle around 140 RPM with an average response time around 30ms, which is even faster than 400 users and first approach. Then I’ll try 2000 users, have a look:
Summary
I showed you two approaches, both written in .Net Core 2.0. The first one is a very simple one using SQL DB, and the second one is Service Fabric with Reliable Actors. From my tests, I could easily see that actors approach is way more performant. Probably around 5 times in this specific case. Let’s point this out:
Pros:
very fast in scenarios, where there are many small pieces of business logic, tightly connected to data
trivial to try and implement – there is a Visual Studio project for that
Cons:
It’s more complicated to implement than the regular approach
Configuring Service Fabric with XML files can be frustrating
Since everything handled by the framework, a developer has a bit less control over what’s happening
Microsoft Orleans is a developer-friendly framework for building distributed, high-scale computing applications. It does not require from developer to implement concurrency and data storage model. It requires developer to use predefined code blocks and enforces application to be build in a certain way. As a result Microsoft Orleans empowers developer with a framework with an exceptional performance.
Orleans proved its strengths in many scenarios, where the most recognizable ones are cloud services for Halo 4 and 5 games.
To test the performance of Microsoft Orleans I’ll compare it to simple micro-service implementation. The scenario is about transferring money from one account to another using a persistent storage. Here is the idea:
Both services will use .Net Core
Data will be saved in Azure CosmosDB database
Services will read and send messages from Service Bus
One message will trigger transferring money, that will need to get and save data from DB and then service will send two messages with account balance updates
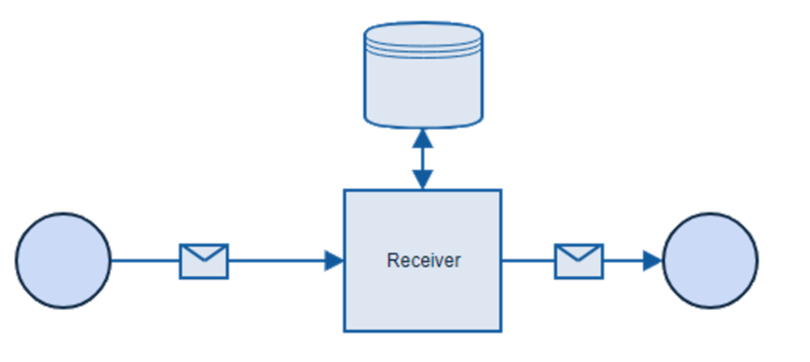
Simple Micro-service approach
This app is really simple. It is a console application, that registers message handler and processes messages. This is how architecture looks like, simple right?
Code that handles message looks like this:
    public void Run()
    {
        var service = new TableStorageService(_configuration);

        try
        {
            var subscriptionClient = new SubscriptionClient(
                _configuration[ServiceBusKey],
                "accountTransferUpdates",
                "commonSubscription");
            subscriptionClient.PrefetchCount = 1000;

            subscriptionClient.RegisterMessageHandler(
                async (message, token) =>
                {
                    var messageJson = Encoding.UTF8.GetString(message.Body);
                    var updateMessage = JsonConvert.DeserializeObject<AccountTransferMessage>(messageJson);

                    await service.UpdateAccount(updateMessage.From, -updateMessage.Amount);
                    await service.UpdateAccount(updateMessage.To, updateMessage.Amount);

                    Console.WriteLine($"Processed a message from {updateMessage.From} to {updateMessage.To}");
                },
                new MessageHandlerOptions(OnException)
                {
                    MaxAutoRenewDuration = TimeSpan.FromMinutes(60),
                    MaxConcurrentCalls = 1,
                    AutoComplete = true
                });
        }
        catch (Exception e)
        {
            Console.WriteLine("Exception: " + e.Message);
        }
    }

    private Task OnException(ExceptionReceivedEventArgs args)
    {
        Console.WriteLine(args.Exception);

        return Task.CompletedTask;
    }
TableStorageService is used to synchronize state with the database, which in this case it read and update account balance.
    public class TableStorageService
    {
        private const string EndpointUriKey = "CosmosDbEndpointUri";
        private const string PrimaryKeyKey = "CosmosDbPrimaryKey";
        private const string ServiceBusKey = "ServiceBusConnectionString";

        private readonly DocumentClient client;
        private readonly TopicClient topic;

        public TableStorageService(IConfigurationRoot configuration)
        {
            client = new DocumentClient(new Uri(configuration[EndpointUriKey]), configuration[PrimaryKeyKey]);
            topic = new TopicClient(configuration[ServiceBusKey], "balanceUpdates");
        }

        public async Task UpdateAccount(int accountNumber, decimal amount)
        {
            Account document;
            try
            {
                var response = await client.ReadDocumentAsync<Account>(accountNumber.ToString());
                document = response.Document;
                document.Balance += amount;
                await client.ReplaceDocumentAsync(accountNumber.ToString(), document);
            }
            catch (DocumentClientException de)
            {
                if (de.StatusCode == HttpStatusCode.NotFound)
                {
                    document = new Account { Id = accountNumber.ToString(), Balance = amount };
                    await client.CreateDocumentAsync(UriFactory.CreateDocumentCollectionUri("bialecki", "accounts"), document);
                }
                else
                {
                    throw;
                }
            }

            await NotifyBalanceUpdate(accountNumber, document.Balance);
        }

        private async Task NotifyBalanceUpdate(int accountNumber, decimal balance)
        {
            var balanceUpdate = new BalanceUpdateMessage
            {
                AccountNumber = accountNumber,
                Balance = balance
            };

            var message = new Message(Encoding.UTF8.GetBytes(JsonConvert.SerializeObject(balanceUpdate)));
            await topic.SendAsync(message);
        }
    }
DocumentClient is CosmosDB client provided by the framework. You might be intrigued by try-catch clause. Currently for in CosmosDB package for .Net Core there is no way to check if the document exists and the proposed solution is to handle an exception when the document is not found. In this case, the new document will be created. NotifyBalanceUpdate sends messages to Service Bus.
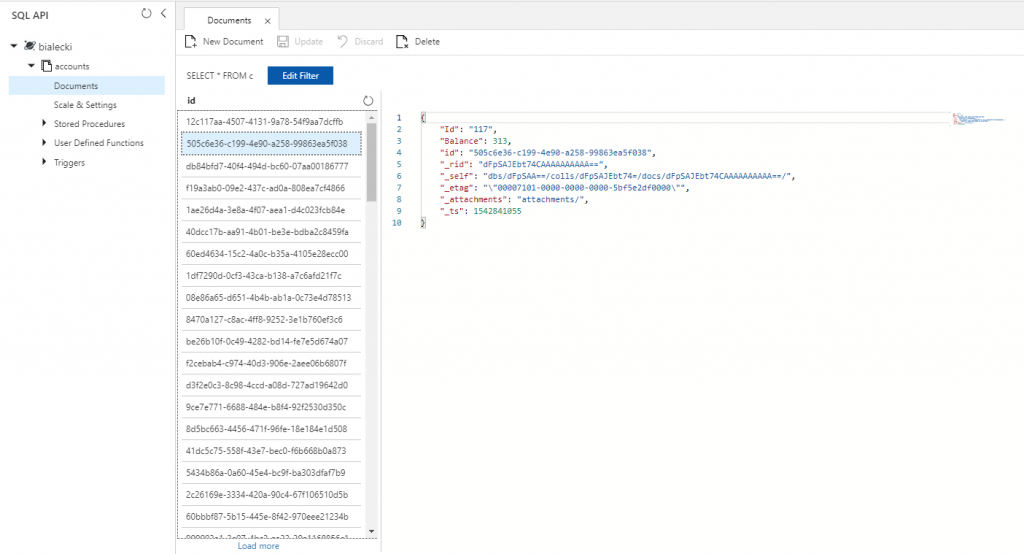
When we go to Azure portal, we can query the data to check if it is really there:
This is how reading 100 messages looks like:
Microsoft Orleans approach
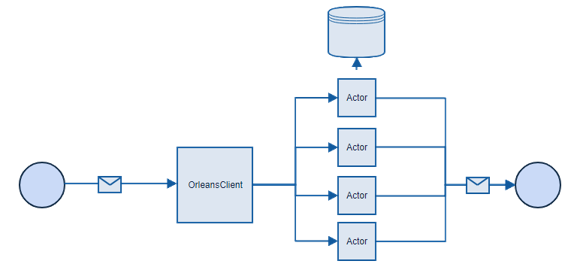
Microsoft Orleans is an actor framework, where each actor can be understood as a separate service, that does some simple operations and can have its own state. In this case, every account can be an actor, it doesn’t matter if we have few or few hundred thousands of them, the framework will handle that. Another big advantage is that we do not need to care about concurrency and persistence, it is also handled by the framework for us. In Orleans, accounts can perform operations in parallel. In this case, the architecture looks much different.
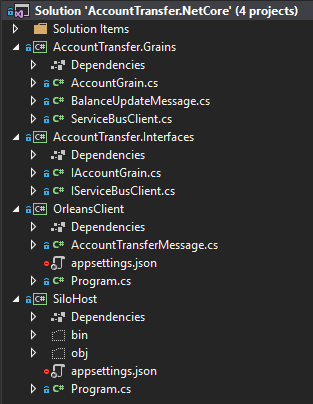
Project structure looks like this:
SiloHost – sets up and run a silo to host grains, which is just another name for actors
OrleansClient – second application. This one connects to the silo and run client code to use grains
AccountTransfer.Interfaces – its an abstraction for grains
AccountTransfer.Grains – grains implementation, that handles business logic
Let’s have a look at how running a silo looks like:
    public class Program
    {
        private static IConfigurationRoot configuration;

        public static int Main(string[] args)
        {
            return RunMainAsync().Result;
        }

        private static async Task<int> RunMainAsync()
        {
            try
            {
                var builder = new ConfigurationBuilder()
                .SetBasePath(Directory.GetCurrentDirectory())
                .AddJsonFile("appsettings.json", optional: true, reloadOnChange: true);

                configuration = builder.Build();

                var host = await StartSilo();
                Console.WriteLine("Press Enter to terminate...");
                Console.ReadLine();

                await host.StopAsync();

                return 0;
            }
            catch (Exception ex)
            {
                Console.WriteLine(ex);
                return 1;
            }
        }

        private static async Task<ISiloHost> StartSilo()
        {
            var builder = new SiloHostBuilder()
                .UseLocalhostClustering()
                .Configure<EndpointOptions>(options => options.AdvertisedIPAddress = IPAddress.Loopback)
                .ConfigureServices(context => ConfigureDI(context))
                .ConfigureLogging(logging => logging.AddConsole())
                .UseInClusterTransactionManager()
                .UseInMemoryTransactionLog()
                .AddAzureTableGrainStorageAsDefault(
                    (options) =>
                    {
                        options.ConnectionString = configuration.GetConnectionString("CosmosBDConnectionString");
                        options.UseJson = true;
                    })
                .UseTransactionalState();

            var host = builder.Build();
            await host.StartAsync();
            return host;
        }

        private static IServiceProvider ConfigureDI(IServiceCollection services)
        {
            services.AddSingleton<IServiceBusClient>((sp) => new ServiceBusClient(configuration.GetConnectionString("ServiceBusConnectionString")));

            return services.BuildServiceProvider();
        }
    }
This is the whole code. Amazingly short comparing to what we are doing here. Notice, that configuring CosmosDB Azure Table storage takes just a few lines. I even configured dependency injection that I will use in account grain.
This is also a simple console application. Both apps need to be run together, cause client is connecting to the silo and if fails, tries again after few seconds. The only part missing here is DoClientWork method:
    private static void DoClientWork(IClusterClient client)
    {
        var subscriptionClient = new SubscriptionClient(
            configuration.GetConnectionString("ServiceBusConnectionString"),
            "accountTransferUpdates",
            "orleansSubscription",
            ReceiveMode.ReceiveAndDelete);
        subscriptionClient.PrefetchCount = 1000;

        try
        {
            subscriptionClient.RegisterMessageHandler(
                async (message, token) =>
                {
                    var messageJson = Encoding.UTF8.GetString(message.Body);
                    var updateMessage = JsonConvert.DeserializeObject<AccountTransferMessage>(messageJson);

                    await client.GetGrain<IAccountGrain>(updateMessage.From).Withdraw(updateMessage.Amount);
                    await client.GetGrain<IAccountGrain>(updateMessage.To).Deposit(updateMessage.Amount);

                    Console.WriteLine($"Processed a message from {updateMessage.From} to {updateMessage.To}");
                    await Task.CompletedTask;
                },
                new MessageHandlerOptions(HandleException)
                {
                    MaxAutoRenewDuration = TimeSpan.FromMinutes(60),
                    MaxConcurrentCalls = 20,
                    AutoComplete = true
                });
        }
        catch (Exception e)
        {
            Console.WriteLine("Exception: " + e.Message);
        }
    }
This is almost the same code that we had in micro-service approach. We are reading Service Bus messages and deserialize them, but then we use actors. From this point execution will be handled by them. AccountGrain looks like this:
    [Serializable]
    public class Balance
    {
        public decimal Value { get; set; } = 1000;
    }

    public class AccountGrain : Grain<Balance>, IAccountGrain
    {
        private readonly IServiceBusClient serviceBusClient;

        public AccountGrain(
            IServiceBusClient serviceBusClient)
        {
            this.serviceBusClient = serviceBusClient;
        }

        async Task IAccountGrain.Deposit(decimal amount)
        {
            try
            {
                this.State.Value += amount;
                await this.WriteStateAsync();

                await NotifyBalanceUpdate();
            }
            catch (Exception e)
            {
                Console.WriteLine(e);
            }
        }

        async Task IAccountGrain.Withdraw(decimal amount)
        {
            this.State.Value -= amount;
            await this.WriteStateAsync();

            await NotifyBalanceUpdate();
        }

        Task<decimal> IAccountGrain.GetBalance()
        {
            return Task.FromResult(this.State.Value);
        }

        private async Task NotifyBalanceUpdate()
        {
            var balanceUpdate = new BalanceUpdateMessage
            {
                AccountNumber = (int)this.GetPrimaryKeyLong(),
                Balance = this.State.Value
            };

            var message = new Message(Encoding.UTF8.GetBytes(JsonConvert.SerializeObject(balanceUpdate)));
            await serviceBusClient.SendMessageAsync(message);
        }
    }
Notice that on top we have serializable Balance class. When defining actor like this: AccountGrain : Grain<Balance>, it means that Balance will be our state, that we can later refer to as this.State. Getting and updating state is trivial, and both Withdraw and Deposit causes sending Service Bus message by calling NotifyBalanceUpdate.
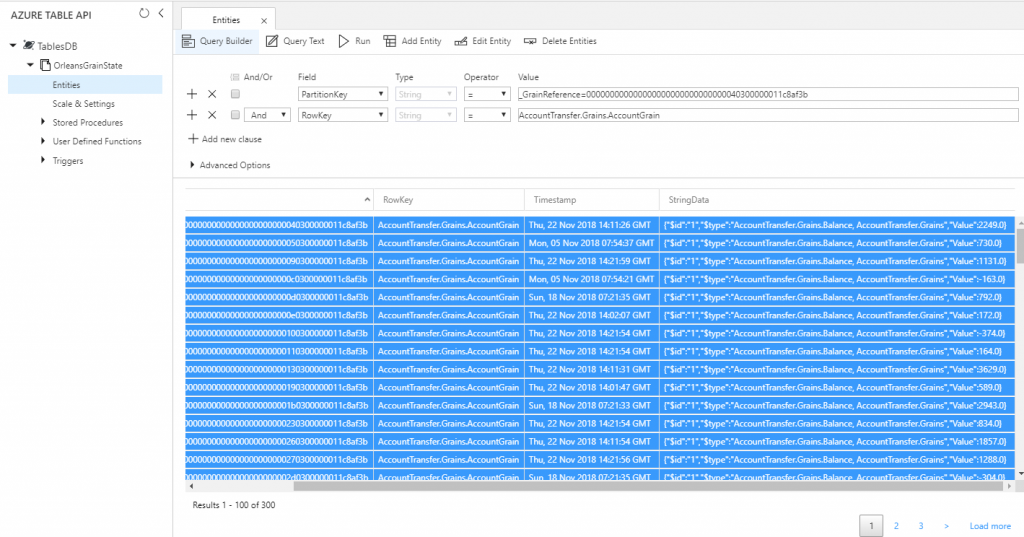
In Azure portal we can have a look how data is saved. I choose to serialize it to json, so we can see account state easily:
Let’s have a look at reading 1000 messages by a single thread with Microsoft Orleans looks like:
It runs noticeably faster, but what’s more interesting is that we can read messages with even 20 concurrent threads at a time:
Comparsion
As you could see, I used two approaches to read and process 100 and 1000 Service Bus messages, written in .net core with a persistant state in remote CosmosDB database. Results can be seen here:
Blue color represents reading 100 messages, red represents reading 1000 messages. As you can see Microsoft Orleans is a few times faster.
To sum up, using Microsoft Orleans:
Pros:
Microsoft actor framework could give you outstanding performance
It requires minimal knowledge to write your first app
Documentation is great
The code is open source, you can post issues
Cons:
It doesn’t fit every scenario
Maintenance and deployment is a bit more difficult than a simple IIS app
If you’re interested in the code, have a look at my GitHub:
From version 3.1 of Microsoft.Azure.ServiceBus it is finally possible to manage queues, topics and subscriptions in .Net Core. Let’s have a look at how we can use it in real life scenarios.
Previously we would use sample code for getting a queue:
public IQueueClient GetQueueClient(string _serviceBusConnectionString, string _queueName)
{
    var queueClient = new QueueClient(_serviceBusConnectionString, _queueName);
    return queueClient;
}
Using ManagementClient we can write much better code.
public async Task<IQueueClient> GetOrCreateQueue(string _serviceBusConnectionString, string _queueName)
{
    var managementClient = new ManagementClient(_serviceBusConnectionString);
    if (!(await managementClient.QueueExistsAsync(_queueName)))
    {
        await managementClient.CreateQueueAsync(new QueueDescription(_queueName));
    }

    var queueClient = new QueueClient(_serviceBusConnectionString, _queueName);
    return queueClient;
}
Now before getting a queue, we are checking if a queue exists and if not, we are creating it. So when executing this code:
It is pretty easy to create a topic subscription or a queue, but SubscriptionDescription object offers a lot more then just that. This is a simple code that creates a subscription:
public async Task<ISubscriptionClient> GetOrCreateTopicSubscription(string serviceBusConnectionString, string topicPath, string subscriptionName)
{
    var managementClient = new ManagementClient(serviceBusConnectionString);
    if (!(await managementClient.SubscriptionExistsAsync(topicPath, subscriptionName)))
    {
        await managementClient.CreateSubscriptionAsync(new SubscriptionDescription(topicPath, subscriptionName));
    }

    var subscriptionClient = new SubscriptionClient(serviceBusConnectionString, topicPath, subscriptionName);
    return subscriptionClient;
}
Let’s have a look at a few most important properties:
This is the duration after which the message expires, starting from when the message is sent to the Service Bus. After that time, the message will be removed from a subscription
EnableDeadLetteringOnMessageExpiration
Support for dead-letter queue. When you enable it, messages will come here instead of being removed from the main queue
Maximum count of message returning to the subscription after failure processing. After that count message will be removed from the subscription
Let’s have a look what we can fill in in a real project.
public async Task<ISubscriptionClient> GetOrCreateTopicSubscription(string serviceBusConnectionString, string topicPath, string subscriptionName)
{
    var managementClient = new ManagementClient(serviceBusConnectionString);
    if (!(await managementClient.SubscriptionExistsAsync(topicPath, subscriptionName)))
    {
        await managementClient.CreateSubscriptionAsync(
            new SubscriptionDescription(topicPath, subscriptionName)
            {
                EnableBatchedOperations = true,
                AutoDeleteOnIdle = System.TimeSpan.FromDays(100),
                EnableDeadLetteringOnMessageExpiration = true,
                DefaultMessageTimeToLive = System.TimeSpan.FromDays(100),
                MaxDeliveryCount = 100,
                LockDuration = System.TimeSpan.FromMinutes(5)
            });
    }

    var subscriptionClient = new SubscriptionClient(serviceBusConnectionString, topicPath, subscriptionName);
    return subscriptionClient;
}
AutoDeleteOnIdle – subscription will be removed from the topic after 100 days idle – that is very unlikely. DefaultMessageTimeToLive and EnableDeadLetteringOnMessageExpiration – messages will be kept in the queue for very long – 100 days, then they will be sent to a dead letter queue. MaxDeliveryCount and LockDuration – message will be processed up to 100 times and for a maximum of 5 minutes.
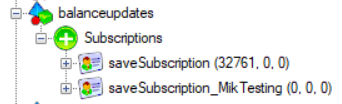
We can do one more thing. When testing a project while development locally it’s ideal to work with real data. In the real case, we would probably have different Service Bus namespace and separate connection string for every environment. There is, however, a trick to use DEV data locally – just create your testing subscription! This is how it can look like:
Testing subscription will have it’s own name, it will still be there up to 100 days of idle, but messages will be kept only for 2 days and they will not end up in dead letter queue. MaxDeliveryCount is only 5, cause if something goes wrong, we will end up having 5 the same errors in logs instead of 100 and this is much more likely to happen when testing locally.
Recently in my team at work, we focus on maintaining older micro-services. While this might not be the most exciting job to do, it is an opportunity to work on a developer craftsmanship. A micro-service or any code that you write, can be old after a year or even a half, cause our developer habits changes. Not only technology goes forward, but we tend to use different nuget packages and in result write the same code in a different way.
Refactoring, which I’m referring to in this post, can be playful, can be fun, but it needs to be done with caution. And foremost, we cannot go too far with it, cause drawing a line here is not a child’s play.
Simplest application possible
Here is a very simple API that fetches a user from the database and fills in his description from a different REST service. Code is written in .Net Core.
[Route("api/[controller]")]
public class UsersController : Controller
{
    private readonly IConfiguration _configuration;

    public UsersController(IConfiguration configuration)
    {
        _configuration = configuration;
    }

    [HttpGet("{userId}")]
    public async Task<IActionResult> Get(int userId)
    {
        try
        {
            var conf = _configuration.GetSection("ConnectionStrings")["Blog"];
            using (var connection = new SqlConnection(conf))
            {
                var user = await connection.QueryFirstOrDefaultAsync<UserDto>(
                    "SELECT [Id], [Name], [LastUpdatedAt] FROM [Users] WHERE Id = @Id",
                    new { Id = userId }).ConfigureAwait(false);

                var userDesctiption = await GetUserDescription(userId);

                return Json(
                    new {
                        Id = user.Id,
                        Name = user.Name,
                        LastModified = user.LastModified,
                        Description = userDesctiption
                });
            }
        }
        catch (Exception)
        {
            return StatusCode(500);
        }
    }

    private async Task<string> GetUserDescription(int userId)
    {
        var client = new HttpClient();
        var response = await client.GetAsync($"users/{userId}/description");
        return await response.Content.ReadAsStringAsync();
    }
}
As you see it almost looks as a rookie developer might write it, but it’s not that bad – configuration is injected with an interface IConfiguration.
What is bad here?
There’s no abstractions – you cannot just swap parts of the code to different implementations. It might be useful for example to use abstraction over HttpClient
Everything is in one class – Single Responsibility rule is non-existent
One method does multiple things – hard to test
It’s not written in a modular way, as an experienced developer might expect it
Have a look at projects structure – it is really minimal:
Those are the most obvious things that should be fixed. Let’s go step by step.
Database and REST calls should have it’s own classes
So I moved that to separate classes and this is how controller looks like:
[Route("api/[controller]")]
public class UsersController : Controller
{
    private readonly IUsersRepository _usersRepository;
    private readonly IUserDescriptionClient _userDescriptionClient;

    public UsersController(IUsersRepository usersRepository, IUserDescriptionClient userDescriptionClient)
    {
        _usersRepository = usersRepository;
        _userDescriptionClient = userDescriptionClient;
    }

    [HttpGet("{userId}")]
    public async Task<IActionResult> Get(int userId)
    {
        try
        {
            var user = await _usersRepository.Get(userId);
            var userDesctiption = await _userDescriptionClient.GetUserDescription(userId);

            return Json(user);
        }
        catch (Exception)
        {
            return StatusCode(500);
        }
    }
}
UsersRepository now looks very decent:
public class UsersRepository : IUsersRepository
{
    private static class SqlQueries {
        internal static string GetUser = "SELECT [Id], [Name], [LastUpdatedAt] FROM [Users] WHERE Id = @Id";
    }

    private readonly IConfiguration _configuration;

    public UsersRepository(IConfiguration configuration)
    {
        _configuration = configuration;
    }

    public async Task<UserDto> Get(int userId)
    {
        var conf = _configuration.GetSection("ConnectionStrings")["Blog"];
        using (var connection = new SqlConnection(conf))
        {
            var user = await connection.QueryFirstOrDefaultAsync<UserDto>(
                SqlQueries.GetUser,
                new { Id = userId }).ConfigureAwait(false);

            return user;
        }
    }
}
UserDescriptionClient is still very minimal:
public class UserDescriptionClient : IUserDescriptionClient
{
    public async Task<string> GetUserDescription(int userId)
    {
        var client = new HttpClient();
        var response = await client.GetAsync($"users/{userId}/description");
        return await response.Content.ReadAsStringAsync();
    }
}
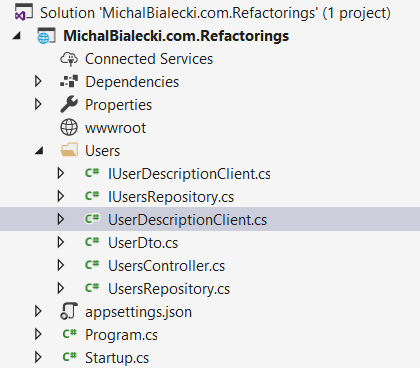
And project structure:
This is a level of refactoring that I feel comfortable with. The code is nicely decoupled, easy to test and read. However, as a project gets larger you can refactor more to have a more shared code. If you then jump to a small project, you might want to do things ‘the right way’, so the code is ready for future. You will use your best approaches from previous projects – but isn’t that going too far?
Let’s go further
First thing I did is create a base class for my UserDescriptionClient:
public abstract class BaseClient<T> where T : class
{
    public async Task<T> Get(string uri)
    {
        var client = new HttpClient();
        var response = await client.GetAsync(uri);

        if (response.IsSuccessStatusCode)
        {
            var contentAsString = await response.Content.ReadAsStringAsync();

            if (typeof(T) == typeof(string))
            {
                return contentAsString as T;
            }

            return JsonConvert.DeserializeObject<T>(contentAsString);
        }

        throw new System.Exception($"Could not fetch data from {uri}");
    }

    public async Task Post(string uri, T data)
    {
        var client = new HttpClient();
        var response = await client.PostAsync(
            uri,
            new StringContent(JsonConvert.SerializeObject(data), System.Text.Encoding.UTF8, "application/json"));

        if (!response.IsSuccessStatusCode)
        {
            throw new System.Exception($"Could not post data to {uri}");
        }
    }
}
And UserDescriptionClient now gets very simple:
public class UserDescriptionClient : BaseClient<string>, IUserDescriptionClient
{
    public async Task<string> GetUserDescription(int userId)
    {
        return await Get($"users/{userId}/description");
    }
}
We can do very similar thing with UsersRepository – create a base class
public abstract class BaseRepository
{
    private readonly IConfiguration _configuration;

    public BaseRepository(IConfiguration configuration)
    {
        _configuration = configuration;
    }

    internal IDbConnection GetBlogConnection()
    {
        var conf = _configuration.GetSection("ConnectionStrings")["Blog"];
        return new SqlConnection(conf);
    }
}
And now users repository looks like this:
public class UsersRepository : BaseRepository, IUsersRepository
{
    private static class SqlQueries {
        internal static string GetUser = "SELECT [Id], [Name], [LastUpdatedAt] FROM [Users] WHERE Id = @Id";
    }

    public UsersRepository(IConfiguration configuration) : base(configuration) {}

    public async Task<UserDto> Get(int userId)
    {
        using (var connection = GetBlogConnection())
        {
            var user = await connection.QueryFirstOrDefaultAsync<UserDto>(
                SqlQueries.GetUser,
                new { Id = userId }).ConfigureAwait(false);

            return user;
        }
    }
}
We also can add more layers – there has to be a service between controller and repository.
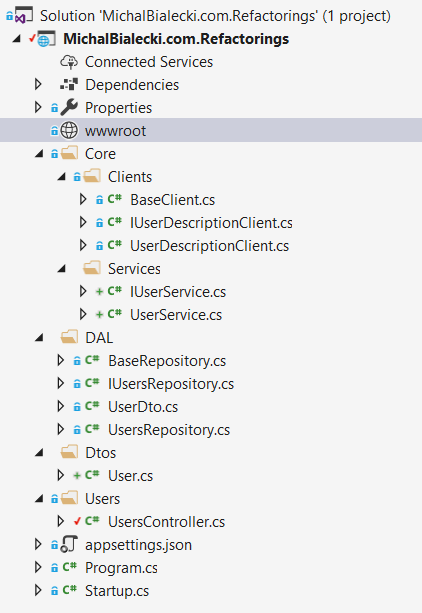
Project tree looks like this:
And I just got started. There is actually much more that you can do:
introduce more folders so that interfaces are in a separate directory
create factories for everything:
preparing controller answer
preparing a request to REST service
creating url for REST service
creation of User instance
move folders to separate libraries
and much more…
It all depends on your imagination, but notice one thing – it didn’t actually add value to the project.
Is refactoring always good?
My refactored project is better designed and decoupled, but you never know which direction project might go. It is a threat when implementing completely new micro-service. You can implement whatever you want in the beginning, but you want to implement as much as possible so that the next developer will have an easier job to do. But would it be really easier? Trying to figure out why you wrote so much code for such a little value. In fact reading and understanding bigger project just takes more time than it should.
Did I get too far with refactoring? What do you think?
Recently I run into a challenge. I’ working on a micro-service that receives and processes messages one by one. How to send Service Bus messages, not instantly, but when they pile up? The reason for cause it is expensive when it comes to performance. Let’s send messages after 10 piles up or after every 20 seconds.
It is not an obvious task, because Microsoft’s implementation does not support it. However, simple buffering can be done like this:
This solution works quite well. Notice that I used static fields, so they would be preserved between requests. On every request instance of SimpleBufferMessagesService will be created anew.
There are a few problems with it:
it is not thread-safe. Two instances of SimpleBufferMessagesService can use the same _messages field and mess with it. It is a rather huge risk because sending Service Bus message takes some time
some messages can wait a long time to be sent. When messages stay in the queue and 20 seconds pass, there has to be another request to send them. This is a threat of losing messages when service will be restarted. We shouldn’t keep messages longer then we need to
Having that in mind we need to think of something, that executes every 20 seconds, in intervals like… like… like Timer!
Timer solution
Timer needs to be registered in Startup class, I did that in the end of Configure method.
    public void Configure(IApplicationBuilder app, IHostingEnvironment env)
    {
        // many things here

        var timeoutInMiliseconds = 20000;
        new Timer(s => { ServiceBusTimerCallback(); }, null, 0, timeoutInMiliseconds);
    }

    private static void ServiceBusTimerCallback()
    {
        var bufferService = new TimerBufferMessagesService();
        bufferService.SendMessages();
    }
And class that sends messages can be modified like that:
    public class TimerBufferMessagesService
    {
        private const string ServiceBusConnectionString = "Endpoint=sb://bialecki.servicebus.windows.net/;SharedAccessKeyName=RootManageSharedAccessKey;SharedAccessKey=[key]";

        private static readonly ICollection<Message> _messages = new List<Message>();

        private readonly TopicClient _topicClient;

        public TimerBufferMessagesService()
        {
            _topicClient = new TopicClient(ServiceBusConnectionString, "accountTransferUpdates");
        }

        public void AddMessage(string message)
        {
            lock (((ICollection) _messages).SyncRoot)
            {
                _messages.Add(new Message(Encoding.UTF8.GetBytes(message)));
            }
        }

        public void SendMessages()
        {
            if (_messages.Count == 0)
            {
                return;
            }

            List<Message> localMessages;
            lock (((ICollection)_messages).SyncRoot)
            {
                localMessages = new List<Message>(_messages);
                _messages.Clear();
            }

            Task.Run(async () => { await _topicClient.SendAsync(localMessages); });
        }
    }
This implementation is much better. It will run every 20 seconds and it sends messages if there is any. The SendMessages method will be called by one instance and AddMessage will be called by many instances but is written in a safe way.
It was perfect till the moment I realized it wasn’t working.
The thing is that sooner or later timer is destroyed by a garbage collector. Even when I tried to save the reference to timer or use GC.KeepAlive(timer), it always got cleared.
    public void Configure(IApplicationBuilder app, IHostingEnvironment env)
    {
        // many lines here

        const int timeoutInMiliseconds = 20000;
        var allTasksWaitHandle = new AutoResetEvent(true);

        ThreadPool.RegisterWaitForSingleObject(
            allTasksWaitHandle,
            (s, b) =>
            {
                ServiceBusTimerCallback();
            },
            null,
            timeoutInMiliseconds,
            false);
    }

    private static void ServiceBusTimerCallback()
    {
        var bufferService = new TimerBufferMessagesService();
        bufferService.SendMessages();
    }
The result is the same, but it will work constantly.


 Imagine you are a Junior .Net Developer and you just started your development career. You got your first job and you are given a task – write unit tests!
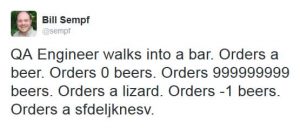
 Important thing is to follow patterns that are visible in your project and stick to it. Naming things correctly might sound obvious and silly, but it’s crucial for code organization and it’s visibility.
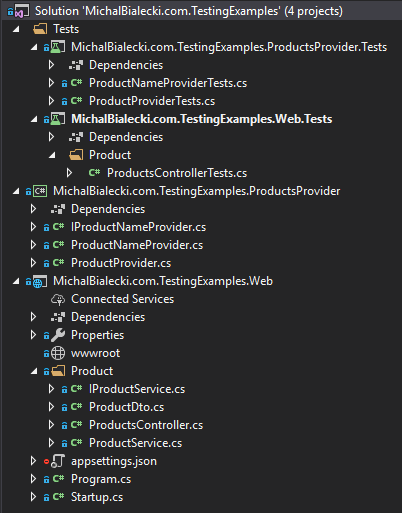


 Recently in my team at work, we focus on maintaining older micro-services. While this might not be the most exciting job to do, it is an opportunity to work on a developer craftsmanship. A micro-service or any code that you write, can be old after a year or even a half, cause our developer habits changes. Not only technology goes forward, but we tend to use different nuget packages and in result write the same code in a different way.
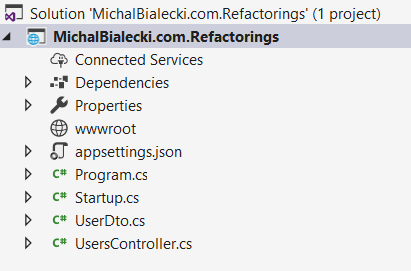
 My refactored project is better designed and decoupled, but you never know which direction project might go. It is a threat when implementing completely new micro-service. You can implement whatever you want in the beginning, but you want to implement as much as possible so that the next developer will have an easier job to do. But would it be really easier? Trying to figure out why you wrote so much code for such a little value. In fact reading and understanding bigger project just takes more time than it should.
 Recently I run into a challenge. I’ working on a micro-service that receives and processes messages one by one. How to send Service Bus messages, not instantly, but when they pile up? The reason for cause it is expensive when it comes to performance. Let’s send messages after 10 piles up or after every 20 seconds.
 The thing is that sooner or later timer is destroyed by a garbage collector. Even when I tried to save the reference to timer or use GC.KeepAlive(timer), it always got cleared.