How we use data to improve our product development

A few years back at Guestline, we decided to build our own payment integration, that we can offer to our clients with benefits to us and savings for the hotels.

The need for a new design

With the new integrations, we initially worked on the back-end part of the puzzle, but later on, we tackled front-end as well. Our current design had its glory days behind and we know we need to refresh it deeply. Let me show you a small part of the process, which is filling in card details in order to conduct a transaction. It happens when a client is making a reservation over the phone, and a receptionist is making an initial payment with given card details.

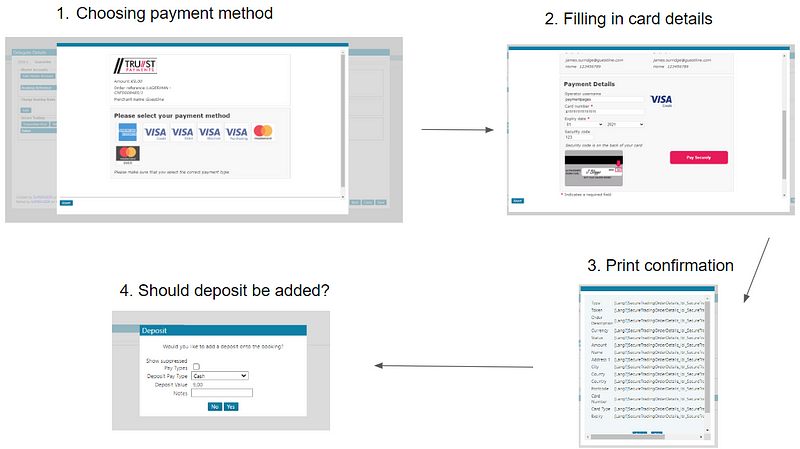
This design is far away from perfect and when it comes to the user experience it’s nothing that we came across in modern payment integrations. We knew that the first two steps could be merged together but what about the other two? Are they needed?

We need more data

We asked those questions to various people, starting from developers, through product owners and support, and ending with clients. What was the answer?

We probably don’t need this, but it has always been like that.

We knew we have to measure it ourselves and here is the part where we used Azure Application Insights. We added logging on every step to figure out how users use our application. This stuff can take time if you don’t have the data you need and you need to add measurements yourself. Nevertheless, after a few weeks, we had our answer.

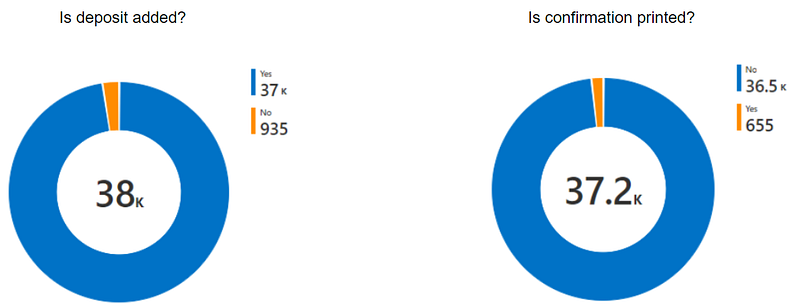
As you see, 97% of times deposit is added and 98% of times, the user doesn’t print the payment confirmation. At this point, we were almost certain that we can make those steps automatic, but we needed to ask those few percent a question.

Why do you use out payment integration like that?

We jumped into calls to our clients and found out, that mostly they just did it as a habit, without any specific purpose. Having that certainty we decided that now, our payment process could be vastly improved.

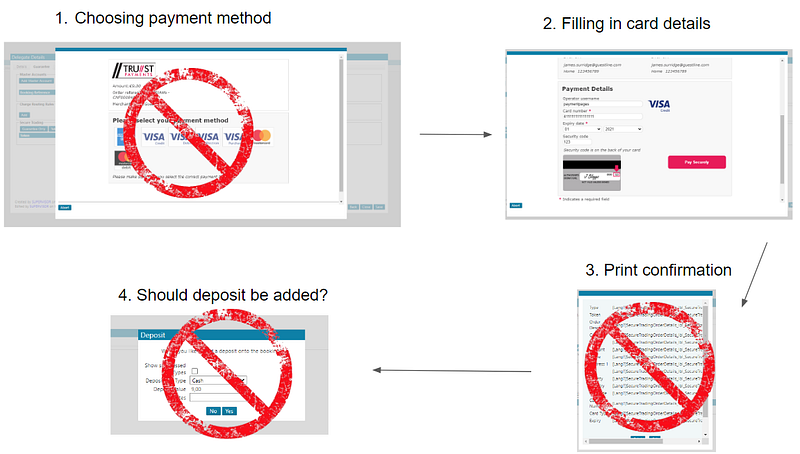
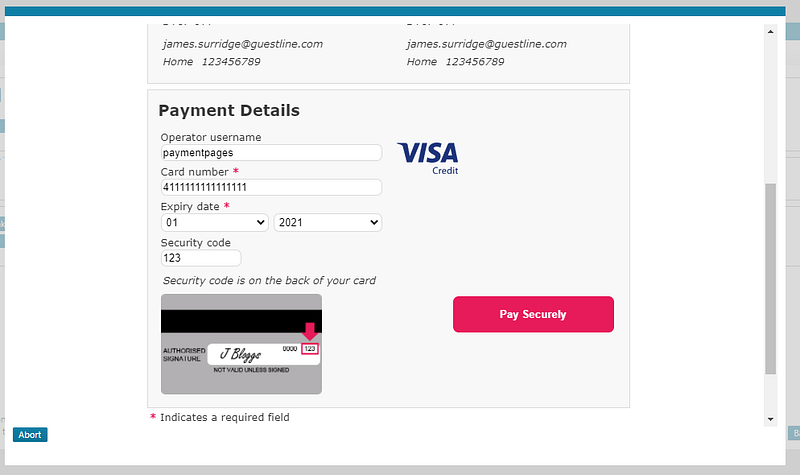
Now we can merge the first two steps and make the last two automatic. The next thing we did was improve on user experience when filling in card details. Here is how it looked before:

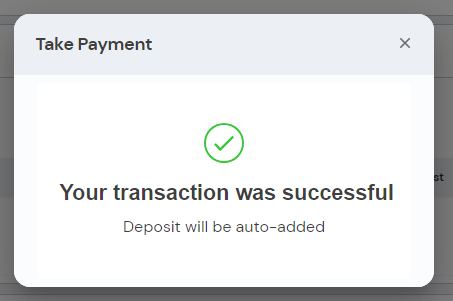
And now the GuestPay version:

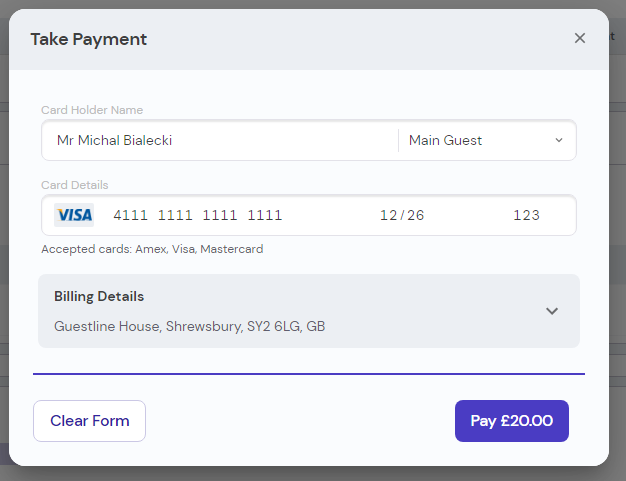
This is a single window that the user is going to see and the billing details will be prefilled from the reservation. The card type will be shown based on the card number.

Once the payment is completed, the notification will be shown to inform the user, that the payment was successful and the deposit will be auto-added.

Rolling out the change

Obviously, this is a massive change for the user, so it has to be introduced gradually. We introduced a feature toggle, that we can turn ON or OFF for each hotel separately. We started with just a few sites for a beta rollout and then based on users’ feedback, we added tweaks to the product.

We also put stress on how intuitive the new payment integration is and if the users can complete the payment without confusion or any guidelines from our side. We wanted to minimize the need for training and a potential rise of support calls regarding payments. This is really important when having around 4000 hotels using our product. Any confusion can bring hundreds of support calls, which we really don’t want to generate.

Once we had that confidence that the process works, we could switch more hotels and monitor how users use it. That is also the part where Application Insights came in handy. One of the metrics that were important for us is pay process duration.

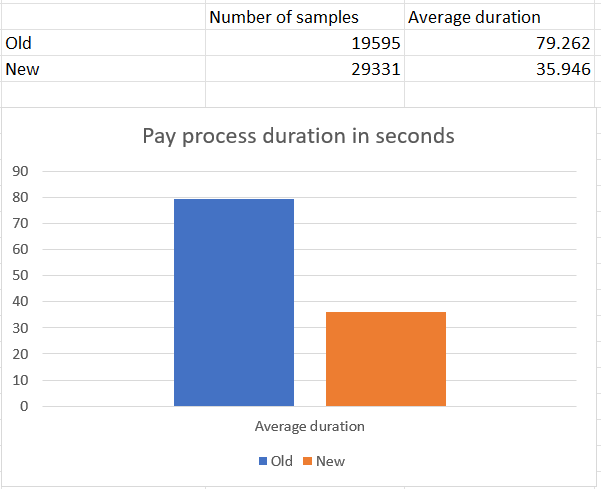
We were able to reduce the pay process by half! From 79 seconds to 35 seconds on average. If we multiply that by the number of payments, we get 44 seconds * 29331 = 1290564 seconds, that’s over 358 hours every 7 days.

We were able to save over 51 hours of guest time every day.

That’s 51 hours of receptionist time that can be used to serve guests and 51 hours of guest’s time not spent on a call to the hotel. With hotel difficulties in hiring staff, every process that can be sped up or made automatic is essential.

Summary

When introducing a change in the legacy system, data collection is crucial. You can ask your clients for feedback but that would always be subjective. Statistics don’t lie, but you need to ask the right questions and interpret them correctly. Remember that a man with a dog has on average 3 legs each.

Gathering data to guide development change will improve your product utility. Getting feedback from the client is one of the hardest things to achieve, but with the proper measurements, you can generate that feedback yourself. This could answer the question of whether a change is progressing in the right direction or give you a hint of what needs to be closely looked at.

Building a bond with the company while working 100% remotely

My name is Michał and since I joined Guestline, back in 2019, I am working 100% remotely from my attic in Zalasewo in central Poland. This is my first remote job and frankly, I wouldn’t change it in any way. Today I feel a part of Guestline and I developed strong relationships with many of my colleagues despite the fact we saw each other in person just a few times.

Remote work is ingrained in Guestline

Guestline Ltd. is a British company, established in the middle-sized town of Shrewsbury over 20 years ago. It grew steadily developing its hospitality software and today it employs over 200 people, with 100+ working from home. A couple of weeks ago I asked my teammates to pin their workplaces on the map. Here is the result:

It turns out, that we are spread all over Europe and beyond! In my team of 10 people, we have daily meetings from Poland, Germany, England, Spain, and Gibraltar!

Most of us work remotely, even from towns that have a physical office. It’s your choice. If you are comfortable with working remotely, you can do it. Maybe that’s why getting used to the new normal wasn’t that big of a deal when the Pandemic happened. It was much harder for our customers, that had to close their hotels, but for us, mostly working from home — nothing changed.

There’s always time for a chat

In Guestline we tend to have a pair programming or mob programming session whenever needed. Those sessions are held in our Teams team channel so that everyone can participate. Some might think it’s a waste of time, but I have other observations.

Chewbacca team “stand-up” meeting

Working together actually solves problems faster, because more heads are involved. You get instant feedback and a brainstorming session is happening automatically. This results in fewer comments on the pull requests and faster feature development.

Also in every session, you share competencies across the team, because you can get involved in a topic that you have no experience with. With guidance from the team, you can complete the task faster and dispel any doubts.

This approach is great for the onboarding process. When a new team member is joining, he or she needs to learn a lot and get to know as many people as possible. Teams chats with cameras on, while working on a task, are perfect for that. Then you can switch after an hour, so the other person shares a screen and gets his hands dirty.

Spend time together

One of the good ideas that we introduced to our daily routine is to have an ice-breaking question at the beginning of the stand-up. One of the team members comes up with a question and we answer it one by one. Here is an example:

If you could learn one new professional skill, what would it be?

You could get answers like woodworking, bass guitar playing, or chemistry and as a result, you are slowly starting to get to know your colleagues. This practice is a starting point for chit-chatting while working. I must admit that through those sessions I developed strong relationships that are not based purely on work.

Me 🙂

Meet in person once in a while

Despite working remotely, we do meet a couple of times a year. Once every year there is a whole company get-together in Shrewsbury. The idea of this meeting is not only to see each other in person but especially to talk to each other. We have a rule that you have to talk to as many people as possible and learn a bit about his or her work. And you should not use your laptop for the whole day!

Guestline summer meeting

I was amazed at how many people I knew just from Teams calls or chats and that I was able to talk to everyone like a distant uncle and find out how much we have in common.

Apart from the big meeting, we have smaller ones in Poznań or Shrewsbury, with fellow Labs members, where we go out for something to eat and a beer.

For me, working remotely blurs the difference between countries, cultures, or weather, because in the end we all use English and work as one development team. This is a great example of how the Internet and Guestline bring people together from all around the world.

Summary

People are sociable creatures, we need each other to grow. We are not robots to solve tasks as soon as possible, we need appreciation, motivation, and a feeling that we belong somewhere. If an organization sees it and gives space for non-task-solving activities, pair programming, and chit-chatting, then it makes it possible. I think Guestline does it well.

5 darmowych gier online, w które możesz zagrać w pracy

Większość programistów uwielbia grać w gry, a niektórzy z przyjemnością  grają po pracy. Niektóre firmy organizują regularne imprezy towarzyskie i spotkania. Jednak kiedy wybuchła pandemia, pracowaliśmy głównie zdalnie, a zorganizowanie imprezy towarzyskiej było po prostu niemożliwe.

W mojej firmie rozpoczęliśmy coś, co nazywa się fun hour, podczas której regularnie gramy razem w gry online. We wszystkie można grać za darmo, ale niektóre z nich oferują płatną subskrypcję z większą ilością opcji. Jestem pewien, że je polubisz!

Gratic.io

Gratic.io to zabawna i całkowicie darmowa gra online. Na zmianę losujemy jedno z dwóch zaproponowanych przez grę angielskich słów. Inni gracze muszą wpisać je ręcznie i odgadnąć, co przedstawia obraz.

Słowa mogą być bardzo proste, jak papuga w tym przypadku, albo naprawdę trudne, jak listwa przypodłogowa. Możesz stworzyć prywatny pokój dla swojej drużyny i grać razem. Zazwyczaj mamy też w tle rozmowę na Teams, dzięki czemu możemy wspólnie komentować rysunki i śmiać się.

Link: https://gartic.io/

Soldat

Soldat to bardzo intensywna, wieloosobowa strzelanka w 2D. Wybierasz jedną z ogólnie dostępnych map i grasz w jednym z dostępnych trybów gry (przechwytywanie flagi, deatmatch itp.). Grafika jest bardzo prosta, ale to fizyka gry sprawia, że wydaje się ona bardzo realistyczna. Gra jest wciągająca, ale krew i latające części ciała mogą nie wszystkim przypaść do gustu.

W moim zespole zwykle dzielimy się na dwie podgrupy i gramy w trybie przechwytywania flagi. Dzięki rozmowie na Teams w tle, możemy swobodnie komunikować się i dzielić obowiązki i zadania między członków zespołu.

Bardzo lubię Soldat, ale są dwie wady tej gry. Pierwszą z nich jest to, że musisz zainstalować go na swoim komputerze, a to może być problemem na formowym laptopie. Po drugie, nie możesz stworzyć prywatnej mapy dla swojej drużyny (przynajmniej w darmowej licencji), więc mogą dołączać inni gracze.

Link: https://soldat.pl/en/

Among Us

Jest to prosta gra, w którą może grać wiele osób, ale tylko dwóch graczy jest oszustami, a pozostali członkowie drużyny muszą się dowiedzieć, którzy to. Zespół musi naprawić statek kosmiczny wykonując proste zadania umieszczone na mapie. Oszuści muszą zabijać członków zespołu jeden po drugim, nie dając się złapać. Za każdym razem, gdy zostaną znalezione zwłoki, zespół decyduje, kto jest oszustem i jeśli się zgodzą – zostaje wyrzucony ze statku.


Najbardziej zabawną częścią tej gry jest dyskusja, która prowadzi do wyrzucenia kogoś. Musisz albo udowodnić, że nie jesteś oszustem, albo bardzo dobrze udawać.

Link: Among Us

Curve Fever

Jest to bardzo prosta gra zręcznościowa w 2D. Przypomina mi węża, ale w wersji wieloosobowej. Każdy gracz buduje ścianę i musi jechać ostrożnie, aby ominąć inne ściany.
 
 
Myślę, że może powiedzieć, że w tej grze praktyka czyni mistrza. 
 

GeoGuessr

 
Jest to oryginalna gra, w której musisz znaleźć miejsce na mapie świata, po prostu eksplorując je w trybie Google Street View. Na każde zdjęcie masz maksymalnie 2 minuty, aby wybrać najbliższą lokalizację. Gdy wszyscy skończą, zostaniesz uszeregowany według tego, jak dobrze wskazałeś to miejsce.
 
 
To wciągająca, ale powolna gra. Muszę przyznać, że to jedna z moich ulubionych gier, bo lubię podróżować i poznawać nowe miejsca. Jakoś się nie nudzi i gramy w nią prawie za każdym razem.


Podsumowanie

Mam nadzieję, że spodobał Ci się mój wybór gier online, w które możesz grać z kolegami z zespołu. Jak ci się podobało? Może gracie w inne gry? Proszę daj mi znać 🙂


5 free online games you can play with your team

Most developers love playing games and some of them still enjoy it after work. Some companies organize regular social events and get-togethers to have fun. However, when pandemic started we mostly worked remotely and organizing a social event was simply impossible.

In my company we started something called a fun hour, where we regularly play online games together. All of them can be played freely, but some of them offers payed subscription with more options. I’m sure you’ll like them! 

Gratic.io

Gratic.io is a fun and completely free online game. You take turns and draw one of the two words proposed by the game. Other players need to type in the works and guess what the picture represents.

Words can be really simple, like a parrot in this case, to really hard one, like baseboard. You can create a private room for your team and play together. We also like to have a Teams call in the background, so we can comment and laugh together. 

Link: https://gartic.io/

Soldat

Soldat is a very intense, 2D, multiplayer shooter. You choose one of the publicly available map and play in one of the available game modes (capture the flag, deatmatch, etc.). Graphic is very simple, but it is the physics of the game that makes it feel realistic. Game is very engaging, but blood and flying body parts isn’t for everyone.

In my team, we usually divide into two sub-teams and play capture the flag mode. With Teams call in the background we can communicate freely and divide responsibilities and tasks to team members. 

I like Soldat very much, but there are two downsides of this game. First one is, that you have to install it on your machine and that could be a problem on your company’s laptop. The second one is that you cannot create a private map for your team (at least in the free license), so there might be other players joining.

Link: https://soldat.pl/en/

Among Us

This is a simple game, where many people can play, but only one two players are imposters and other teammates needs to find out who they are. The team needs to fix the spaceship by completing simple tasks placed on the map. Imposters needs to kill team members one by one without getting caught. Everytime a dead body is found, the team decides who is the imposter and if they agree – he or she is kicked out.


The most funny part of this game is the discussion that leads to kicking someone out. You either need to prove you’re not the imposter or fake it really good.

Link: Among Us

Curve Fever

This is a very simple, 2D arcade game. It resembles me a snake, but in a multiplayer version. Every player leaves a wall and need to drive carefully to omit all the walls. 
 
 
I think you can already tell, that in this game practise makes perfect. 
 

GeoGuessr

 
This is an original game, where you need to spot a place on the worlds map just by exploring a place in a google street view mode. You have a maximum of 2 minutes on every photo to pick the nearest location. After everyone finishes, you will be ranked by how good you spotted the place.
 
 
This is an engaging, but slow paced game. I have to admit that this is one of my favourite games as I like to travel and explore new places. Somehow it doesn’t get boring and we play it almost every time. 


Summary

I hope you liked my selection of multiplayer games, that you can play with your teammates. How did you like it? Maybe you are enjoying different ones? Please let me know 🙂


Praktyczne różnice pomiędzy C# a Vb.Net

Od około półtora roku pracuję w projekcie, który początkowo był napisany w Vb.Net, ale teraz nowszy kod jest tworzony w C#. To świetny przykład tego, jak jeden projekt można napisać w dwóch językach, a kod w Vb.Net może odwoływać się do C# i na odwrót.

Vb.Net i C# są bardzo podobne i są kompilowane do tego samego języka pośredniego, ale niektóre różnice są bardziej zaskakujące niż inne.

Proste różnice

Zacznijmy od rzeczy oczywistych. Vb.Net używa prostego języka angielskiego w swojej składni, podczas gdy C# używa składni opartej na C. Spójrzmy na przykład.

    private string ReplaceAnd(string s)
    {
        if (s != null && s.Contains(":"))
            return s.Replace(":", "?");

        return s;
    }

A teraz ten sam przykład w Vb.Net:

    Private Function ReplaceAnd(s As String) As String
        If s IsNot Nothing And s.Contains(":") Then
            Return s.Replace(":", "?")
        End If

        Return s
    End Function

Przyzwyczajenie się do deklarowania typów za pomocą słowa kluczowego As zajęło mi trochę czasu. Także If potrzebuje słowa Then, ale to są rzeczy, które piszesz raz lub dwa razy i staje się to nawykiem.

Moim zdaniem największe zmiany przy porównaniu C # z Vb.Net to:

  • nie używamy nawiasów do bloków kodu
  • nie ma potrzeby umieszczania średników na końcu instrukcji
  • nazwy zmiennych nie uwzględniają wielkości liter
  • i kilka innych 😃

&& vs And vs AndAlso

Wszystkie te proste różnice to tylko różnice w składni języka, ale zasadniczo kod pozostaje taki sam. Jednym z moich największych błędów podczas pisania kodu Vb.Net było użycie operatora And jako && z C#. Chodzi o to, że te dwa operatory nie są równoznaczne.

Spójrzmy na przykład. Użyję dwóch metod, które sprawdzają wartość null w instrukcji If i dokonają podmiany ciągu znaków.

    Private Function ReplaceAndAlso(s As String) As String
        If s IsNot Nothing AndAlso s.Contains(":") Then
            Return s.Replace(":", "?")
        End If

        Return s
    End Function

    Private Function ReplaceAnd(s As String) As String
        If s IsNot Nothing And s.Contains(":") Then
            Return s.Replace(":", "?")
        End If

        Return s
    End Function

Różnica pomiędzy And i AndAlso jest następująca:

  • And sprawdzi warunek po prawej stronie, nawet jeśli warunek po lewej stronie jest fałszywy
  • AndAlso nie sprawdzi warunku po prawej stronie, jeśli ten po lewej jest fałszywy

Aby to zobrazować, napisałem testy jednostkowe:

    <TestCase("abc:d", "abc?d")>
    <TestCase(Nothing, Nothing)>
    Public Sub AndAlsoTest(toReplace As String, expected As String)
        ReplaceAndAlso(toReplace).Should().Be(expected)
    End Sub

    <TestCase("abc:d", "abc?d")>
    <TestCase(Nothing, Nothing)>
    Public Sub AndTest(toReplace As String, expected As String)
        ReplaceAnd(toReplace).Should().Be(expected)
    End Sub

A rezultaty są następujące:

AndTest kończy się niepowodzeniem, ponieważ operator Andsprawdza zarówno warunek po lewej, jak i po prawej stronie, co powoduje wyjątek NullReferenceException. Więc jeśli chcesz sprawdzić wartość null w instrukcji If i zrobić coś innego, po prostu użyj AndAlso.

Wymuszenie przekazania zmiennej przez wartość

Może nie jest to duża różnica, ale byłem zaskoczony, że da się to zrobić.

Przyjrzyjmy się prostemu kodowi i dwóm testom:

    <Test>
    Public Sub AddTest()
        Dim a As Integer = 5

        Dim result = Add(a)
        a.Should().Be(6)
        result.Should().Be(6)
    End Sub

    <Test>
    Public Sub AddByValueTest()
        Dim a As Integer = 5

        Dim result = Add((a))
        a.Should().Be(5)
        result.Should().Be(6)
    End Sub

    Public Function Add(ByRef x As Integer) As Integer
        x = x + 1
        Return x
    End Function

Mamy prostą metodę Add, w której zwiększamy podaną wartość o 1. Przekazujemy tę zmienną przez referencję, więc również należy ją zmienić.

Zauważ, że w AddByValueTest przekazujemy (a) i w ten sposób możemy przekazać zmienną przez wartość. Zauważ, że działa to tylko dla typów wartościowych.

A wyniki dowodzą, że tak naprawdę działa:

Zamiana enum na string

Ta różnica mnie zaskoczyła, kiedy ją zobaczyłem i była to ostateczna motywacja do napisania tego postu. Robiłem refaktoryzację wokół Vb.Net z konwersją enum-ów, a mój kolega przeglądał zadanie i powiedział.

– Hej, fajna refaktoryzacja, ale obawiam się, że może nie zadziałać. – powiedział kolega.

– Naprawdę? Uruchomiłem ten kod i działał poprawnie. – Powiedziałem.

– Lepiej sprawdź to jeszcze raz, dla pewności napisałem nawet test jednostkowy. – powiedział kolega.

Rzućmy okiem na ten test. Konwertuję enum na ciąg znaków.

    public enum ProfileType
    {
        Person = 1,
        Company = 2
    }

    [Test]
    public void ConvertEnumTest()
    {
        Convert.ToString(ProfileType.Company).Should().Be("2");
    }

A kiedy go uruchomisz, zawodzi, mój kolega miał rację. 😲

Jednak byłem podejrzliwy i kod, który napisałem był w Vb.Net, a nie w C#, więc napisałem kolejny test. Ale tym razem w Vb.Net.

    <Test>
    Public Sub ConvertEnumTest()

        Convert.ToString(ProfileType.Company).Should().Be("2")

    End Sub

I wiesz co? Przechodzi!

Więc mój oryginalny kod był poprawny. Jednak Convert.ToString() na enum działa inaczej w Vb.Net i C#.

Summary

Praca z Vb.Net brzmi jak powrót do średniowiecza, ale w rzeczywistości dość szybko przyzwyczaiłem się do składni Visual Basic. Możliwości obu są bardzo podobne, ponieważ pod spodem nadal jest ten sam kod, ale C# wydaje mi się nieco bardziej zwięzły i intuicyjny. Może dlatego, że w szkole wolałem C++ od Pascala 😁

Mam nadzieję, że post Ci się podobał, miłego dnia! 😊

Practical differences between C# vs Vb.Net

For around a year and a half, I’ve been working with a project that was initially written in Vb.Net, but now newer code is written in C#. It’s a great example of how one project can be written in two languages, and code in Vb.net can reference C# and the other way round.

Vb.Net and C# are very similar and are compiled to the same Intermediate Language, but I found some differences more surprising than the others. 

Simple differences

Let’s start with the obvious things. Vb.Net uses simple English in its syntax, while C# uses C-based syntax. Let’s have a look at the example.

    private string ReplaceAnd(string s)
    {
        if (s != null && s.Contains(":"))
            return s.Replace(":", "?");

        return s;
    }

And now the same example in Vb.Net:

    Private Function ReplaceAnd(s As String) As String
        If s IsNot Nothing And s.Contains(":") Then
            Return s.Replace(":", "?")
        End If

        Return s
    End Function

It took me some time to get used to declaring types with As keyword. Also If statement needs Then, but those are the things you write once or twice and it becomes a habit.

In my opinion, the biggest changes when comparing C# with Vb.Net are:

  • we don’t use brackets for code blocks
  • there is no need for semicolons at the end of the instruction
  • variable names are not case sensitive
  • and a few more 😃

&& vs And vs AndAlso

All those simple differences are just differences in the language, but basically, code stays the same. One of my biggest mistakes when I wrote Vb.Net code was using And as && operator in C#. The thing is that they are not the same.

Let’s have a look at the example. I’ll use two methods that check for null in the If statement and do a replace.

    Private Function ReplaceAndAlso(s As String) As String
        If s IsNot Nothing AndAlso s.Contains(":") Then
            Return s.Replace(":", "?")
        End If

        Return s
    End Function

    Private Function ReplaceAnd(s As String) As String
        If s IsNot Nothing And s.Contains(":") Then
            Return s.Replace(":", "?")
        End If

        Return s
    End Function

The difference between And and AndAlso is that:

  • And will check statement on the right side even if the statement on the left side is false
  • AndAlso will not check the right side statement if the one on the left is false

To show it clearly I wrote unit tests:

    <TestCase("abc:d", "abc?d")>
    <TestCase(Nothing, Nothing)>
    Public Sub AndAlsoTest(toReplace As String, expected As String)
        ReplaceAndAlso(toReplace).Should().Be(expected)
    End Sub

    <TestCase("abc:d", "abc?d")>
    <TestCase(Nothing, Nothing)>
    Public Sub AndTest(toReplace As String, expected As String)
        ReplaceAnd(toReplace).Should().Be(expected)
    End Sub

And the results are:

AndTest fails, cause And operator check both left and right side, which causes a NullReferenceException. So if you want to check for null in the If statement and do something else as well, just use AndAlso.

Enforce passing a variable by value

Maybe it’s not a very significant difference, but I was surprised that it can be done.

Let’s have a look at a simple code and two tests:

    <Test>
    Public Sub AddTest()
        Dim a As Integer = 5

        Dim result = Add(a)
        a.Should().Be(6)
        result.Should().Be(6)
    End Sub

    <Test>
    Public Sub AddByValueTest()
        Dim a As Integer = 5

        Dim result = Add((a))
        a.Should().Be(5)
        result.Should().Be(6)
    End Sub

    Public Function Add(ByRef x As Integer) As Integer
        x = x + 1
        Return x
    End Function

We have a simple Add method, where we increment a given value by 1. We pass this variable by reference, so it should be changed as well.

Notice that in AddByValueTest we pass (a) and this is the way how we can pass a variable by value. Note that it only works for value types.

And the results proves that it really works like that:

Converting enum to string

This difference stunned me when I saw it and it was a final motivation to write this post. I was doing a refactoring around Vb.Net with converting enums and my colleague was doing a review of the task and said.

– Hey, cool refactoring, but I’m afraid it might not work. – said the colleague.

– Really? I run that code and it was fine. – I said.

– You might want to check that again, I even wrote a unit test, to be sure. – said the colleague.

Let’s have a look at this test. I’m converting an enum to a string.

    public enum ProfileType
    {
        Person = 1,
        Company = 2
    }

    [Test]
    public void ConvertEnumTest()
    {
        Convert.ToString(ProfileType.Company).Should().Be("2");
    }

And when you run it, it fails, my colleague was right. 😲

However, I was suspicious and the code I wrote was in Vb.Net, not in C#, so I wrote another test. But this time in Vb.Net.

    <Test>
    Public Sub ConvertEnumTest()

        Convert.ToString(ProfileType.Company).Should().Be("2")

    End Sub

And you know what? It passes!

So my original code was correct. However, Convert.ToString() on an enum works differently in Vb.Net and C#.

Summary

Working with Vb.Net sounds like going back to the middle-ages, but in fact, I got accustomed to the Visual Basic syntax quite quick. The capabilities of both are very similar, cause it’s still the same code underneath, but I found C# slightly more concise and more intuitive as well. Maybe it’s because I preferred C++ over Pascal in school 😁

There are differences, as you saw in this article, but they do not interfere with your daily work.

I hope you like this post, have a good day! 😊

Refaktoryzacja przy pomocy refleksji

Czasami zdarza się, że muszę przeprowadzić refaktoryzację, w której Resharper nie może mi pomóc. W moim ostatnim poście opisałem, jak przydatne mogą być wyrażenia regularne przy takiej pracy: Refaktoryzacj przy pomocy wyrażeń regularnych w Visual Studio

Tym razem sprawa jest inna i prosta podmiana nie zadziała w tym przypadku.

Domyślna wartość dla właściwości

Natrafiłem na kod, w którym atrybut DefaultValue był często używany, ale w nie tak, jak powinien. Atrybut DefaultValue jest częścią platformy .Net Framework i jest używany przez generatory kodu w celu sprawdzenia, czy wartość domyślna właściwości jest taka sama jak wartość bieżąca i czy należy wygenerować dla tej właściwości kod. Nie chcę wchodzić w szczegóły, ale możesz zajrzeć do tego artykułu, aby uzyskać więcej informacji.

W moim przypadku musiałem zmienić wszystkie domyślne wartości na  przypisania właściwości podczas tworzenia klasy. Problem polegał na tym, że ta klasa miała ponad 1000 takich właściwości, a zrobienie tego ręcznie nie tylko zajęłoby dużo czasu, ale mogłoby potencjalnie wprowadzić błędy.

Spójrzmy na przykładowy kod:

    public class DefaultSettings
    {
        public DefaultSettings()
        {
            // assignments should be here
        }

        [DefaultValue(3)]
        public int LoginNumber { get; set; }

        [DefaultValue("PrimeHotel")]
        public string HotelName { get; set; }

        [DefaultValue("London")]
        public string Town { get; set; }

        [DefaultValue("Greenwod")]
        public string Street { get; set; }

        [DefaultValue("3")]
        public string HouseNumber { get; set; }

        [DefaultValue(RoomType.Standard)]
        public RoomType Type { get; set; }
    }

Tutaj przydaje się refleksja. Mógłbym łatwo zidentyfikować atrybuty właściwości dla danego typu, ale jak zmienić je w kod?

Napiszmy test jednostkowy! Test jednostkowy to mały fragment kodu, który może korzystać z niemal każdej klasy z testowanego projektu i co najważniejsze – można go łatwo uruchomić. 💪

    [TestFixture]
    public class PropertyTest
    {
        [Test]
        public void Test1()
        {
            var prop = GetProperties();

            Assert.True(true);
        }

        public string GetProperties()
        {
            var sb = new StringBuilder();

            PropertyDescriptorCollection sourceObjectProperties = TypeDescriptor.GetProperties(typeof(DefaultSettings));

            foreach (PropertyDescriptor sourceObjectProperty in sourceObjectProperties)
            {
                var attribute = (DefaultValueAttribute)sourceObjectProperty.Attributes[typeof(DefaultValueAttribute)];

                if (attribute != null)
                {
                    // produce a string
                }
            }

            return sb.ToString();
        }
    }

To prosty kod, który uruchamia metodę GetProperties. Metoda ta pobiera PropertyDescriptorCollection która reprezentuje wszystkie właściwości w klasie DefaultSettings. Następnie dla każdej z nich sprawdzamy, czy zawiera DefaultValueAttribute. Teraz pozostaje tylko wygenerowanie kodu dla każdej właściwości przy użyciu klasy StringBuilder. Domyślasz się jak? Jest to łatwiejsze niż może się wydawać.

Sprawdźmy jak kod będzie się różnił dla poszczególnych typów:

public string GetProperties()
{
    var sb = new StringBuilder();

    PropertyDescriptorCollection sourceObjectProperties = TypeDescriptor.GetProperties(typeof(DefaultSettings));

    foreach (PropertyDescriptor sourceObjectProperty in sourceObjectProperties)
    {
        var attribute = (DefaultValueAttribute)sourceObjectProperty.Attributes[typeof(DefaultValueAttribute)];

        if (attribute != null)
        {
            if (sourceObjectProperty.PropertyType.IsEnum)
            {
                sb.AppendLine($"{sourceObjectProperty.Name} = {sourceObjectProperty.PropertyType.FullName.Replace("+", ".")}.{attribute.Value};");
            }
            else if (sourceObjectProperty.PropertyType.Name.Equals("string", StringComparison.OrdinalIgnoreCase))
            {
                sb.AppendLine($"{sourceObjectProperty.Name} = \"{attribute.Value}\";");
            }
            else
            {
                var value = attribute.Value == null ? "null" : attribute.Value;
                sb.AppendLine($"{sourceObjectProperty.Name} = {value};");
            }
        }
    }

    return sb.ToString();
}

Dla typu enum, musimy wyświetlić przestrzeń nazw(namespace) oraz typ i jego wartość po kropce. Dla ciągów znaków,  musimy wstawić apostrofy, a dla typu nullowalnego, wartością powinno być null. Dla innych musimy tylko przypisać wartość.

Jesteś ciekawy co z tego wyszło? 🤔

Powiedziałbym, że całkiem, całkiem:) 

Kiedy wkleję go do mojego konstruktora, kod będzie wyglądał następująco:

    public DefaultSettings()
    {
        LoginNumber = 3;
        HotelName = "PrimeHotel";
        Town = "London";
        Street = "Greenwod";
        HouseNumber = "3";
        Type = PrimeHotel.Web.Models.RoomType.Standard;
    }

I wiesz co? Działa!

Podsumowanie

Używanie refleksji nie jest najlepszą praktyką, ale jest ona bardzo potężnym narzędziem. W tym przykładzie pokazałem, jak jej użyć i wywołać ten kod w bardzo prosty sposób – jako test jednostkowy. Nie jest to kod, który bym commitował, ale w przypadku podejścia prób i błędów jest świetny. Jeśli natrafiłeś na takie ręczne zadanie w swoim kodzie, spróbuj je zautomatyzować 😎

Mam nadzieję, że nauczyłeś się czegoś dzisiaj i jeżeli tak, to świetnie! 🍺

Nie zapomnij zapisać się na newsletter, aby nie przegapić kolejnych postów. 📣


Refactoring with reflection

There are often times when you need to do a refactoring, that Resharper cannot help you with. In my last post I described how regular expressions can be useful: Static refactoring with Visual Studio regular expressions

This time the case is different and simple replacement would not work in this case.

The default value for a property

I came across the code, where the DefaultValue attribute was heavily used, but actually, not like it should be. The DefaultValue attribute provided by the .Net Framework is useful for code generators to see if the property default value is the same as the current value and if the code for that property should be generated. I don’t want to get into details, but you can have a look at this article for more information.

In my case, I needed to change all the default values to assignments of properties when the class was created. The problem was that this class had more than 1000 properties like this and doing it manually would not only take a lot of time but could potentially introduce bugs.

Let’s have a look at the sample code:

    public class DefaultSettings
    {
        public DefaultSettings()
        {
            // assignments should be here
        }

        [DefaultValue(3)]
        public int LoginNumber { get; set; }

        [DefaultValue("PrimeHotel")]
        public string HotelName { get; set; }

        [DefaultValue("London")]
        public string Town { get; set; }

        [DefaultValue("Greenwod")]
        public string Street { get; set; }

        [DefaultValue("3")]
        public string HouseNumber { get; set; }

        [DefaultValue(RoomType.Standard)]
        public RoomType Type { get; set; }
    }

This is where reflection comes in handy. I could easily identify the attributes on properties for a given type, but how to change that into code?

Let’s write a unit test! A unit test is a small piece of code that can use almost any class from the tested project and what’s the most important – can be easily run. 💪

    [TestFixture]
    public class PropertyTest
    {
        [Test]
        public void Test1()
        {
            var prop = GetProperties();

            Assert.True(true);
        }

        public string GetProperties()
        {
            var sb = new StringBuilder();

            PropertyDescriptorCollection sourceObjectProperties = TypeDescriptor.GetProperties(typeof(DefaultSettings));

            foreach (PropertyDescriptor sourceObjectProperty in sourceObjectProperties)
            {
                var attribute = (DefaultValueAttribute)sourceObjectProperty.Attributes[typeof(DefaultValueAttribute)];

                if (attribute != null)
                {
                    // produce a string
                }
            }

            return sb.ToString();
        }
    }

It’s a simple test that just runs GetProperties method. This method fetches PropertyDescriptorCollection that represents all properties in DefaultSettings class. Then for each of those, we check if they contain DefaultValueAttribute. Now we just need to somehow generate code for every property and write it to StringBuilder. It’s actually simpler than it sounds.

Let’s check how code will behave differently for enums, strings, and other types:

public string GetProperties()
{
    var sb = new StringBuilder();

    PropertyDescriptorCollection sourceObjectProperties = TypeDescriptor.GetProperties(typeof(DefaultSettings));

    foreach (PropertyDescriptor sourceObjectProperty in sourceObjectProperties)
    {
        var attribute = (DefaultValueAttribute)sourceObjectProperty.Attributes[typeof(DefaultValueAttribute)];

        if (attribute != null)
        {
            if (sourceObjectProperty.PropertyType.IsEnum)
            {
                sb.AppendLine($"{sourceObjectProperty.Name} = {sourceObjectProperty.PropertyType.FullName.Replace("+", ".")}.{attribute.Value};");
            }
            else if (sourceObjectProperty.PropertyType.Name.Equals("string", StringComparison.OrdinalIgnoreCase))
            {
                sb.AppendLine($"{sourceObjectProperty.Name} = \"{attribute.Value}\";");
            }
            else
            {
                var value = attribute.Value == null ? "null" : attribute.Value;
                sb.AppendLine($"{sourceObjectProperty.Name} = {value};");
            }
        }
    }

    return sb.ToString();
}

For an enum, we need to provide a name with namespace and an enum value after a dot. For strings, we need to add apostrophes and for nullable types, we need to provide null. For others – we just assign the attribute value.

Are you curious if that would work? 🤔

Not too bad, not too bad at all 🙂 

If I paste that into my constructor, it will look like this:

    public DefaultSettings()
    {
        LoginNumber = 3;
        HotelName = "PrimeHotel";
        Town = "London";
        Street = "Greenwod";
        HouseNumber = "3";
        Type = PrimeHotel.Web.Models.RoomType.Standard;
    }

Guess what? It works!

The summary

Reflection is not considered as the best practice but it is a very powerful tool. In this example, I showed how to use it and invoke that code in a very simple way – as a unit test. It’s not the code that you would commit, but for a try and error process, it’s great. If you came across a manual task like this in your code, try to hack it 😎

I hope that you learned something with me today. If so, happy days 🍺

Don’t forget to subscribe to the newsletter to get notifications about my next posts. 📣


Refaktoryzacj przy pomocy wyrażeń regularnych w Visual Studio

Wyrażenia regularne to uniwersalne narzędzie w skrzynce narzędziowej każdego programisty. Jednym z miejsc, w których mogą one być przydatne, są okna dialogowe Quick Find i Quick Replace w Visual Studio. W tym poście pokażę, jak wykorzystać możliwości wyrażeń regularnych w inteligentnej refaktoryzacji.

Zmiana enum na string

Załóżmy, że chciałbym zmienić enum na ciąg znaków w mojej aplikacji, ponieważ zdałem sobie sprawę, że ta właściwość może zawierać wartość, którą użytkownik dodał ręcznie i nie można jej wstępnie zdefiniować. Rzućmy okiem na ten enum:

public enum EventType
{
    Unknown = 0,
    Concert = 1,
    Movie = 2
}

Teraz spróbujmy znaleźć wszystkie zastosowania tego enuma. Do tego zadania używam Quick Find w programie Visual Studio, Ctrl + F.

Czy zauważyłeś niebieski prostokąt w oknie dialogowym Quick Find? Jest to opcja wyszukiwania za pomocą wyrażenia regularnego. Włączmy to i przejdźmy do okna dialogowego Quick Replace. Możesz to zrobić za pomocą przełącznika po lewej stronie lub skrótu Ctrl + H.

Wpisałem wyrażenie EventType\.(\w+), które oznacza że szukam czegoś, co zaczyna się od EventType, później następuje zwyczajna kropka, którą muszę poprzedzić \. Następnie nawiasy, ktore oznaczają, że rozliczynam podgrupę, a /w+ oznacza dowolną literę jeden lub więcej razy. Zamienię to na "$1", czyli standardowe cudzyslowy oraz $1, który jest oznaczeniem pierwszej grupy.

Rezultat jest całkiem niezły:

Możemy nieco dopracować to wyrażenie i dodać nazwę grupy.

Zamieniając (\w+) na  (?<entryType>\w+) nadaję nazwę rezultatom tej grupy, której możemy użyć w Quick Replace.

Podsumowanie

Tworzenie wyrażeń regularnych to proces prób i błędów, w którym trzeba dopracować wyrażenie kilka razy, aż będzie pasowało do tego co potrzebujemy. Rezultaty mogą jednk przerosnąć nasze oczekiwania i przy takiej ręcznej pracy można zaoszczędzić dużo czasu.

Mam nadzieję, że nauczyłeś się dziś czegoś nowego, a jeśli tak, to ten dzień na pewno będzie spoko! 💗 

Static refactoring with Visual Studio regular expressions

Regular expressions are a multi-tool in every developer toolbox. One of the places they can be useful is Quick Find and Quick Replace dialogs in Visual Studio. In this post, I’m going to show you how you can use the power of regular expressions in smart refactoring.

Changing an enum to string

Let’s assume I’d like to change an enum to a string in my application, cause I realized that this property can include a value that the user added by hand and cannot be predefined. Let’s have a look at this enum:

public enum EventType
{
    Unknown = 0,
    Concert = 1,
    Movie = 2
}

Now let’s try to find all the usages of this enum. For that task, I’m using a Quick Find in Visual Studio, Ctrl + F.

Have you noticed a blue rectangle in a Quick Find dialog? It is an option to search with a regular expression. Let’s enable that and switch to the Quick Replace dialog. You can do it with the toggle on the left side or with the Ctrl + H.

I entered EventType\.(\w+) expression that means, that it will start with a EventType string, then a regular dot, which I must escape with \. Next are parenthesis, which means that I’m starting a subexpression group, and /w+ will match a word character one or more times. I’m going to replace it with "$1", which is a standard quotation mark and $1 is a reference to the first group.

And the result is really good:

We can refine this expression a bit and add a name for a group.

By changing (\w+) to  (?<entryType>\w+) we have given a name to the results of this group. We can use it in the Replace With input.

Summary 

Creating a regular expression is a try-and-error process, where you would need to refine your expression a couple of times until it matches what you need. However, it can be really useful and with a manual job like that, can save a lot of time.

I hope that you learned something new today and if so, happy days! 💗