Tag Archives: azure

Add CosmosDB persistent storage to Microsoft Orleans in .Net Core

Microsoft Orleans is a developer-friendly framework for building distributed, high-scale computing applications. It is a perfect solution for processing a large amount of data quickly. It shows it strengths especially when you need to use a storage while processing the data because it keeps a state in memory so save or update state operations are very fast.

If you want to know more about Microsoft Orleans, read my previous post about it: https://www.michalbialecki.com/2018/03/05/getting-started-microsoft-orleans/

Getting started with Microsoft Orleans for .Net Core

Microsoft Orleans 2.0 is the version written in .Net Standard, that can be used by applications targeting both .Net Core and the full framework. You can have a look at its github repo here: https://github.com/dotnet/orleans.

There is also a very good Microsoft page with an updated documentation: https://dotnet.github.io/orleans/Documentation/2.0/New.html

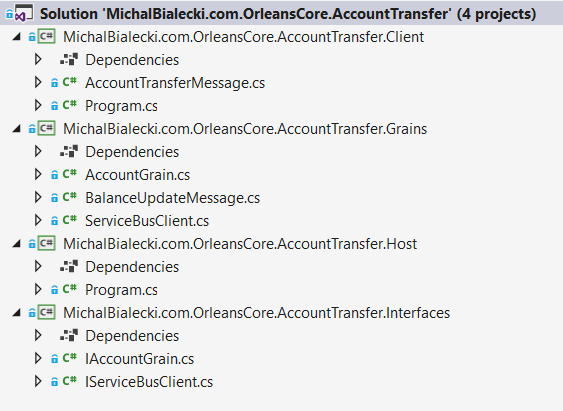
Regular Orleans solution consists of 4 projects: Grains – library with Orleans actor classes, Interfaces – abstraction for Grains to use in other libraries, Host – a project that runs a silos and a Client – project that connect to Host and execute clients code.

Have a look at the project structure, thanks to .Net Core it is simple and minimal.

Persistent storage in Microsoft Orleans

Microsoft Orleans offers a variety of options to save grain state. With one of the provided mechanisms, you can save grain state without writing any code, just providing proper configuration. You can also implement your own provider by implementing low-level interfaces. Here are some storage provider methods you can use when configuring silo host:

  • AddMemoryGrainStorage – grain state will be kept in memory and probably will be lost when the machine is down or new version is deployed
  • AddAzureBlobGrainStorage – Azure Blob storage will be used
  • AddAzureTableGrainStorage – Azure Table API will be used, Cosmos DB Table API is also compatible
  • AddAdoNetGrainStorage – ADO.Net storage in MSSQL database
  • AddDynamoDBGrainStorage – Amazon AWS DynamoDB storage

Note that adding Blob and Azure Table extension methods is possible when Microsoft.Orleans.Persistence.AzureStorage package is installed. ADO.Net extension method is in the Microsoft.Orleans.Persistence.AdoNet package and DynamoDB extension method is in Microsoft.Orleans.Persistence.DynamoDB package.

If you want to save grain state, in a grain class you need to extend Grain<T> instead of Grain, where T is an application data type, that will be persistent. You also can set a storage provider name in a grain class like this, but if you don’t, then a default provider will be used.

[StorageProvider(ProviderName="AzureTable")]
public class AccountGrain : Grain<Balance>, IAccountGrain

Read and write state in the grain

Grain state will be read automatically from storage provider when grain is activated and before OnActivateAsync() method is called. The grain is responsible for saving it’s state by calling base.WriteStateAsync() method. Orleans may perform performance optimizations and it is not guaranteed that state will be saved right after WriteStateAsync method is called. To be sure that grain uses the latest data from persistent storage, you can manually read data with base.ReadStateAsync() method.

Configuring CosmosDB Table API persistent storage

First I’ll extend an AccountGrain base class with Balance class, that will represent my state.

namespace MichalBialecki.com.OrleansCore.AccountTransfer.Grains
{
    [Serializable]
    public class Balance
    {
        public decimal Value { get; set; } = 0;
    }
    
    public class AccountGrain : Grain<Balance>, IAccountGrain
    {
        private readonly IServiceBusClient serviceBusClient;

        public AccountGrain(IServiceBusClient serviceBusClient)
        {
            this.serviceBusClient = serviceBusClient;
        }

        async Task IAccountGrain.Deposit(decimal amount)
        {
            this.State.Value += amount;
            await this.WriteStateAsync();

            await NotifyBalanceUpdate();
        }

        async Task IAccountGrain.Withdraw(decimal amount)
        {
            this.State.Value -= amount;
            await this.WriteStateAsync();

            await NotifyBalanceUpdate();
        }

        Task<decimal> IAccountGrain.GetBalance()
        {
            return Task.FromResult(this.State.Value);
        }

        private async Task NotifyBalanceUpdate()
        {
            var balanceUpdate = new BalanceUpdateMessage
            {
                AccountNumber = (int)this.GetPrimaryKeyLong(),
                Balance = this.State.Value
            };

            var message = new Message(Encoding.UTF8.GetBytes(JsonConvert.SerializeObject(balanceUpdate)));
            await serviceBusClient.SendMessageAsync(message);
        }
    }
}

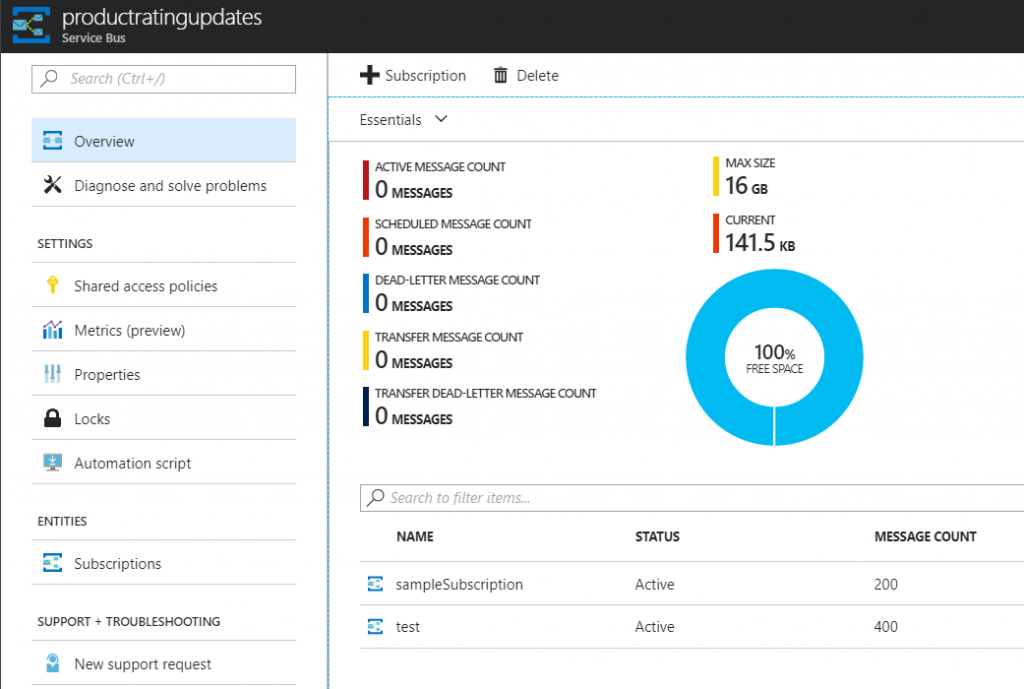
I’m using a NotifyBalanceUpdate method to send Service Bus message with an updated state. Notice that I save a state with this.WriteStateAsync() method after I update it.

Next thing to do is set a right configuration in Host project Program.cs file.

    private static async Task<ISiloHost> StartSilo()
    {
        var builder = new SiloHostBuilder()
            .UseLocalhostClustering()
            .Configure<EndpointOptions>(options => options.AdvertisedIPAddress = IPAddress.Loopback)
            .ConfigureServices(context => ConfigureDI(context))
            .ConfigureLogging(logging => logging.AddConsole())
            .AddAzureTableGrainStorageAsDefault(
                (options) => {
                    options.ConnectionString = CosmosBDConnectionString;
                    options.UseJson = true;
                });

        var host = builder.Build();
        await host.StartAsync();
        return host;
    }

This is a very simple configuration, where I use AddAzureTableGrainStorageAsDefault extensions method and provide a connection string to CosmosDB Table API storage and a flag that I’d like data to be saved as json.

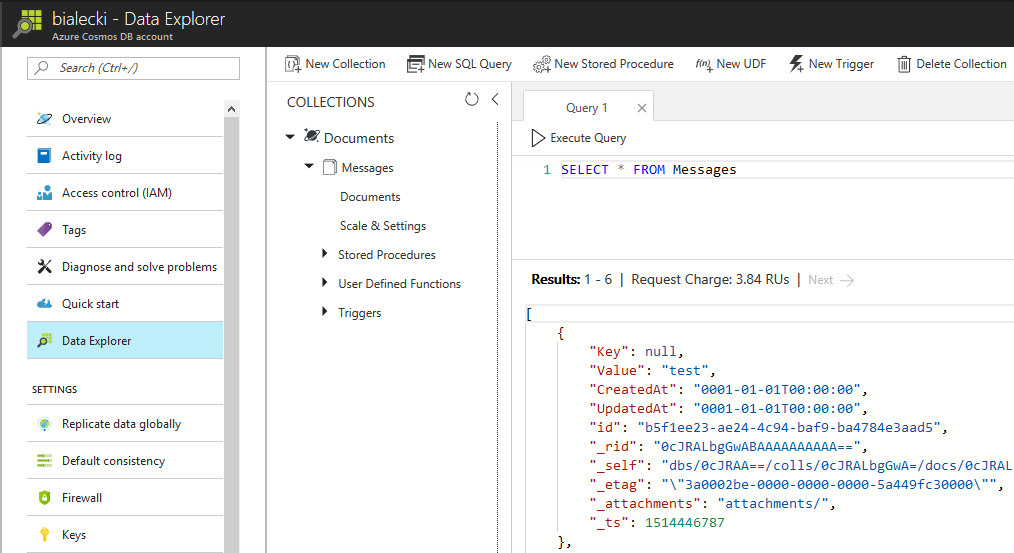
After running my application in Azure Portal I can see OrleansGrainState table, that was automatically created and this is what it contains:

You can read more about grain persistence in this Microsoft page: https://dotnet.github.io/orleans/Documentation/Core-Features/Grain-Persistence.html

All code that you saw is available at my GitHub repository: https://github.com/mikuam/orleans-core-example.

Receiving messages from Azure Service Bus in .Net Core

For some time now we can observe how new .Net Core framework is growing and become more mature. Version 2.0 was released in August 2017 and it is more capable and supports more platforms then it’s previous releases. But the biggest feature of this brand new Microsoft framework is its performance and it’s ability to handle http requests much faster then it’s bigger brother.

However introduction of new creation is only the beginning as more and more packages are being ported or rewritten to new, lighter framework. This is a natural opportunity for developers to implement some additional changes,  refactor existing code or maybe slightly simplify existing API. It also means that porting existing solutions to .Net Core might not be straightforward and in this article I’ll check how receiving messages from Service Bus looks like.

First things first

In order to start receiving messages, we need to have:

After all of this, my topic looks like this:

Receiving messages

To demonstrate how to receive messages I created a console application in .Net Core 2.0 framework. Then I installed Microsoft.Azure.ServiceBus (v2.0) nuget package and also Newtonsoft.Json to parse messages body. My ProductRatingUpdateMessage message class looks like this:

    public class ProductRatingUpdateMessage
    {
        public int ProductId { get; set; }

        public int SellerId { get; set; }

        public int RatingSum { get; set; }

        public int RatingCount { get; set; }
    }

All of the logic is inside MessageReceiver class:

    public class MessageReceiver
    {
        private const string ServiceBusConnectionString = "Endpoint=sb://bialecki.servicebus.windows.net/;SharedAccessKeyName=RootManageSharedAccessKey;SharedAccessKey=[privateKey]";

        public void Receive()
        {
            var subscriptionClient = new SubscriptionClient(ServiceBusConnectionString, "productRatingUpdates", "sampleSubscription");

            try
            {
                subscriptionClient.RegisterMessageHandler(
                    async (message, token) =>
                    {
                        var messageJson = Encoding.UTF8.GetString(message.Body);
                        var updateMessage = JsonConvert.DeserializeObject<ProductRatingUpdateMessage>(messageJson);

                        Console.WriteLine($"Received message with productId: {updateMessage.ProductId}");

                        await subscriptionClient.CompleteAsync(message.SystemProperties.LockToken);
                    },
                    new MessageHandlerOptions(async args => Console.WriteLine(args.Exception))
                    { MaxConcurrentCalls = 1, AutoComplete = false });
            }
            catch (Exception e)
            {
                Console.WriteLine("Exception: " + e.Message);
            }
        }
    }


Notice that creating a SubscriptionClient is very simple, it takes just one line and handles all the work. Next up is RegisterMessageHandler which handles messages one by one and completes them in the end. If something goes wrong message will not be completed and after lock on it will be removed – it will be available for processing again. If you set AutoComplete option to true, then message will be automatically completed after returning from User Callback. This message pump approach won’t let you handle incoming messages in batches, but parameter MaxConcurrentCalls can be set to handle multiple messages in parallel.

Is it ready?

Microsoft.Azure.ServiceBus nuget package in version 2.0 offers most desirable functionality. It should be enough for most cases but it also has huge gaps:

  • Cannot receive messages in batches
  • Cannot manage entities – create topics, queues and subscriptions
  • Cannot check if queue, topic or subscription exist

Especially entities management features are important. It is reasonable that when scaling-up a service that read from topic, it creates it’s own subscription and handles it on it’s own. Currently developer needs to go to Azure Portal to create subscriptions for each micro-service manually.

Update! 

Version 3.1 supports entities management – have a look at my post about it: Managing ServiceBus queues, topics and subscriptions in .Net Core

If you liked code posted here, you can find it (and a lot more) in my github blog repo: https://github.com/mikuam/Blog.


Getting started with CosmosDB in Azure with .NET Core

CosmosDB is Microsoft’s new way of storing data in the cloud, comparing to good old MSSQL Server. It offers globally distributed, multi-model database. Interesting fact is that it offers multiple model of storing data: key-value, column-family, documents and graph as shown in this picture:

azure-cosmos-db

Image from https://docs.microsoft.com/en-us/azure/cosmos-db/media/introduction/

First you need a Cosmos DB account

Create a Cosmos DB account, then go to Keys tab – you will need PrimaryKey and EndpointUri.

cosmos-db-keys

Now go to Data Explorer and create a database and collection. I created Documents database and Messages collection.

cosmos-db-data-explorer

Connecting to Cosmos DB

I’m developing my app in .NET Core and for that I need to install Microsoft.Azure.DocumentDB.Core nuget package. Then I created a DocumentDbService class, that will connect to application to Cosmos DB api.

public class DocumentDbService
{
    private const string DatabaseName = "Documents";

    private const string CollectionName = "Messages";

    public async Task SaveDocumentAsync(DocumentDto document)
    {
        try
        {
            var client = new DocumentClient(new Uri(ConfigurationHelper.GetCosmosDbEndpointUri()), ConfigurationHelper.GetCosmosDbPrimaryKey());
            await client.UpsertDocumentAsync(UriFactory.CreateDocumentCollectionUri(DatabaseName, CollectionName), document);
        }
        catch (Exception e)
        {
            Console.WriteLine("Error: {0}, Message: {1}", e.Message, e.GetBaseException().Message);
        }
    }
}

ConfigurationHelper class is just a static class that gets EndpointUri and PrimaryKey as strings, so you can just paste them here directly. The code above will create a new document in Documents database and Messages collection.

DocumentDto is just a simple object that will be saved as json:

public class DocumentDto
{
    public string StockId { get; set; }

    public string Name { get; set; }

    public float Price { get; set; }

    public DateTime UpdatedAt { get; set; }
}

In order do use it in ASP.NET Core I created a controller:

public class MessagesController : Controller
{
    [HttpPost]
    public async Task<IActionResult> Save([FromBody]SendMessageDto message)
    {
        try
        {
            var document = new DocumentDto
            {
                StockId = message.StockId,
                Name = message.Name,
                Price = message.Price,
                UpdatedAt = DateTime.UtcNow
            };

            await new DocumentDbService().SaveDocumentAsync(document);

            return StatusCode(200);
        }
        catch (Exception e)
        {
            Console.WriteLine(e);
            return StatusCode(500, e.Message);
        }
    }
}

Usage of it is very simple – it creates DocumentDto and store it in Cosmos DB database. To see the result you need to go to Azure’s Data Explorer and fetch for Messages like in a screen above.

Getting data from Cosmos DB with SQL api

Microsoft’s new storage api has ability to store data in a multiple formats. Let’s try getting the latest updates from Messages collection. In DocumentDbService class we need a part of code to get data:

public IQueryable<DocumentDto> GetLatestDocuments()
{
    try
    {
        var client = new DocumentClient(new Uri(ConfigurationHelper.GetCosmosDbEndpointUri()), ConfigurationHelper.GetCosmosDbPrimaryKey());
        return client.CreateDocumentQuery<DocumentDto>(
            UriFactory.CreateDocumentCollectionUri(DatabaseName, CollectionName),
            "SELECT * FROM Messages ORDER BY Messages.UpdatedAt desc",
            new FeedOptions { MaxItemCount = 10 });
    }
    catch (Exception e)
    {
        Console.WriteLine("Error: {0}, Message: {1}", e.Message, e.GetBaseException().Message);
        return null;
    }
}

This is where magic happens. As you can see I used plain old SQL query as it would be Messages table, but instead I queried json objects that does not necessary need to have UpdatedAt field.

Code in the controller is very simple.

[HttpGet]
public IQueryable<DocumentDto> GetTenLatestUpdates()
{
    try
    {
        var documents = new DocumentDbService().GetLatestDocuments();

        return documents;
    }
    catch (Exception e)
    {
        Console.WriteLine(e);
        return null;
    }
}

Notice that GetTenLatestUpdates controller method returns IQueryable interface that on web will be presented as json, but there is also a way to efficiently filter data with OData.

Sending a Azure Service Bus message in ASP.NET core

ASP.NET Core is a open-source web framework that everyone are so excited about recently. There are some good arguments to be excited about it: ability to run on Windows, macOS and Linux, ability to host website in IIS, Nginx, Apache and Docker and it’s fast.

Can it be used for Service Bus scenarios?

Yes, it certainly can. Let’s create a project, that will send service bus message triggered by web request. I’ll create the simplest ASP.NET Core Web Application in .Net Core 2.0 framework.

net-core-create-new-api

Now lets create a helper class to connect to Service Bus.

IMPORTANT: Install Microsoft.Azure.ServiceBus nuget package instead of WindowsAzure.ServiceBus, which will not work with .NET Core.

My ServiceBusHelper class looks like this:

public class ServiceBusHelper
{
    public static QueueClient GetQueueClient(ReceiveMode receiveMode = ReceiveMode.ReceiveAndDelete)
    {
        const string queueName = "stockchangerequest";
        var queueClient = new QueueClient(ConfigurationHelper.ServiceBusConnectionString(), queueName, receiveMode, GetRetryPolicy());
        return queueClient;
    }

    public static TopicClient GetTopicClient(string topicName = "stockupdated")
    {
        var topicClient = new TopicClient(ConfigurationHelper.ServiceBusConnectionString(), topicName, GetRetryPolicy());
        return topicClient;
    }

    private static RetryExponential GetRetryPolicy()
    {
        return new RetryExponential(TimeSpan.FromSeconds(5), TimeSpan.FromSeconds(30), 10);
    }
}

Microsoft.Azure.ServiceBus nuget package differs just a bit from WindowsAzure.ServiceBus so for creating topic you won’t use QueueClient.CreateFromConnectionString method, but rather TopicClient constructor, where you can directly pass custom retry policy.

You probably noticed that I created a ConfigurationHelper class to read vales from config. To have a connection string to your bus in a file, add appsettings.json file your peoject. Also set it’s properties to Content and Copy if newer. This way it will be copied to server when project is deployed. My configuration file looks like this:

{
    "ServiceBusConnectionString":
      "Endpoint=sb://bialecki.servicebus.windows.net/;SharedAccessKeyName=RootManageSharedAccessKey;SharedAccessKey=[removedForSafety]"
}

And ConfigurationHelper class looks like this:

public static class ConfigurationHelper
{
    private static string connection;

    public static string ServiceBusConnectionString()
    {
        if (string.IsNullOrWhiteSpace(connection))
        {
            connection = GetServiceBusConnectionString();
        }

        return connection;
    }

    private static string GetServiceBusConnectionString()
    {
        var builder = new ConfigurationBuilder()
            .SetBasePath(Directory.GetCurrentDirectory())
            .AddJsonFile("appsettings.json");

        var config = builder.Build();

        var value = config.GetValue<string>("ServiceBusConnectionString");
        return value;
    }
}

All code needed to connect to service bus is complete – congrats:)

However our job is not yet done. I mentioned earlier that I want to send messages to the bus triggered by web request. Do achieve it I need to have a controller:

public class MessagesController : Controller
{
    [HttpPost]
    public async Task<IActionResult> Send([FromBody]SendMessageDto mesaage)
    {
        try
        {
            var topicClent = ServiceBusHelper.GetTopicClient();
            await topicClent.SendAsync(new Message(Encoding.UTF8.GetBytes(mesaage.Value)));

            return StatusCode(200);
        }
        catch (Exception e)
        {
            Console.WriteLine(e);
            return StatusCode(500, e.Message);
        }
    }
}

public class SendMessageDto
{
    public string Value { get; set; }
}

Notice that there is no ApiController. In .NET Core there is only one Controller that can be used both to handle api logic and return json, or serve views for a web page.

In order for routing to work I also added some code in Startup class.

public void Configure(IApplicationBuilder app, IHostingEnvironment env)
{
    if (env.IsDevelopment())
    {
        app.UseDeveloperExceptionPage();
    }

    app.UseMvc(routes =>
    {
        routes.MapRoute("default", "api/{controller=Home}/{action=Index}/{id?}");
    });
}

Publishing to Azure App Service

Since it is much better to test an app online instead of locally, I published it with Azure App Service. It’s a powerful tool for deploying and scaling web, mobile and api apps running on any platform. Microsoft also says that it ensures performance, scalability and security, but the most important for me is that you can deploy your app within couple of clicks from Visual Studio.

net-core-publish-to-azure-service-app

Now I can test my app by making POST request like this:

net-core-sending-request-to-app-service

And the response is 200! To sum up:

  • there is no problem with writing code in .Net Core or .Net Standard using Azure Service Bus
  • Core already written for regular .Net Framework will not work, but it’s not a big job to make it compatible
  • Working with event hubs and relays will require to install separate nuget packages

To read more about Azure Service Bus nuget package go to this accoucement.

All code published here can be found in my public github repo.

Custom data source in Application Insights

Application Insights(AI) is a park of Azure clous services, that gathers application telemetry data and is able to show it with nice charts. User can also query gathered data to create custom reports.

application-insights-performance-monitor

To gather telemetry data user must only enable it in Visual Studio. Detailed instructions can be found here: https://docs.microsoft.com/en-us/azure/application-insights/app-insights-asp-net

Creating custom data source

Underneath pretty charts and fancy numbers there are powerful mechanisms that can fast analize and query gigabytes of data. There is a way to use it with your own data. Firt thing what need to ba done, is to have data, that we will be providing. In this example I will just copy generated file to a separate blob storage, where it can be fetched from AI. My file looks like this:

{"ProductId": "P1", "Stock": "110", "UpdatedAt": "2017-08-13T14:50:28Z"}
{"ProductId": "P1", "Stock": "109", "UpdatedAt": "2017-08-13T14:50:48Z"}
{"ProductId": "P1", "Stock": "112", "UpdatedAt": "2017-08-13T14:51:08Z"}
{"ProductId": "P1", "Stock": "114", "UpdatedAt": "2017-08-13T14:51:28Z"}

Notice that separate lines are valid json, but whole file is not. Also one item of data should take exactly one line. Second option is to provide json table with brackets.

To add new data source go to Application Insights page and use button on the left side:

application-insights-add-data-source

If you don’t have this option – you probably do not have permissions to do so.

As a file format you can specify either CSV or Json. You can also provide a part of the file you will be importing, but it has to have at least 10 rows.

application-insights-defining-data-source

Transfer file to Application Insights

To transfer file to AI, file has to be copied to blob storage and then AI needs to be notified, what file to download. Like in this schema:

application-insights-send-file-schema

Number 1 is quite obvious, just copy your file to blob storage. Second step is a bit tricky, because you will need couple of information. After creating a custom data source, there is a “How to send data?” link of the right, that might help you.

ai-how-to-send-data

To get “blobSasUri” go to your blob storage and then to Shared Access Signature – you can generate it there. In time just format current time in ISO format. Full query should resamble something like this:

{  
   "data":{  
      "baseType":"OpenSchemaData",
      "baseData":{  
         "ver":"2",
         "blobSasUri":"https://miktests.blob.core.windows.net/mikai/stockData.json?sv=2017-04-17&ss=b&srt=sco&sp=rwdlac&se=2019-09-04T06:08:37Z&st=2017-09-03T22:08:37Z&spr=https&sig=#############",
         "sourceName":"########-####-####-####-############",
         "sourceVersion":"1.0"
      }
   },
   "ver":1,
   "name":"Microsoft.ApplicationInsights.OpenSchema",
   "time":"2017-09-03T22:13:01Z",
   "iKey":"########-####-####-####-############"
}

After sending a POST request with correct body – it should return 200 response and in couple of minutes data should be pulled in to Application Insights. So you should be able to do something like this:

ai-first-results

Or even like this:

ai-second-results


Send messages in batch without exceeding a limit

Service Bus allows user to send messages in batches, which is great what it comes to performance. Differences sending messages in batches and separately can be huge. Actually, lets look at an example. This is a very simple send:

private static void SimpleSendBatch()
{
    var client = GetQueueClient();
    client.SendBatch(GetALotOfMessages());
}

If we compare it to sending messages sequential, we get:

batch_sending_times

So sending 200 messages sequential can take up to 20 seconds, but that will differ depending on a cpu, internet connection, etc. However, from chart above you get the point – when we send one message – use Send, when sending more then one – use SendBatch.

When collection of messages is too big

However when you attempt to send a rather huge batch, you might exceed a limit, that is 256KB per batch, not only per message itself. If you exceed this limit, you can get an error like this:

A request from the client instance has exceeded the maximum message size, and the underlying channel will be recreated. Validate the content size before retrying.

So what can we check to chop messages into smaller chunks? There is a Size property in the BrokeredMessage object, but that relates only to content and there are still standard and custom properties. If we don’t use it that much, we can implement a simple solution of checking batch size:

private static void SimpleAndSmartSendBatch()
{
    var client = GetQueueClient();
    var messages = GetALotOfMessages();

    const int maxBatchSizeInBytes = 230000;
    var i = 0;
    long currentBatchSize = 0;
    var listToSend = new List<BrokeredMessage>();
    while (i < messages.Count)
    {
        if (currentBatchSize + messages[i].Size < maxBatchSizeInBytes)
        {
            listToSend.Add(messages[i]);
            currentBatchSize += messages[i].Size;
        }
        else
        {
            client.SendBatch(listToSend);
            listToSend.Clear();
            listToSend.Add(messages[i]);
            currentBatchSize = messages[i].Size;
        }

        i++;
    }

    if (listToSend.Any())
    {
        client.SendBatch(listToSend);
    }
}

In the code above I set 230000 bytes as a limit instead of 256000. This is just a small margin that can prevent errors in the future. That solution should be sufficient for most of the scenarios.

The best way to calculate message size

First of all – there is no way to know for sure how big is the message. However, if you really want to use sending batch to maximum, you need to calculate message size more precisely.

While investigating the topic I came across a github discussion and a post from Sean Feldman – explains it very good and there’s code as well:

https://weblogs.asp.net/sfeldman/asb-batching-brokered-messages

Based on that solution I created my own that uses BrokeredMessage.

public static long GetEstimatedMessageSize(BrokeredMessage message)
{
    var standardPropertiesSize =
        GetStringSizeInBytes(message.MessageId) + // MessageId
        GetStringSizeInBytes(message.ContentType) + // ContentType
        GetStringSizeInBytes(message.CorrelationId) + // CorrelationId
        4 + // DeliveryCount
        8 + // EnqueuedSequenceNumber
        8 + // EnqueuedTimeUtc
        8 + // ExpiresAtUtc
        1 + // ForcePersistence
        1 + // IsBodyConsumed
        GetStringSizeInBytes(message.Label) + // Label
        8 + // LockedUntilUtc
        16 + // LockToken
        GetStringSizeInBytes(message.PartitionKey) + // PartitionKey
        8 + // ScheduledEnqueueTimeUtc
        8 + // SequenceNumber
        GetStringSizeInBytes(message.SessionId) + // SessionId
        4 + // State
        8 + // TimeToLive
        GetStringSizeInBytes(message.To) + // To
        GetStringSizeInBytes(message.ViaPartitionKey);  // ViaPartitionKey;

    var customPropertiesSize = message.Properties.Sum(p => GetStringSizeInBytes(p.Key) + GetObjectSize(p.Value));

    return message.Size + customPropertiesSize + standardPropertiesSize;
}

private static int GetStringSizeInBytes(string value) => value != null ? Encoding.UTF8.GetByteCount(value) : 0;

private static long GetObjectSize(object o)
{
    using (Stream s = new MemoryStream())
    {
        var formatter = new BinaryFormatter();
        formatter.Serialize(s, o);
        return s.Length;
    }
}

We can calculate how big are standard properties and custom properties, but there are still properties inside of BrokeredMessage like dates and timespans. To be safe it’s better to keep 5-10% of margin.

Implementing deferral mechanism in ServiceBus

Deferral is a method to leave a message in a queue or subscription when you cannot process it at the moment. When using PeekLock read mode you read a message but leave it in a queue. When processing of a message is done, you call Complete and message is removed from queue, but when something goes wrong, you can call Abandon and message will be available in a queue for next read. Important thing to remember is that there is a time interval for locking the message in a queue, it’s LockDuration. If message will not be processed and completed during that time, it will be again available in the queue and you will get MessageLockLostException when trying to do anything with it. When message is losing it’s lock and stays in a queue, either by being abandoned or lock has expired, it will get it’s DeliveryCount incremented. After reaching limit, which is by default 10, message will be moved to dead-letter queue.

message-lifecycle

It is a great life-cycle, where message that we just cannot process, will go to dead-letter queue. With retry policy all transient errors that occurs while connecting to Service Bus will be handled internally – you do not have to worry about it. Problems may occur when you would like to handle connection problems not related to Service Bus. Solution that Microsoft is proposing is to defer a message that you cannot process, leave it in the queue, but hide it from receivers. This message will be available only when asking for it with it’s sequence number. Whole loop can look like this:

private static async Task StartListenLoopWithDeferral()
{
    var client = GetQueueClient(ReceiveMode.PeekLock);
    var deferredMessages = new List<KeyValuePair>();

    while (true)
    {
        var messages = Enumerable.Empty();

        try
        {
            messages = await client.ReceiveBatchAsync(50, TimeSpan.FromSeconds(10));
            messages = messages ?? Enumerable.Empty();
            if (!messages.Any())
            {
                continue;
            }

            foreach (var message in messages)
            {
                Console.WriteLine("Received a message: " + message.GetBody());
            }
            await client.CompleteBatchAsync(messages.Select(m => m.LockToken));

            // handling dererred messages
            var messagesToProcessAgain = deferredMessages.Where(d => d.Value < DateTime.Now).Take(10).ToList();
            foreach (var messageToProcess in messagesToProcessAgain)
            {
                BrokeredMessage message = null;
                try
                {
                    deferredMessages.Remove(messageToProcess);
                    message = await client.ReceiveAsync(messageToProcess.Key);

                    if (message != null)
                    {
                        // processing
                        Console.WriteLine("Received a message: " + message.GetBody());

                        await client.CompleteAsync(message.LockToken);
                    }
                }
                catch (MessageNotFoundException) { }
                catch (Exception e)
                {
                    Console.WriteLine(e);
                    deferredMessages.Add(new KeyValuePair(
                        message.SequenceNumber,
                        DateTimeOffset.Now + TimeSpan.FromMinutes(2)));
                }
            }
        }
        catch (MessageLockLostException e)
        {
            Console.WriteLine(e);

            foreach (var message in messages)
            {
                await message.AbandonAsync();
            }
        }
        catch  (Exception e)
        {
            Console.WriteLine(e);

            // defer messages
            foreach (var message in messages)
            {
                deferredMessages.Add(new KeyValuePair(
                    message.SequenceNumber,
                    DateTimeOffset.Now + TimeSpan.FromMinutes(2)));
                await message.DeferAsync();
            }
        }
    }
}

Code contains of endless loop, that ReceiveBatchAsync messages and process them. If something goes wrong, messages are added to deferredMessages list with 2 minutes time span. After completing messages successfully, program checks if there are any messages that should be processed again. If there would be any problem again,  message will be added to deferredMessages list again. There is also a check for MessageLockLostException, that might occur when message went to dead-letter queue and we should no longer ask for it. Message ids are kept in memory and that is obvious potential issue, cause when program will be restarted, this list will be wpied and there will be no way to get those messages from the queue.

Deferral pros and cons

Deferral mechanism can be useful, because it basis on original Azure infrastructure and handling messages this way keeps messages DeliveryCount property incrementing and eventually moves message to dead-letter queue. It is also a way to handle one message and make it available again after a custom time.

However, algorithm itself is not easy and needs to handle many edge cases, that makes it error prone. Second thing is that it breaks the order of messages, where in some cases it is essential to keep FIFO. I wouldn’t recommend it to in every scenario. Maybe a better approach would be to add a simple wait, when something goes wrong and try again after a while.

Receive message from queue in push model

Push and pull models are in general approaches of distributing the data between services. In the context of messaging it mean how messages are received by the client. In the previous post I showed how to receive messages by waiting for them to come – this is pull model. Receive method will wait some amount of time for messages to come, not necessarily blocking thread. In push model time of code execution is steered by data coming to the client, in this case – messages appearing in the queue. User can register a method to be executed when messages comes and when error occurs. Let’s see some code:

static void GetMessagesBySubscribing()
{
    var queueClient = GetQueueClient();
    queueClient.OnMessage(OnMessage);
}

private static void OnMessage(BrokeredMessage brokeredMessage)
{
    Console.WriteLine("Received a message: " + brokeredMessage.GetBody&lt;string&gt;());
}

Code just could not look simpler. All handling of message life is inside OnMessage method even if we specify different ReceiveMode. Let’s add error handling:

static void GetMessagesBySubscribing()
{
    var queueClient = GetQueueClient();
    var options = new OnMessageOptions
    {
        AutoComplete = true,
        MaxConcurrentCalls = 5
    };
    options.ExceptionReceived += OptionsOnExceptionReceived;
    queueClient.OnMessage(OnMessage, options);
}

private static void OptionsOnExceptionReceived(object sender, ExceptionReceivedEventArgs exceptionReceivedEventArgs)
{
    if (exceptionReceivedEventArgs?.Exception != null)
    {
        Console.WriteLine("Exception occured: " + exceptionReceivedEventArgs.Exception.Message);
    }
}

private static void OnMessage(BrokeredMessage brokeredMessage)
{
    try
    {
        Console.WriteLine("Received a message: " + brokeredMessage.GetBody&lt;string&gt;());
    }
    catch (Exception e)
    {
        Console.WriteLine("Exception occured while processing: " + e.Message);
    }
}

A method that logs errors can be registered to ExceptionReceived in OnMessageOptions class. It will log every error that happens while handlind connection to queue and messages handling. I also added a try-catch block to catch all exceptions that may occur during message processing. If an error occurs while processing message that we would not catch, it will appear in ExceptionReceived metod, but it’s better to have it separated.

There are two more options that specified in OnMessageOptions. AutoComplete is set to true, then queue client will try to complete a message after it is processed and abandon it on error. However, there might be a scenario, when we would like to decide if message should be completed or abandoned during the processing. It could be accomplished with AutoComplete set to false. MaxConcurrentCalls defines how many threads should work in parallel processing messages in the queue. For example if set to 5, when many messages appears in a queue, queue client will create up to 5 different threads processing consecutive messages. Each thread will work on a separate message and will handle it’s life-cycle. If it is important that only one thread should work on processing messages, then MaxConcurrentCalls should be set to 0.

Proper error handling in ExceptionReceived

In ExceptionReceived method you will get all kinds of errors, but you shouldn’t worry about any transient errors. Don’t be surprised that you can get MessagingException even if you define a retry policy – those errors are bubbled up for monitoring purposes. So it is up to you if you log them or not. After having a problem with connecting, client should recreate itself and try to receive messages again. Code can look like this:

private static void OptionsOnExceptionReceived(object sender, ExceptionReceivedEventArgs exceptionReceivedEventArgs)
{
    if (exceptionReceivedEventArgs?.Exception != null)
    {
        if (!(exceptionReceivedEventArgs.Exception is MessagingException && ((MessagingException)exceptionReceivedEventArgs.Exception).IsTransient))
        {
            Console.WriteLine("Exception occured: " + exceptionReceivedEventArgs.Exception.Message);
        }
    }
}

Azure Service Bus – introduction

Azure Service Bus is a Microsoft implementation of a messaging system, that works seamlessly in the cloud and does not require to set up a server of any kind. Messaging is a good alternative for communication between micro-services. Let’s compare the two.

REST communication

service-bus-communication

  • contract constrains may be a risk
  • synchronous model be default
  • load balancing is harder

Messaging communication

REST-communication

  • asynchronous
  • easy for load balancing, can have multiple competing readers
  • fire and forget

Using messages for communication is much more elastic in planning architecture. You can add move receivers and more senders at will. It’s a fire and forget model, when you do not care when message will be processed and you don’t need to worry how it will reach the receiver – your messaging system will care about it for you.

Azure Service Bus

To explore Service Bus options, go to your Azure portal and search for Service Bus.

service-bus-search


Go inside and you’ll need to create of choose a namespace. Namespaces can be useful when you would like to group multiple queries or topics for example by different contexts. It’s much easier to browse through them when you have for example all orders related queues in a orders namespace. Inside the namespace you’ll see list of your queues and topics.

topics-and-queues


Queues

Queue is a FIFO (First In, First out) is a messages delivery to one or more competing consumers.  Each message is received and processed by only one consumer and messaging system centrally manage this process,  so no deadlock will occur.

queue

It is expected that messages are processed in the same order which they arrived. Messages however do not have to be processed right away when they arrived. They can wait safely in the queue for first free consumer. With possibility of having multiple consumers is in very easy to balance load and add new consumers in the infrastructure, so messages will be processed faster. This is of course with an assumption that messages can be processed independently and do not relate to one another. Another key feature is that work of consumers do not affect work done by publisher. During heavy load or high usage of the system messages will be stored in the queue and consumers will not be overloaded with multiple call as it is in REST services, but continue to work and process messages with the same speed as usual.

In Azure Service Bus queues size of a queue can be huge, even up to 16GB. Message size limit is rather small – maximum of 256KB. However sessions support allows creation of unlimited-size sequences of related messages.

Topics

topic


Comparing to queue where only one consumer is processing a message, in topics messages are cloned in to subscriptions, which contains the same messages. This represents one-to-many form of communication in a publish/subscribe pattern. The subscriptions can use additional filters to restrict the messages that they want to receive. Messages can be filtered by their attributes, where published can for example set recipient who should receive that message. Consumers instead of connecting directly to topic, connects to a subscriptions, that can be understood as a virtual queue. The same way as queues, subscriptions can have multiple competing consumers and this gives even more possibilities to plan services architecture.

An example usage a topic can be for example notifications about product stock status changed. Topic where messages are sent can have multiple subscriptions each filtering messages according to their needs. One may need all updates but other may be interested only in digital products like games. With SqlFilterExpression class filter rule can look like this:

ProductType = ‘Digital’ AND QuantityForSale > 0

Queues, topics and subscriptions gives a lot possibilities and are easier to scale and adapt in the future. Comparing to REST services they are slightly more complicated to implement, needs centralized system but offers much more in return.

Getting Azure subscription

There are a couple of ways you can get access to Azure services. You might get it from work or with BizSpark program. However, if you want to get it for free, just go to Azure website and start a trial.


azure-getting-started

After couple of minutes of configuration you will have full functional Azure environment with vast variety of options, overwhelming at first. Feel free to browse and explore what you can do with it. In the next blog posts I’ll try to bring up closer some of the options.

azure-dashboard-net