.Net Core – introduction

A .Net Core is a catchphrase that you can hear more and more often in both developer discussions and job offers. You probably already heard that it’s fast, simple and runs on multiple platforms. In this post, I’d like to sum everything up and highlight what I like the most about it.

Why new framework?

Microsoft successfully released a full .Net Framework more than a dozen years ago. In every version, there were new features released. What are the biggest drawbacks?

  • it runs and can only be developed on Windows
  • it’s not modular, you target a framework as a dependency, rather than multiple packages
  • ASP.NET is not fast enough compared to other frameworks
  • it’s not open-source, so the community cannot really contribute

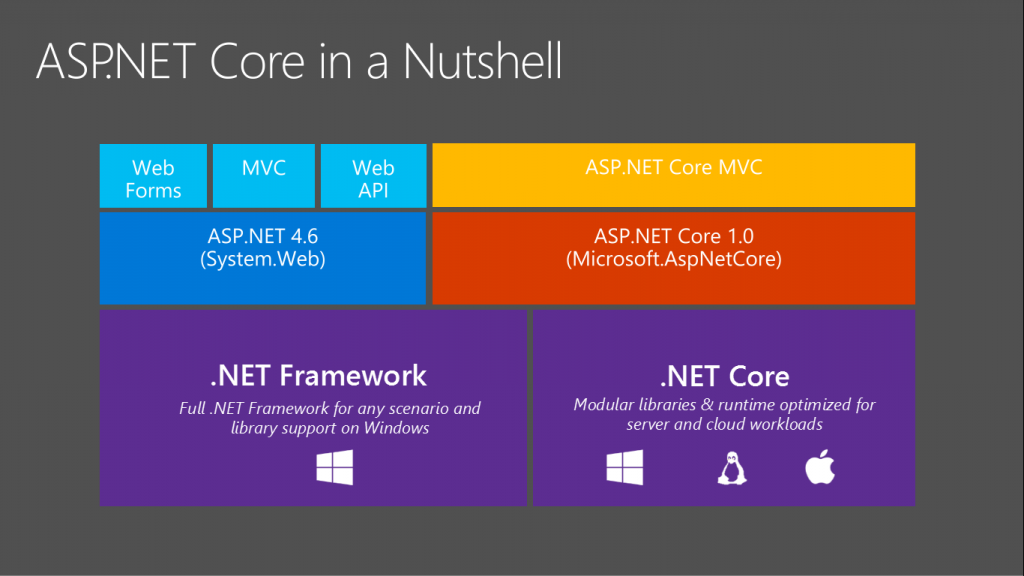
Because of that Microsoft needed to introduce something new, that would need to be run on Windows, Linux, be small, fast and modular. This is why .Net Core was introduced. Version 1.0 was developed in parallel to .Net Framework 4.6. It was initially released in the middle of 2016 as a set of open-source libraries hosted on GitHub.

Image from:
https://codeburst.io/what-you-need-to-know-about-asp-net-core-30fec1d33d78

Cross-platform

Now software written in .Net Core can be run on Windows, Linux and MacOS. What’s even more important, you can also run or host .Net Core apps on mentioned operating systems. So from now on, your ASP.NET website does not need an IIS for hosting, it can now be hosted on Linux. You can even create a docker container out of it and deploy it in the cloud. This is great in terms of maintenance, scalability, and performance. It also means that you no longer need to have Microsoft infrastructure to host your .net app.

Modularity

In .Net Framework new features were added only with a new release. Since in .Net Core every library is a nuget package, your app does not need to be dependent on one library. You can have a different version of System.IO and System.Net.Http.

What’s more you install only basic dependency, that is Microsoft.NETCore.App and other can be installed depending on what you need. This will be reflected in smaller app size.

Open-source

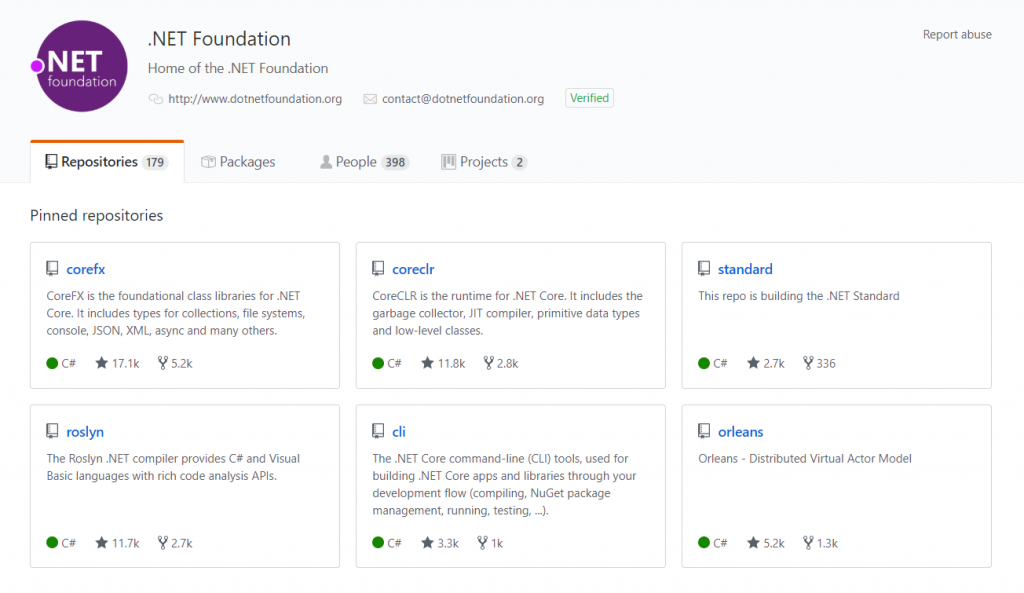
From the very beginning .Net Core was published as a dozen of GitHub repositories. Now there are 179 of those! You are free to take a look at what features are coming in and how the core looks like. It also means that while writing code, you can go inside of a framework method to check out what’s going on underneath.

Around those repositories grew a community eager to develop .Net Core and they are constantly improving it. You can be a part of it! As in any GitHub repository, you can raise an issue if you notice a bug or create a pull-request to propose a solution.

Easier to write code

The biggest difference between .Net Framework and .Net Core is a project file. Instead of ProjectName.csproj in a XML format we now have much more compact ProjectName.json in JSON. I created two sample projects, one in .Net Core and one in .Net Framework, have a look:

As you can see – there are fewer dependencies in .NET Core. The project file looks like this:

A .Net Core project file only specified a target framework, nothing more is needed. This is an example of the simplest class library created with Visual Studio. When the project gets bigger, this difference is getting more noticeable. Great comparison of those two formats can be found here.

Performance

Since developers could build framework anew, they could test and tweak code, that supposes to be untouchable before. Also because of rebuilt request pipeline, .Net Core is really fast when it comes to handling HTTP requests. Take a look at this comparison between other hosting environments:

Image from:
https://www.ageofascent.com/2019/02/04/asp-net-core-saturating-10gbe-at-7-million-requests-per-second/

You can see that ASP.NET is the 3rd fastest web server and can handle 7 million requests per second. This is impressive!

What is .Net Standard?

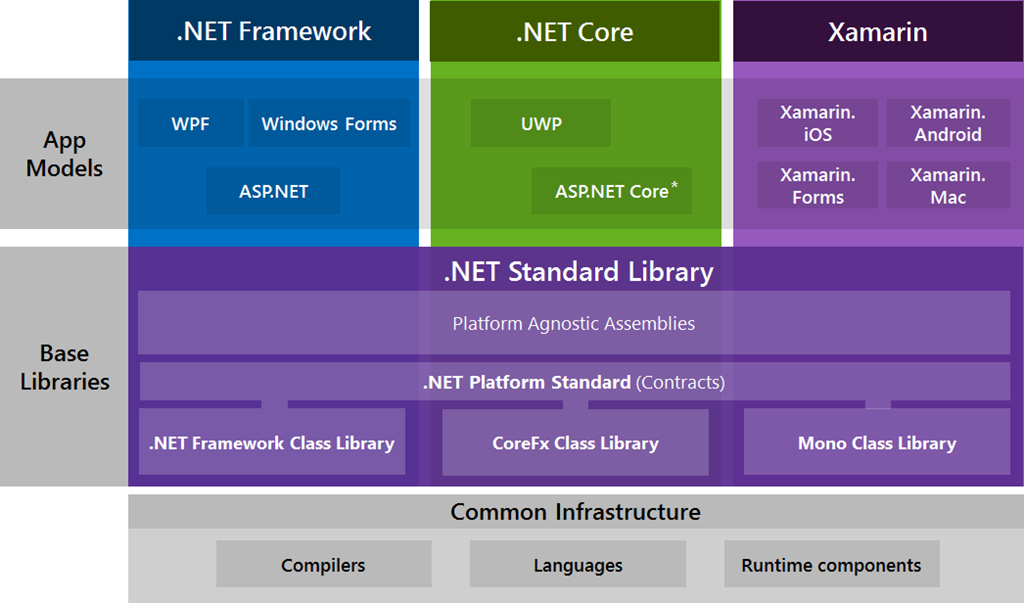
A .Net Standard is a specification for .Net Apis, that will be available across all platforms. Have a look at the lower part of this architecture:

Image from:
https://gigi.nullneuron.net/gigilabs/multi-targeting-net-standard-class-libraries/

.Net Standard is implemented in .Net Framework, in CoreFx(.Net Core) and in Mono. That means that once you target your class library to .Net Standard it can be run on any platform, but you will have less Apis to choose from. However, if you target your library to .Net Core, you can use all the features of .Net Core, but it could be run only on .Net Core apps.

What to choose? In all my projects I’m targeting .Net Standard and for building standard back-end services it was always enough. From version 2.0 .Net Standard supports a lot of Apis and you shouldn’t have a problem making it work.

Can I use .Net Core from now on then?

Yes and no. I strongly recommend you to use it in your new projects, cause it has multiple advantages. However, porting some legacy libraries or websites can be a hassle. .Net Standard and .Net Core supports a lot of Apis, but not everything that was available in .Net Framework is now available. Also some 3rd party libraries will not be ported at all, so major change in your project might be needed. Some Microsoft libraries are already ported, some are still in progress and some are totally rewritten. This means that .Net Core is not backward compatible and porting libraries to it can be easy or not possible at all.

All in all using .Net Core is a step in the right direction, cause Microsoft puts a lot of work into its development.

Thanks for reading and have a nice day!

O tym jak stworzyłem… stronę z kamperami!

W 2019 roku w ciągu 2 miesięcy stworzyłem stronę bookacamper.pl, największą w Polsce tablicę ogłoszeń o wynajmie i sprzedaży przyczep kempingowych i kamperów. Strona jest całkowicie darmowa i ma po prostu pomóc w odnalezieniu tego jedynego, najlepszego pojazdu:)

Narodziny miłości do kempingów

Od czasu kiedy pierwszy raz wypożyczyłem kampera i poleciałem z rodziną do odległej Kanady, zakochałem się w tym sposobie na wakacje. Być może to ta niezależność podróżowania, bo możesz dojechać na kemping i jak Ci się nie spodoba, to jedziesz na następny. Może to rewelacyjna infrakstruktura – w Kanadzie aż roi się od kempingów, a niemalże obok co drugiego domu dostrzegaliśmy przyczepę kempingową. Do tego widoki i przepiękna przyroda zapiera dech w piersiach. A może po prostu coś szalonego, nowego i nierealnego na pierwszy rzut oka. No bo z dwójką małych dzieci i trzecim w drodze na inny kontynent? Chyba macie już przed oczyma naszych bliskich, którzy co chwilę dopytywali co żeśmy sobie wymyślili 🙂

Wspomnienie przygody

W Kanadzie spędziliśmy prawie 3 tygodnie i zabraliśmy ze sobą wspaniałe wspomnienia, a także chęć, żeby to kiedyś powtórzyć. W tym roku zaczęliśmy obmyślać następną wyprawę… postanowiliśmy, że wypożyczymy przyczepę i zwiedzimy Europę, ponownie całą rodzinką, tylko tym razem już w piątkę.

Zacząłem szukać wypożyczalni przyczep kempingowych i owszem, w Wielkopolsce jest ich kilka, jednak ciężko mi było te oferty porównać, wyszukać w wygodny sposób. Stąd pomysł, żeby zrobić jedno miejsce, gdzie mógłbym przeglądać wszystkie ogłoszenia. To chyba nie może być takie trudne, co nie?

Wybór technologii

Na codzień jestem programistą. Co więcej – zajmuję się pisaniem dużych sklepów internetowych. Co więc mogło być pierwszą myślą, jaka mi zakiełkowała w głowie?

Nie chcę tego sam pisać od początku, to za dużo pracy!

Słyszałem, że pół Internetu działa na WordPress i miałem z nim już do czynienia. Był to więc naturalny wybór, co więcej, ten blog jest postawiony właśnie na WP!

WordPress to darmowy gotowy silnik do blogowania oraz do każdego innego biznesu jaki jesteś w stanie sobie wyobrazić. WP to podstawowy system, który postawisz dosłownie w kilka minut oraz gigantyczna społeczność, która go rozwija.

Czy WordPress jest darmowy?

Jak powiedziałby dobry konsultant – to zależy. Po pierwsze zależy to od tego, czy masz własny hosting. Możesz użyć gotowego, darmowego hostingu na wordpress.com i zacząć bez kosztów. Nie będziesz jednak mógł instalować pluginów, przez co możliwość dostosowania wyglądu i finkcjonalności strony jest dość mocno ograniczona. No chyba że wykupisz konto płatne, które pozwala na więcej.

Najlepiej moim zdaniem jest wykupić hosting WordPress, gdzie postawienie strony potrwa kilka minut, jednak to jakie pluginy zainstalujesz będzie zależało od Ciebie. Ze swojej strony mogę polecić hosting na Webio.pl, gdzie jest postawiony ten blog. Działa bez zarzutów 🙂

Jak zatem mogą się szacować koszty roczne? Moim zdaniem minimum to ok. 100zł rocznie za hosting i ok 20-100zł rocznie za domenę. Warto dobrze przemyśleć nazwę swojej domeny, ponieważ nasza strona będzie z nią nieodzownie związana.

Potrzebuję czegoś więcej niż blog

Co prawda posty na blogu możesz zacząć pisać od razu, jednak żeby przerobić WP na sklep internetowy z torebkami, tablicę ogłoszeń wędkarskich, a może agencję matrymonialną dla kotów – musisz doinstalować wtyczkę(plugin).

Widok ogłoszeń dzięki wtyczce Wp Adverts

I tutaj zaczyna się prawdziwa praca – szukanie odpowiedniego dodatku może zająć dni, a nawet tygodnie. Większość dodatków można zobaczyć w praktyce na stronach twórców, a także zainstalować i oddać w ciągu 30 dni, jeżeli jednak nie o to Ci chodziło.

Do swojego projektu ostatecznie wybrałem serię dodatków WP Adverts, możesz zobaczyć wersję demonstracyjną tutaj:
https://demo.wpadverts.com/lite/adverts/. Wtyczka ta pozwala na stworzenie tablicy ogłoszeń, oraz:

  • łatwe dodanie ogłoszenia z formularza oraz jego edycja
  • dodanie lokalizacji ogłoszeń oraz wyświetlenie map Google z lokalizacją
  • dodanie weryfikacji reCaptacha, żeby zabezpieczyć dodawanie ogłoszeń
  • konfigurowane kategorie (u mnie jest to sprzedaż przyczep, wynajem przyczep, sprzedaż kamperów oraz wynajem kamperów
  • dodanie własnych pól do ogłoszeń – mogłem dodać DMC czy długość przyczepy
  • formularz do szukania ogłoszeń, także po lokalizacji oraz po własnych polach, jak np. rok produkcji
Bogate wyszukiwanie po niestandardowych polach

W tym wypadku twórcy dodatku udzielają rewelacyjnego wsparcia – mogę potwierdzić. Podczas konfiguracji strony miałem parę pytań i uzyskałem odpowiedź w kilka godzin!

Jakie mam zainstalowane wtyczki?

Wtyczki w WordPress są do wszystkiego, dosłownie. Jeżeli chcesz zmienić coś na stronie, to po prostu wyszukujesz odpowiednią wtyczkę i jej używasz. Proste. Oto te, które mi się przydają najbardziej:

  • WP Adverts – seria wtyczek do obsługi ogłoszeń na stronie. Jedyna płatna wtyczka na liście
  • Loco Translate – pozwala przetłumaczyć WP Adverts na język polski
  • Contact Form 7 – tworzy prosty formularz do kontaktu
  • Facebook Widget – integruje stronę z Facebook, widać ile osób lubi naszą stronę. Można też pokazać ostatnie posty
  • Informacja o ciasteczkach – informacja na dole strony, że strona używa ciasteczek
  • LoginPress – Customizing the WordPress Login – pozwala dostosować stronę logowania, żeby pasowała do naszej strony
  • Really Simple SSL – dzięki niej SSL i linki działają poprawnie
  • Akismet antyspam – blokuje spam przychodzący z formularza kontaktowego oraz komentarzy
  • GA Google Analytics – pozwala skonfigurować Google Analytics na stronie

Wtyczek jest dość sporo i jest to też dość pracochłonne, żeby je skonfigurować. Czasami zajmowało mi to kilka minut, a innym razem kilka godzin lub dni, zanim rozwiązałem problem.

Inną przeszkodą może być to, że większość wtyczek jest opisana po angielsku i bez znajomości tego języka dużo trudniej będzie Ci przeglądać chociażby dokumentację, bądź szukać odpowiedzi na forach internetowych.

Czy mogę dowolnie zmieniać wygląd strony?

W skrócie – tak. Fantastyczną możliwością jest to, że można skorzystać z gotowych motywów dostępnych za darmo, lub za opłatą.

Testowanie różnych motywów jest bardzo wygodne, ponieważ wystarczy wybrać motyw i zastosować go na próbę na swojej stronie. Strona zmieni swój układ i wygląd, ale treści i obrazki pozostaną bez zmian.

Diabeł tkwi w szczegółach. Motywy są piękne, kolory są świetnie dobrane i dobrze wyświetlają się na komórce, jednak mają swoje ograniczenia. Kiedy chcemy aby np. nagłówek lub menu wyglądało trochę inaczej, a nie da się tego zmienić za pomocą wbudowanych opcji, pozostaje nam edycja manualna. Każdy motyw pozwala na edycję HTML-a i CSS-a, więc teoretycznie można zmienić wszystko, ale nie jest to najłatwiejsze.

Co warto zrobić

Jest kilka rzeczy, które najlepiej skonfigurować i załatwić od razu.

  • Skrzynka pocztowa z adresem zgodnym z domeną strony – należy skonfigurować pocztę na serwerze gdzie jest postawiona strona, żeby WordPress mógł wysyłać wiadomości e-mail z formularza kontaktowego
  • Dodać certyfikat SSL – to dodatkowa usługa, którą trzeba wykupić, aby przy adresie naszej strony pojawiła się ‘kłódka’. Potwierdza to że strona jest bezpieczna i posiada ważny certyfikat
  • Poszukaj podobnych stron. Prawdopodobnie stron takich jak Twoja jest kilkanaście w Internecie i z pewnością czymś się różnią. Poprzeglądaj je i zobacz, jakie elementy sprawdzą się najlepiej u Ciebie
  • Żyj w zgodzie z sieciami społecznościowymi. Facebook, Instagram i LinkedIn to genialne narzędzia do promowania siebie i swojego biznesu. Kiedy szukam np. restauracji po nazwie niemalże zawsze trafiam na Facebook, gdzie jest cała społeczność zgromadzona na fanpage-u danego lokalu. Publikuj treści i promuj się. W moim przypadku duża część ruchu trafia na moje strony właśnie z sieci społecznościowych

Próbuj, to nic nie kosztuje*

Stworzenie podstawowej strony na WordPress jest dziecinnie proste. Może to być Twój blog, może mały biznes albo sklep internetowy. Ważne, żeby było to coś, co naprawdę lubisz. Z własnego doświadczenia wiem, że blogowanie przynosi niesamowitą satysfakcję.

*stworzenie strony na WordPress może kosztować kilkaset złotych, jednak głównie jest to Twój poświęcony czas, a ten zawsze się znajdzie.

Mnie do działania zachęcił ten TED talk:

Mam nadzieję, że tym postem zmotywowałem Cię do działania i przekonałem, że realizowanie chociażby najśmielszych przedsięwzięć nie musi być wcale takie trudne. Powoli obserwuję, że na bookacamper.pl wchodzi coraz więcej osób i to bardzo cieszy. Jeżeli spodobała Ci się ta strona i jesteś fanem campingów tak jak ja, to daj znać. Pomoc w rozwoju strony zawsze się przyda!

Także do dzieła i powodzenia! 🙂

Code review #4 – in-memory caching

This is a post on a series about great code review feedback, that I either gave or received. You can go ahead and read the previous ones here: https://www.michalbialecki.com/2019/06/21/code-reviews/

The context

Caching is an inseparable part of ASP.net applications. It is the mechanism that makes our web pages loading blazing fast with a very little code required. However, this blessing comes with responsibility. I need to quote one of my favorite characters here:

Downsides come into play when you’re no longer sure if the data that you see are old, or new. Caches in different parts of your ecosystem can make your app inconsistent, incoherent. But let’s not get into details since it’s not the topic of this post.

Let’s say we have an API, that gets user by id and code looks like this:

[HttpGet("{id}")]
public async Task<JsonResult> Get(int id)
{
    var user = await _usersRepository.GetUserById(id);
    return Json(user);
}

Adding in-memory caching in .net core is super simple. You just need to add one line in the Startup.cs

And then pass IMemoryCache interface as a dependency. Code with in-memory caching would look like this:

[HttpGet("{id}")]
public async Task<JsonResult> Get(int id)
{
    var cacheKey = $"User_{id}";
    if(!_memoryCache.TryGetValue(cacheKey, out UserDto user))
    {
        user = await _usersRepository.GetUserById(id);
        _memoryCache.Set(cacheKey, user, TimeSpan.FromMinutes(5));
    }

    return Json(user);
}

Review feedback

Why don’t you use IDistributedCache? It has in-memory caching support.

Explanation

Distributed cache is a different type of caching, where data are stored in an external service or storage. When your application scales and have more than one instance, you need to have your cache consistent. Thus, you need to have one place to cache your data for all of your app instances. .Net net code supports distributed caching natively, by IDistributedCache interface.

All you need to do is to change caching registration in Startup.cs:

And make a few modifications in code using the cache. First of all, you need to inject IDistributedCache interface. Also remember that your entity, in this example UserDto, has to be annotated with Serializable attribute. Then, using this cache will look like this:

[HttpGet("{id}")]
public async Task<JsonResult> Get(int id)
{
    var cacheKey = $"User_{id}";
    UserDto user;
    var userBytes = await _distributedCache.GetAsync(cacheKey);
    if (userBytes == null)
    {
        user = await _usersRepository.GetUserById(id);
        userBytes = CacheHelper.Serialize(user);
        await _distributedCache.SetAsync(
            cacheKey,
            userBytes,
            new DistributedCacheEntryOptions { SlidingExpiration = TimeSpan.FromMinutes(5) });
    }

    user = CacheHelper.Deserialize<UserDto>(userBytes);
    return Json(user);
}

Using IDistributedCache is more complicated, cause it doesn’t support strongly types and you need to serialize and deserialize your objects. To not mess up my code, I created a CacheHelper class:

public static class CacheHelper
{
    public static T Deserialize<T>(byte[] param)
    {
        using (var ms = new MemoryStream(param))
        {
            IFormatter br = new BinaryFormatter();
            return (T)br.Deserialize(ms);
        }
    }

    public static byte[] Serialize(object obj)
    {
        if (obj == null)
        {
            return null;
        }

        var bf = new BinaryFormatter();
        using (var ms = new MemoryStream())
        {
            bf.Serialize(ms, obj);
            return ms.ToArray();
        }
    }
}

Why distributed cache?

Distributed cache has several advantages over other caching scenarios where cached data is stored on individual app servers:

  • Is consistent across requests to multiple servers
  • Survives server restarts and app deployments
  • Doesn’t use local memory

Microsoft’s implementation of .net core distributed cache supports not only memory cache, but also SQL Server, Redis and NCache distributed caching. It all differs by extension method you need to use in Startup.cs. This is really convenient to have caching in one place. Serialization and deserialization could be a downside, but it also makes it possible to make a one class, that would handle caching for the whole application. Having one cache class is always better then having multiple caches across an app.

When to use distributed memory cache?

  • In development and testing scenarios
  • When a single server is used in production and memory consumption isn’t an issue

If you would like to know more, I strongly recommend you to read more about:

  All code posted here you can find on my GitHub: https://github.com/mikuam/Blog

Postman the right way

Postman is a great tool to quickly create a request and run it against your API. This is a flexible tool created to make your work simpler. You can save you requests, define variables for different environments and share it with your team. Today I’ll show you the most useful and practical features of Postman.

Swagger is not good enough

Swagger is an API package, that eases working with API. It comes almost out of the box. With a little configuration, it exposes user-friendly interface alongside with your API. Postman, on the other hand, is an external tool to make requests to your API but does not interfere with it. It comes in handy in cases where Swagger is not enough. What’s the main advantage of using it is the fact, that you can store your requests and you don’t need to fill in the data for the request over and over again. In fact, both tools are great and can be used together, but with a slightly different purpose.

Let’s look at the example. This is how swagger looks under .net core:

And this is a Postman window with the same request:

Comparing to Swagger, Postman is much more compact and because it is an external tool, it offers much more.

The best things

I won’t list the whole documentation here, but I’m going to show you what I like the most and what I use on a day to day basis.

Simply provide authorization

In the Authorization tab you can easily define what you need and it will be added to you request. It supports whole list of authorization methods and frankly, I only used a few of them. For example if you need to provide basic authorization, you just need to put user and password, without a need to encode it in base64 manually.

Save request to a collection

Next, to the Send button, there is an option to save a request and put it in the collection. If you have different micro-services you work on, you can divide your requests by service, or by context and put them into different collections. You can even create nested folders to make separation of requests even greater.

Add variables

The great thing that I discovered recently is an ability to define your own variables. To do this you need to click settings icon on the right and choose Globals button at the bottom of a popup.

Then you will be able to define variables you can use later. I added a url for my service(document-service-url), since I will be using that in every request for my service.

You can use your variable, by putting its name in a double curly braces like in the image above. This is very convinient when suddenly you need to change a port in your url or a password in the basic authorization method.

Define environments

As you saw, the URL that I used is defined by variable, that I can use in every request, but only locally. What about other environments? Postman support that as well. To add an environment, just click on the settings icon on the right and add one.

Now when I choose Development environment, the value of my variable will be different.

Share you requests across the team

This is all great, but how can you send a request to a friend, so he can use it as well? The easiest this is export entire collection as a json file and you colleague can import it in his Postman.

The other thing that you can do is to share you collection. On the top there is a My workspace dropdown, where you can define teams.

Once you click on a team, Postman will load all of the teams collctions. Great thing about it is, that you can work with the same requests within a one team and keep them up to date as the work goes. This was a real game changer for me and in fact a motivation to write this post! There is however a little drawback – in a free version, you can only share 25 requests across the team, and this is not a lot.

To sum up – I am very impressed by Postman and the possibilities that it offers. It actually offers much more then I mentioned. I also like its visual side and simplicity. I hope you like it too 🙂

Code reviews

This is a series about great code reviews, that I either gave or received. Code reviews are crucial for code quality and I strongly recommend you to have it in your company. Two heads are always better than one, especially in an atmosphere of cooperation and mutual learning. I have pleasure and luck to work in such a team and I have to admit, that code review discussions are always appreciated.

Without further due, let’s get to it. Have a good read! 🙂

Have you ever got a great review feedback? If you do, feel free to write me! I bet it’s worth to share it with the community and readers of this blog.

Code review #3 – use threads like Mr Fowler

This is another post in a series about great code review feedback, that I either gave or received. It will always consist of 3 parts: context, review feedback and explanation. You can go ahead and read the previous ones here: https://www.michalbialecki.com/2019/06/21/code-reviews/. This post is about doing things the right way.

The context

In my daily job we have a custom scheduling service, that is very simple. It just makes POST requests without a body based on a CRON expression. Then it check if the request was successful. The problem occured when jobs were getting longer and longer so that they reached a request timeout and apperad to be failed, while on a receiver, they run just fine. We decided, that a receiver should just return a success and do it’s work in a separate thread. This is how I approached this task:

Instead of having call with an await:

[HttpPost("ExportUsers")]
public async Task<IActionResult> ExportUsers()
{
    var result = await _userService.ExportUsersToExternalSystem();
    return result ? Ok() : StatusCode(StatusCodes.Status500InternalServerError);
}

I added a simple wrapper with Task.Run

[HttpPost("ExportUsers")]
public IActionResult ExportUsers()
{
    Task.Run(
        async () =>
            {
                var result = await _userService.ExportUsersToExternalSystem();
                if (!result)
                {
                    // log error
                }
            });
            
    return Ok();
}

Review feedback

Start a new thread as David Fowler does.

Explanation

When using Task.Run a thread is blocked from a thread pool. This is not a bad idea, but it should be used wisely. The thread should be released in a reasonable timeframe, not blocked for a lifetime of an application. An anti-pattern here would be to start listening Service Bus messages inside Task.Run, which would block a thread forever.

After refactoring my code looks like this:

[HttpPost("ExportUsers")]
public IActionResult ExportUsers()
{
    var thread = new Thread(async () =>
    {
        var result = await _userService.ExportUsersToExternalSystem();
        if (!result)
        {
            // log error
        }
    })
    {
        IsBackground = true
    };
    thread.Start();

    return Ok();
}

You can look at the more detailed explanation by David Fowler here: https://github.com/davidfowl/AspNetCoreDiagnosticScenarios/blob/HEAD@%7B2019-05-16T19:27:54Z%7D/AsyncGuidance.md#avoid-using-taskrun-for-long-running-work-that-blocks-the-thread

There are many examples here that really makes you think about how to write better code, so I strongly encourage you to read it. Enjoy! 🙂

Code review #2 – remember about your awaits

This is another post about great code review feedback, that I either gave or received. It will always consist of 3 parts: context, review feedback and explanation. You can go ahead and read the previous ones here: https://www.michalbialecki.com/2019/06/21/code-reviews/. This time I’m going to show you a very simple bug I found.

The context

The problem occurred when I was investigating a code with multiple available calls. And after some refactoring, it came down to something like this.

public async Task InsertUser()
{
    try
    {
        // async stuff here

        client.PostAsync("http://localhost:49532/api/users/InsertMany", null).ConfigureAwait(false);

        // more async cally 
    }
    catch (Exception e)
    {
        Console.WriteLine(e);
        throw;
    }
}

The thing was, that my call to InsertMany endpoint was not working somehow, and I didn’t catch any exceptions in this code. Do you know what’s wrong with it?

Review feedback

Oh, you haven’t awaited this one!

Explanation

That’s correct. There is a try-catch block that should catch every exception, but when async call is not awaited, then a Task is returned. So as a result no call would be made. This is potentially dangerous, because code will compile. IDE will give you a hint, but it can be easily overlooked.

As a good practice you can check if a call was a success:

public async Task InsertUser()
{
    try
    {
        // async stuff here

        var response = await client.PostAsync("http://localhost:49532/api/users/InsertMany", null).ConfigureAwait(false);
        response.EnsureSuccessStatusCode();

        // more async cally 
    }
    catch (Exception e)
    {
        Console.WriteLine(e);
        throw;
    }
}

So take a good care about you async / await calls 🙂

Bulk insert in Dapper

Dapper is a simple object mapper, a nuget package that extends the IDbConnection interface. This powerful package come in handy when writing simple CRUD operations. The thing I struggle from time to time is handling big data with Dapper. When handling hundreds of thousands of objects at once brings a whole variety of performance problems you might run into. I’ll show you today how to handle many inserts with Dapper.

The problem

Let’s have a simple repository, that inserts users into DB. Table in DB will look like this:

Now let’s have a look at the code:

public async Task InsertMany(IEnumerable<string> userNames)
{
    using (var connection = new SqlConnection(ConnectionString))
    {
        await connection.ExecuteAsync(
            "INSERT INTO [Users] (Name, LastUpdatedAt) VALUES (@Name, getdate())",
            userNames.Select(u => new { Name = u })).ConfigureAwait(false);
    }
}

Very simple code, that takes user names and passes a collection of objects to Dapper extension method ExecuteAsync. This is a wonderful shortcut, that instead of one object, you can pass a collection and have this sql run for every object. No need to write a loop for that! But how this is done in Dapper? Lucky for us, Dapper code is open and available on GitHub. In SqlMapper.Async.cs on line 590 you will see:

There is a loop inside the code. Fine, nothing wrong with that… as long as you don’t need to work with big data. With this approach, you end up having a call to DB for every object in the list. We can do it better.

What if we could…

What if we could merge multiple insert sqls into one big sql? This brilliant idea gave me my colleague, Miron. Thanks, bro!:) So instead of having:

We can have:

The limit here is 1000, cause SQL server does not allow to set more values in one insert command. Code gets a bit more complicated, cause we need to create separate sqls for every 1000 users.

public async Task InsertInBulk(IList<string> userNames)
{
    var sqls = GetSqlsInBatches(userNames);
    using (var connection = new SqlConnection(ConnectionString))
    {
        foreach (var sql in sqls)
        {
            await connection.ExecuteAsync(sql);
        }
    }
}

private IList<string> GetSqlsInBatches(IList<string> userNames)
{
    var insertSql = "INSERT INTO [Users] (Name, LastUpdatedAt) VALUES ";
    var valuesSql = "('{0}', getdate())";
    var batchSize = 1000;

    var sqlsToExecute = new List<string>();
    var numberOfBatches = (int)Math.Ceiling((double)userNames.Count / batchSize);

    for (int i = 0; i < numberOfBatches; i++)
    {
        var userToInsert = userNames.Skip(i * batchSize).Take(batchSize);
        var valuesToInsert = userToInsert.Select(u => string.Format(valuesSql, u));
        sqlsToExecute.Add(insertSql + string.Join(',', valuesToInsert));
    }

    return sqlsToExecute;
}

Lets compare!

Code is nice and tidy, but is it faster? To check it I uesd a local database and a simple users name generator. It’s just a random, 10 character string.

public async Task<JsonResult> InsertInBulk(int? number = 100)
{
    var userNames = new List<string>();
    for (int i = 0; i < number; i++)
    {
        userNames.Add(RandomString(10));
    }

    var stopwatch = new Stopwatch();
    stopwatch.Start();

    await _usersRepository.InsertInBulk(userNames);

    stopwatch.Stop();
    return Json(
        new
            {
                users = number,
                time = stopwatch.Elapsed
            });
}

I tested this code for 100, 1000, 10k and 100k. Results surprised me.

The more users I added, the best performance gain I got. For 10k users it 42x and for 100k users it’s 48x improvement in performance. This is awesome!

It’s not safe

Immediately after posting this article, I got comments from you, that this code is not safe. Joining raw strings like that in a SQL statement is a major security flaw, cause it’s exposed for SQL injection. And that is something we need to take care of. So I came up with the code, that Nicholas Paldino suggested in his comment. I used DynamicParameters to pass values to my sql statement.

public async Task SafeInsertMany(IEnumerable<string> userNames)
{
    using (var connection = new SqlConnection(ConnectionString))
    {
        var parameters = userNames.Select(u =>
            {
                var tempParams = new DynamicParameters();
                tempParams.Add("@Name", u, DbType.String, ParameterDirection.Input);
                return tempParams;
            });

        await connection.ExecuteAsync(
            "INSERT INTO [Users] (Name, LastUpdatedAt) VALUES (@Name, getdate())",
            parameters).ConfigureAwait(false);
    }
}


This code works fine, however it’s performance is comparable to regular approach. So it is not really a way to insert big amounts of data. An ideal way to go here is to use SQL Bulk Copy and forget about Dapper.

  All code posted here you can find on my GitHub: https://github.com/mikuam/Blog

I know that there is a commercial Dapper extension, that helps with bulk operations. You can have a look here. But wouldn’t it be nice, to have a free nuget package for it? What do you think?

Code review #1 – dapper and varchar parameters

This is a first post about great code review feedback, that I either gave or received. It will always consist of 3 parts: context, review feedback and explanation. You can go ahead and read previous ones here: https://www.michalbialecki.com/2019/06/21/code-reviews/. So lets not wait anymore and get to it.

The context

This is a simple ASP.Net application, that is requesting database to get count of elements filtered by one parameter. In this case we need a number of users providing a country code, that is always two character string.

This is how DB schema looks like:

Code in .net app is written with Dapper nuget package, that extends functionalities of IDbCommand and offers entities mapping with considerably good performance. It looks like this:

public async Task<IEnumerable<UserDto>> GetCountByCountryCode(string countryCode)
{
    using (var connection = new SqlConnection(ConnectionString))
    {
        return await connection.QueryAsync<UserDto>(
            "SELECT count(*) FROM [Users] WHERE CountryCode = @CountryCode",
            new { CountryCode = countryCode }).ConfigureAwait(false);
    }
}

Looks pretty standard, right? What is wrong here then?

Review feedback

Please convert countryCode parameter to ANSI string in GetCountByCountryCode method, cause if you use it like that, it’s not optimal.

Explanation

Notice, that CountryCode in database schema is a varchar(2) and this means that it stores two 1-byte characters. On the contrary nvarchar type is 2-byte per character type, that can store multilingual data. When using .net String type we are using unicode strings by default and therefore if we pass countryCode string to SQL it will have to be converted to ANSI string first.

The correct code should look like this:

public async Task<IEnumerable<UserDto>> GetCountByCountryCodeAsAnsi(string countryCode)
{
    using (var connection = new SqlConnection(ConnectionString))
    {
        return await connection.QueryAsync<UserDto>(
            "SELECT count(*) FROM [Users] WHERE CountryCode = @CountryCode",
            new { CountryCode = new DbString() { Value = countryCode, IsAnsi = true, Length = 2 } })
            .ConfigureAwait(false);
    }
}

If we run SQL Server Profiler and check what requests are we doing, this is what we will get:

As you can see first query needs to convert CountryCode parameter from nvarchar(4000) to varchar(2) in order to compare it.

In order to check how that would impact the performance, I created a SQL table with 1000000(one milion) records and compared results.

Before review it took 242 miliseconds and after review it took only 55 miliseconds. So as you see it is more that 4 times performance improvement in this specific case.

  All code posted here you can find on my GitHub: https://github.com/mikuam/console-app-net-core

Perfect console application in .net Core: add unit tests

Unit test are crucial part in software development process. In late 1990s Kent Beck stated that writing tests is the most important part of writing software in ExtremeProgramming metodology. You can read a bit more about it in Martins Fowler article.

This is a part of a series of articles about writing a perfect console application in .net core 2. Feel free to read more:

My example

To have a simple example how to add tests to .net core console application I created a TicketStore app. It is a console app to reserve tickets in cinema. It’s structure looks like this:

Here is how command handling looks like:

    command = Console.ReadLine();
    if (!_commandValidator.IsValid(command))
    {
        Console.WriteLine($"Sorry, command: '{command}' not recognized.");
    }

And CommandValidator looks like this:

As you noticed validator contains regular expression and parsing logic, that can always be faulty. We only allow a column to be from A to H and seat to be between 1 and 15. Let’s add unit test to be sure that it works that way.

Adding tests project

Adding a test project

Project name that I would like to test is MichalBialecki.com.TicketStore.Console so I need to add a class library with name
MichalBialecki.com.TicketStore.Console.Tests.

Adding unit tests packages

To write unit tests I’m adding my favourite packages:

  • NUnit – unit test framework
  • NUnit3TestAdapter – package to run tests
  • NSubstitute – mocking framework
  • Microsoft.NET.Test.Sdk – it’s important to remember about this one, tests would not run without it

Now we can start writing tests.

First test

I added a CommandValidatorTests and now my project structure looks like this:

And test looks like this.

    using MichalBialecki.com.TicketStore.Console.Helpers;
    using NUnit.Framework;

    [TestFixture]
    public class CommandValidatorTests
    {
        private CommandValidator _commandValidator;

        [SetUp]
        public void SetUp()
        {
            _commandValidator = new CommandValidator();
        }

        [TestCase("A1", true)]
        [TestCase("A15", true)]
        [TestCase("A11", true)]
        [TestCase("H15", true)]
        [TestCase("H16", false)]
        [TestCase("K15", false)]
        [TestCase("I4", false)]
        [TestCase("K.", false)]
        [TestCase("", false)]
        [TestCase(null, false)]
        public void IsValid_GivenCommand_ReturnsExpectedResult(string command, bool expectedResult)
        {
            // Arrange & Act
            var result = _commandValidator.IsValid(command);

            // Assert
            Assert.AreEqual(expectedResult, result);
        }
    }

In Resharper unit tests sessions window all tests passed.

Notice how test results are shown – everything is clear from the first sight. You can immidiately see what method is tested and with what conditions.

If you’re interested what are the best practices to write unit tests, have a look at my article: https://www.michalbialecki.com/2019/01/03/writing-unit-tests-with-nunit-and-nsubstitute/. It will guide you through the whole process and clearly explaining best practices.

  All code posted here you can find on my GitHub: https://github.com/mikuam/console-app-net-core