Wysłanie żądania w programie ASP.NET Core w .NET 5 jest standardową operacją, którą można dość łatwo wykonać. Jednak szczegóły mają znaczenie w tym przypadku i pokażę Wam najlepsze praktyki. Przyjrzymy się również niektórym zaawansowanym funkcjom, aby uzyskać pełny ogląd sytuacji.
Żądania do prawdziwego API
W tym artykule będę korzystać z bezpłatnej usługi dostępnej w Internecie do pobierania prognoz pogody – http://weatherstack.com. Aby móc z niego korzystać, po prostu zarejestruj się na stronie internetowej i możesz go również użyć. W ciągu miesiąca dostępnych jest 1000 żądań dla darmowego konta, które powinno wystarczyć do zaspokojenia naszych potrzeb.
Najpierw rzućmy okiem na żądania, które zamierzamy wysyłać. Aby przetestować API, używam aplikacji Postman, która jest bardzo wydajna, ale intuicyjna. Gorąco zachęcam do przeczytania mojego artykułu na ten temat tutaj: Postman the right way
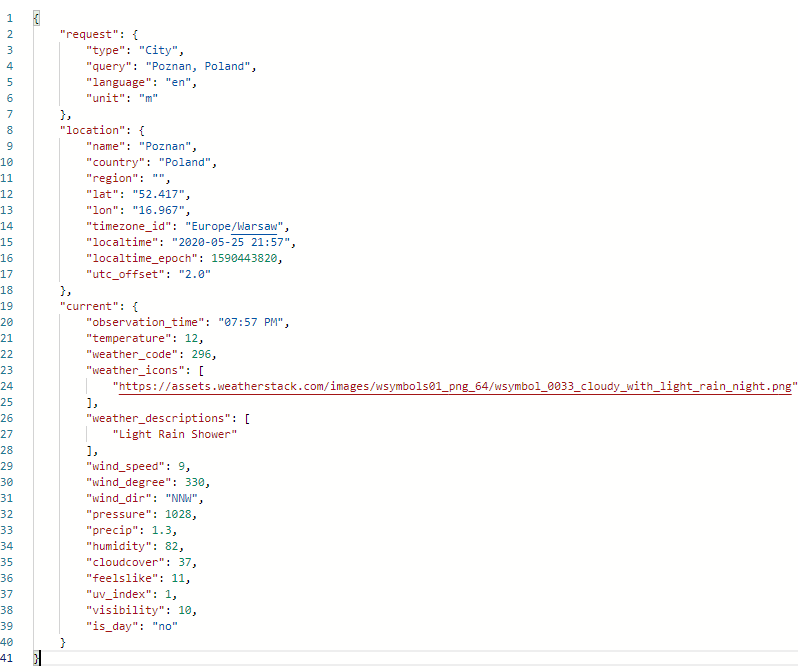
Oto jak wygląda żądanie pobrania aktualnej pogody w Poznaniu:
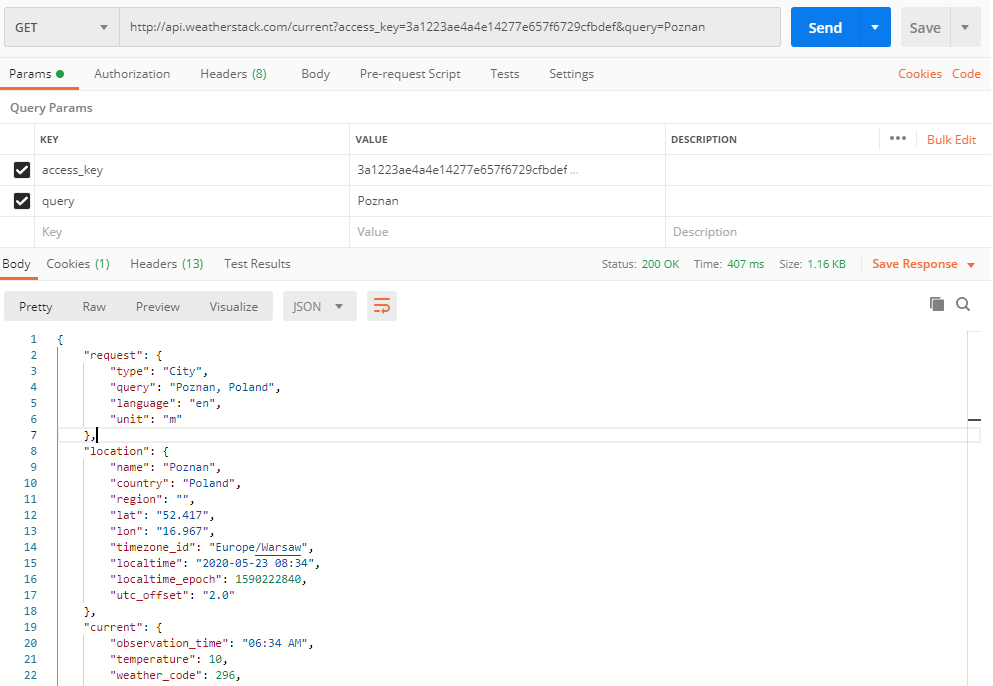
Jest to żądanie typu GET wysłane na adres http://api.weatherstack.com/current z dwoma parametrami:
access_keyktóry otrzymasz kiedy zarejestrujesz kontoqueryktóre jest nazwą miasta
Odpowiedź, którą otrzymaliśmy to 200 OK z zawartości w formacie JSON.
Żeby wykonać to żądanie w kodzie, zaimplementuję klasę WeatherStackClient.
using Microsoft.Extensions.Logging;
using System;
using System.Net.Http;
using System.Text.Json;
using System.Threading.Tasks;

namespace PrimeHotel.Web.Clients
{
    public class WeatherStackClient : IWeatherStackClient
    {
        private const string AccessKey = "3a1223ae4a4e14277e657f6729cfbdef";
        private const string WeatherStackUrl = "http://api.weatherstack.com/current";

        private HttpClient _client;
        private readonly ILogger<WeatherStackClient> _logger;

        public WeatherStackClient(HttpClient client, ILogger<WeatherStackClient> logger)
        {
            _client = client;
            _logger = logger;
        }
    }
}
Kilka rzeczy w tym kodzie warto wyjaśnić:
AccessKeyjest na razie wpisany na sztywno, ale w prawdziwym produkcyjnym API powinien być pobrany z pliku konfiguracyjnegoIWeatherStackClientinterfejs, który został dodany, aby wykorzystać go przy wstrzykiwaniu zależności (Dependency Injection)HttpClientjest przekazywany przez konstruktor. Będzie on automatycznie stworzony i zarządzany przez framework
A teraz utwórzmy kod odpowiedzialny za logikę:
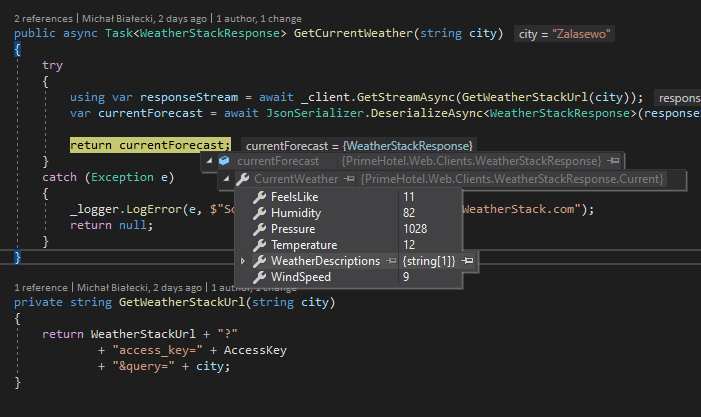
    public async Task<WeatherStackResponse> GetCurrentWeather(string city)
    {
        try
        {
            using var responseStream = await _client.GetStreamAsync(GetWeatherStackUrl(city));
            var currentForecast = await JsonSerializer.DeserializeAsync<WeatherStackResponse>(responseStream);

            return currentForecast;
        }
        catch (Exception e)
        {
            _logger.LogError(e, $"Something went wrong when calling WeatherStack.com");
            return null;
        }
    }

    private string GetWeatherStackUrl(string city)
    {
        return WeatherStackUrl + "?"
                + "access_key=" + AccessKey
                + "&query=" + city;
    }
Przeanalizujmy ten kod po kolei i zobaczmy co się w nim dzieje:
_client.GetStreamAsyncjest metodą asynchroniczną, której przekazujemy URL i zwraca treść odpowiedzi w postaci strumienia. Jest więcej metod do wyboru:GetAsync,PostAsync,PutAsync,PatchAsync,DeleteAsyncaby wykonać wszystkie operacje CRUD. Jest także metodaGetStringAsyncktóre działa podobnie doGetStreamAsyncGetWeatherStackUrltworzy URL poprzez dodanie do siebie URL serwisu oraz parametrówJsonSerializer.DeserializeAsync<WeatherStackResponse>(responseStream)deserializuje strumień danych do obiektu typuWeatherStackResponse
A klasa WeatherStackResponse wygląda następująco:
using System.Text.Json.Serialization;

namespace PrimeHotel.Web.Clients
{
    public class WeatherStackResponse
    {
        [JsonPropertyName("current")]
        public Current CurrentWeather { get; set; }

        public class Current
        {
            [JsonPropertyName("temperature")]
            public int Temperature { get; set; }

            [JsonPropertyName("weather_descriptions")]
            public string[] WeatherDescriptions { get; set; }

            [JsonPropertyName("wind_speed")]
            public int WindSpeed { get; set; }

            [JsonPropertyName("pressure")]
            public int Pressure { get; set; }

            [JsonPropertyName("humidity")]
            public int Humidity { get; set; }

            [JsonPropertyName("feelslike")]
            public int FeelsLike { get; set; }
        }
    }
}
Zauważ, że użyłem atrybutu JsonPropertyName, aby określić które elementy w JSON odpowiadają właściwościom w mojej klasie. A oto struktura, którą chcę zmapować.
Zauważ, że nie muszę mapować wszystkich właściwości, a jedynie te, których potrzebuję. Ostatnia rzeczy, czyli zarejestrowanie klasy WeatherStackClient w kontenerze IoC. Aby tego dokonać, muszę przejść do klasy Startup i w metodzie ConfigureServices dodać następującą linię.
services.AddHttpClient<IWeatherStackClient, WeatherStackClient>();
Używamy dedykowanej metody rejestracji klas używającycj HttpClient. Pod spodem korzystamy z IHttpClientFactory, który pomaga w utrzymaniu puli i żywotności klientów. Istnieje ograniczona liczba połączeń HTTP, która może być utrzymywana w jednym momencie, a jeśli utworzysz zbyt wielu klientów, którzy blokują połączenie, niektóre z twoich żądań nie zostaną zrealizowane. IHttpClientFactory dodaje także konfigurowalne środowisko logowanie (za pośrednictwem ILogger) dla wszystkich wysyłanych żądań. Podsumowując, wspomniany mechanizm ułatwia życie programiście i działa przy tym w sposób inteligentny.
Czy to działa? Tak! Odpowiedź została poprawnie odwzorowana na moją klasę i mogę ją zwrócić.
Zastanawiasz się może co zostało zalogowane podczas procesowania tego żądania? Sprawdźmy.

Jak wspomniałem wcześniej, IHttpClientFactory zapewnia również mechanizm logowania, dzięki czemu każde żądanie jest logowane. Tutaj widać, że zalogowano nie tylko adres, ale także metodę HTTP i czas wykonania. Może to być bardzo przydatne podczas debugowania.
Dodanie mechanizmu ponawiania próby
W świecie mikro-serwisów, każdy serwis może czasami mieć gorszy dzień. Dlatego musimy mieć mechanizm ponawiania prób dla usług, do których wysyłamy żądania, i wiemy, że od czasu do czasu zawodzą. W ASP.NET Core dla .NET 5 istnieje biblioteka zewnętrzna, ale zintegrowana we framework, właśnie w tym celu – to Polly. Polly to wszechstronna biblioteka do obsługi błędów dla platformy .NET. Pozwala programistom na płynne i bezpieczne tworzenie zasad, jak błędy mają być obsługiwane. Chodzi to o scenariusze takie jak: ponawianie próby, Circuit Breaker, Timeout, Bulkhead Isolation, oraz Fallback.
W naszym przypadku dodamy mechanizm ponownej próby, która wywoła usługę WeatherStack i ponowi próbę 3 razy po początkowej awarii. Dzięki Polly można łatwo ustawić wiele prób i opóźnień między nimi. Rzućmy okiem na przykład – jest to metoda w klasie Startup, w której konfigurujemy kontener DI.
    services.AddHttpClient<IWeatherStackClient, WeatherStackClient>()
        .AddTransientHttpErrorPolicy(
            p => p.WaitAndRetryAsync(new[]
            {
                TimeSpan.FromSeconds(1),
                TimeSpan.FromSeconds(5),
                TimeSpan.FromSeconds(10)
            }));
Za pomocą tego kodu ponowimy to samo żądanie z opóźnieniem 1, 5 i 10 sekund. Nie jest wymagany dodatkowy kod. Polly zrobi to wszystko za nas. Zobaczymy zalogowany błąd, że coś się nie powiedzie, ale dopiero gdy wszystkie próby zakończą się niepowodzeniem, otrzymamy wyjątek.
Dodanie cancellation token
Cancellation token to mechanizm, który może zatrzymać wykonywanie połączenia asynchronicznego. Powiedzmy, że nasze żądanie nie powinno zająć więcej niż 3 sekundy, ponieważ jeśli tak jest, to wiemy, że coś jest nie tak i nie ma sensu czekać.
Aby zaimplementować taki mechanizm, musimy utworzyć cancellation token i podać go podczas wysyłanie żądania w kliencie HTTP.
    public async Task<WeatherStackResponse> GetCurrentWeatherWithAuth(string city)
    {
        try
        {
            using var cancellationTokenSource = new CancellationTokenSource(TimeSpan.FromSeconds(3));

            using var responseStream = await _client.GetStreamAsync(GetWeatherStackUrl(city), cancellationTokenSource.Token);
            var currentForecast = await JsonSerializer.DeserializeAsync<WeatherStackResponse>(responseStream);

            return currentForecast;
        }
        catch (TaskCanceledException ec)
        {
            _logger.LogError(ec, $"Call to WeatherStack.com took longer then 3 seconds and had timed out ");
            return null;
        }
        catch (Exception e)
        {
            _logger.LogError(e, $"Something went wrong when calling WeatherStack.com");
            return null;
        }
    }
Jeśli żądanie potrwa zbyt długo, otrzymamy wyjątek TaskCancelledException, który możemy wychwycić i zareagować na niego inaczej, niż w przypadku nieoczekiwanego wyjątku.
Dodanie autoryzacji
Podstawowa autoryzacja jest zdecydowanie najprostsza i jest jedną z najpopularniejszych. Chodzi o to, że każde żądanie do określonej usługi musi być autoryzowane, więc razem z naszą zawartością, musimy wysyłać także informacje autoryzacyjne. Przy podstawowej autoryzacji musimy przekazać użytkownika i hasło zakodowane jako ciąg znaków w formacie base64 i umieścić go w nagłówku żądania. Zobaczmy, jak można to osiągnąć.
    private const string ApiKey = "3a1223ae4a4e14277e657f6729cfbdef";
    private const string Username = "Mik";
    private const string Password = "****";

    public WeatherStackClient(HttpClient client, ILogger<WeatherStackClient> logger)
    {
        _client = client;
        _logger = logger;

        var authToken = Encoding.ASCII.GetBytes($"{Username}:{Password}");
        _client.DefaultRequestHeaders.Authorization = new AuthenticationHeaderValue(
            "Basic",
            Convert.ToBase64String(authToken));
    }
W ten sposób każde połączenie z WeatherStackClientbędzie zawierało informacje o autoryzacji i nie będziemy musieli niczego dodawać podczas wysyłania żądań. Jedynym miejscem, w którym musimy umieścić dodatkowy kod, jest konstruktor.
Pamiętaj, że autoryzacja nie jest wymagana, aby wysyłać żądania do weatherstack.com i jest dodana tylko w celach demonstracyjnych.
Ten artykuł nie obejmował wszystkich możliwości IHttpClientFactory, więc jeśli chcesz dowiedzieć się więcej, po prostu przejdź do tego artykułu Microsoft.
Mam nadzieję, że post Ci się spodobał. Cały kod z tego posta znajdziesz na moim koncie na GitHub:
![]()
https://github.com/mikuam/PrimeHotel