Tag Archives: ef core migrations

Useful SQL statements when writing EF Core 5 migrations

Entity Framework Core 5 is a great ORM and I love how efficient and concise it is. With the migrations mechanism enabled, you can generate the next migration based on changes applied to your model. This is so cool, but when it comes to other database objects, you are on your own. I mean – you can still use migrations, but you have to figure out a SQL statement yourself. Let’s take a look at some cool statements you can use with the SQL Server database.

CREATE OR ALTER

This is a very powerful command that literally just check if a database object exists, and it alters it or creates a new one based on that fact.

So instead of writing a statement like this:

IF OBJECT_ID('UpdateProfilesCountry', 'P') IS NOT NULL
DROP PROC UpdateProfilesCountry
GO

CREATE PROCEDURE [dbo].[UpdateProfilesCountry]
    @StardId int
AS
BEGIN
    SET NOCOUNT ON;
    UPDATE Profiles SET Country = 'Poland' WHERE LEFT(TelNo, 2) = '48' AND Id > @StardId
END

I can use CREATE OR ALTER, like this:

CREATE OR ALTER PROCEDURE [dbo].[UpdateProfilesCountry]
    @StardId int
AS
BEGIN
    SET NOCOUNT ON;
    UPDATE Profiles SET Country = 'Poland' WHERE LEFT(TelNo, 2) = '48' AND Id > @StardId
END

Additionally, CREATE OR ALTER does not reset permissions, so you don’t need to re-apply them, which would be necessary with the first script.

CREATE OR ALTER can be used with the following objects:

  • STORED PROCEDURES (including natively compiled)
  • FUNCTIONS (Transact-SQL, including natively compiled)
  • TRIGGERS
  • VIEWS

Other database objects like tables or indexes cannot be handled with that statement. You can find more information about it in this Microsoft post.

Note: CREATE OR ALTER is available from SQL Server 2016 SP1.

DROP IF EXISTS

DROP IF EXISTS is a useful statement that can be used for many database objects. It will check if the object exists and if it does, it will drop it – all in one statement.

Instead of writing a statement like this:

IF OBJECT_ID('dbo.Products', 'U') IS NOT NULL 
  DROP TABLE dbo.Products; 

Now we can write a simple one-liner:

DROP TABLE IF EXISTS dbo.Products

Clean and simple. DROP IF EXISTS will work for many database objects, like:

  • AGGREGATE
  • ASSEMBLY
  • VIEW
  • DATABASE
  • DEFAULT
  • FUNCTION
  • INDEX
  • PROCEDURE
  • ROLE
  • RULE
  • SCHEMA
  • SECURITY POLICY
  • SEQUENCE
  • SYNONYM
  • TABLE
  • TRIGGER
  • TYPE
  • USER
  • VIEW

You can read more about it in this Microsoft post. Also Note: DROP IF EXISTS is available from SQL Server 2016.

Hope you like it, maybe you have some SQL statements you find useful at your work? Give me a shout or leave a comment. Cheers! 😉 

How to configure relationships in Entity Framework Core 5

Relationships in a database context define how two entities relate to each other. Entity Framework Core really shines in supporting relationships. It offers a convention-based configuration, that will configure relationships based on the model provided. For more advanced cases we can use robust Fluent API capabilities, that offer greater flexibility.

I must admit that working with relationships in Entity Framework Core 5 feels very natural for a developer and that might be simply its most important feature.

Types of relationships

Relationships in the database will mean, that two entities relate to each other. They are logically connected. Let’s take a look at a hotel model example:

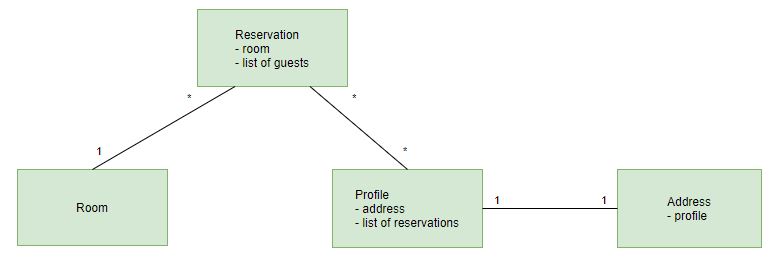
We have a reservation, that has a single room and a list of guests. The room can be assigned to many reservations. A profile can be assigned to many reservations, but it has only one address related. We have 3 different types of relationships defined here:

  • one-to-many – room to a reservation
  • many-to-many – reservation to profile
  • one-to-one – profile to address

Those types are nicely supported by Entity Framework Core, so let’s have a look at the model that corresponds to this schema. Here is a Reservation:

    public class Reservation
    {
        public int Id { get; set; }

        public int RoomId { get; set; }

        public Room Room { get; set; }

        public List<Profile> Profiles { get; set; }

        public DateTime Created { get; set; }

        public DateTime From { get; set; }

        public DateTime To { get; set; }
    }

And Room:

    public class Room
    {
        public int Id { get; set; }

        public int Number { get; set; }

        public string Description { get; set; }

        public DateTime LastBooked { get; set; }

        public int Level { get; set; }

        public RoomType RoomType { get; set; }

        public bool WithBathroom { get; set; }

        public int NumberOfPlacesToSleep { get; set; }
    }

    public enum RoomType
    {
        Standard,
        Suite
    }

And Profile:

    public class Profile
    {
        public int Id { get; set; }

        public string Ref { get; set; }

        public string Salutation { get; set; }

        public string Forename { get; set; }

        public string Surname { get; set; }

        public string TelNo { get; set; }

        public string Email { get; set; }

        public string Country { get; set; }

        public DateTime? DateOfBirth { get; set; }

        public Address Address { get; set; }

        public List<Reservation> Reservations { get; set; }
    }

And finally, Address:

    public class Address
    {
        public int Id { get; set; }

        public string Street { get; set; }

        public string HouseNumber { get; set; }

        public string City { get; set; }

        public string PostCode { get; set; }

        public int ProfileId { get; set; }

        public Profile Profile { get; set; }
    }

And a cherry on top, a PrimeDbContext:

    public class PrimeDbContext : DbContext
    {
        public PrimeDbContext(DbContextOptions<PrimeDbContext> options)
            : base(options)
        {
        }

        public virtual DbSet<Room> Rooms { get; set; }

        public virtual DbSet<Profile> Profiles { get; set; }

        public virtual DbSet<Reservation> Reservations { get; set; }

        public virtual DbSet<Address> Address { get; set; }

        protected override void OnModelCreating(ModelBuilder modelBuilder)
        {
        }
    }

Please notice a very important thing, thanks to a convention-based configuration, there is no additional configuration needed in the model classes and PrimeDbContext class.

Configuration is easy

Have you noticed how easy it is to configure relationships in Entity Framework Core 5? If you have properties named correctly, then EF Core will deduct relationships on its own. A relationship is defined by a navigation property, that is an entity inside an entity. Look at the Reservation. There is a Room, that is a navigation property and there is a RoomId that will be treated as a foreign key to define a constraint. 

There are 3 ways to configure model and relationships:

  • convention-based – with properly named properties, EF Core will deduct how entities are related
  • data annotations – handy attributes that you can put on the entity property
  • Fluent API – a fully-featured API for configuring relations and entities as you wish

Here is an example of a data annotation to set a non-standard named foreign key:

public class Post
{
    public int PostId { get; set; }
    public string Title { get; set; }
    public string Content { get; set; }

    public int BlogForeignKey { get; set; }

    [ForeignKey("BlogForeignKey")]
    public Blog Blog { get; set; }
}

If the foreign key would be named BlogId, then it would be configured automatically, but a custom name has to be handled manually.

Even with many-to-many relationships there is no need to define a joining table and write additional configuration. It is a new feature available from RC1 version, so documentation available on the official Microsoft page can be misleading. Hopefully, it will be updated soon.

Luckily, in most cases, you would not need to write much of configuration manually, cause it is mainly required when coping with advanced scenarios and custom mappings.

Model First approach

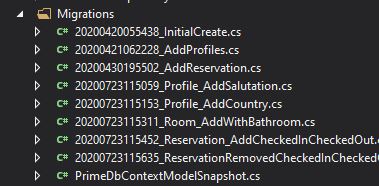
Model First approach lets you define your model and relationships and use Entity Framework Core to generate SQL for you. All you need to do is to create models that you want and when you’re done, just create a database migration. This is true of course when you already have EF Core migrations in place. 

It also works for updating the model, when you need to add a related entity, EF Core migrations will handle that surprisingly well.

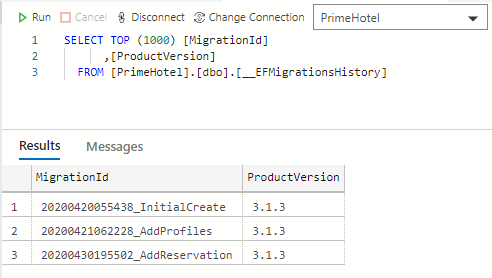
Let’s say I had a profile entity and I wanted to add an Address entity in a one-to-one relationship. You can take a look at the code of those both classes above. When I add a new migration from dotnet CLI, I get a new migration like this, already generated for me, based on my model changes.

    public partial class AddAddress : Migration
    {
        protected override void Up(MigrationBuilder migrationBuilder)
        {
            migrationBuilder.CreateTable(
                name: "Address",
                columns: table => new
                {
                    Id = table.Column<int>(type: "int", nullable: false)
                        .Annotation("SqlServer:Identity", "1, 1"),
                    Street = table.Column<string>(type: "nvarchar(max)", nullable: true),
                    HouseNumber = table.Column<string>(type: "nvarchar(max)", nullable: true),
                    City = table.Column<string>(type: "nvarchar(max)", nullable: true),
                    PostCode = table.Column<string>(type: "nvarchar(max)", nullable: true),
                    ProfileId = table.Column<int>(type: "int", nullable: false)
                },
                constraints: table =>
                {
                    table.PrimaryKey("PK_Address", x => x.Id);
                    table.ForeignKey(
                        name: "FK_Address_Profiles_ProfileId",
                        column: x => x.ProfileId,
                        principalTable: "Profiles",
                        principalColumn: "Id",
                        onDelete: ReferentialAction.Cascade);
                });

            migrationBuilder.CreateIndex(
                name: "IX_Address_ProfileId",
                table: "Address",
                column: "ProfileId",
                unique: true);
        }

        protected override void Down(MigrationBuilder migrationBuilder)
        {
            migrationBuilder.DropTable(
                name: "Address");
        }
    }

Nice and easy, but what’s most important – it works!

Summary

Configuring relationships in Entity Framework Core 5 is as simple as it can possibly be. Most of the mapping can be done automatically by the framework, just by naming properties right. If you’re struggling with more advanced scenarios you can go with Fluent API, which offers a lot and is rather compact. In just a few lines you can define how to map a view to an entity.

My favorite part, though, is a Model First approach, where you create a model that you would like to work with and generate SQL with EF Core migrations. 

All code mentioned here is available on my GitHub, code that uses those relationships as well! Feel free to drop by.

Wykonanie procedury składowanej w Entity Framework Core

Procedury składowane są integralną częścią każdej bazy danych MS SQL. Są idealne do opakowania skomplikowanego kodu SQL w obiekt bazy danych, którego możemy ponownie użyć. Jak wykonać procedurę składowaną w Entity Framework Core 5? Przekonajmy się.

Dodanie procedury składowanej

Przede wszystkim musimy dodać procedurę składowaną. Najlepszym sposobem na to jest dodanie migracji bazy danych z odpowiednim kodem SQL. Zacznijmy od dodania migracji za pomocą polecenia globalnego narzędzia EF Core:

dotnet ef migrations add spUpdateProfilesCountry

To polecenie wygeneruje migrację, w której możemy umieścić nasz SQL. Zobaczmy, jak to może wyglądać:

public partial class spUpdateProfilesCountry : Migration
{
    protected override void Up(MigrationBuilder migrationBuilder)
    {
        var sql = @"
            IF OBJECT_ID('UpdateProfilesCountry', 'P') IS NOT NULL
            DROP PROC UpdateProfilesCountry
            GO

            CREATE PROCEDURE [dbo].[UpdateProfilesCountry]
                @StardId int
            AS
            BEGIN
                SET NOCOUNT ON;
                UPDATE Profiles SET Country = 'Poland' WHERE LEFT(TelNo, 2) = '48' AND Id > @StardId
            END";

        migrationBuilder.Sql(sql);
    }

    protected override void Down(MigrationBuilder migrationBuilder)
    {
        migrationBuilder.Sql(@"DROP PROC UpdateProfilesCountry");
    }
}

Jest to prosty kod SQL, który najpierw sprawdza, czy procedura istnieje, a jeśli tak, usuwa ją. Następnie tworzy nową procedurę z nazwą UpdateProfilesCountry, która zaktualizuje kolumnę Country dla każdego profilu, którego numer telefonu zaczyna się od 48.

Kiedy migracja zostanie wykonana na bazie danych, stworzy procedurę składowaną UpdateProfilesCountry.

Wykonanie procedury składowanej

Nie ma dedykowanej metody wykonywania procedury składowanej, więc w przypadku, gdy procedura składowana nie zwraca danych, możemy po prostu wywołać ją jako zwykły kod SQL. Można to osiągnąć w następujący sposób:

await primeDbContext.Database.ExecuteSqlInterpolatedAsync(
    "UpdateProfilesCountry @p0",
    parameters: new[] { minimalProfileId.ToString() });

Kiedy odpytam bazę danych o wszystkie numery zaczynające się od 48, to zobaczę, że kraj został zaktualizowany na Poland. Oznacza to, że nasza procedura została poprawnie wykonana.

BTW. Nie przejmuj się że widzisz prawdziwe dane osobowe. Są to dane fałszywe, wygenerowane przy pomocy biblioteki Bogus 🙂

Podsumowanie

Entity Framework Core całkiem dobrze radzi sobie z procedurami składowanymi. Nie ma dedykowanej metody uruchamiania procedury, ale można ją uruchomić jako standardowy kod SQL. Jeśli jednak chcesz pobrać dane z bazy danych przy pomocy procedury składowanej, to jest to już inne podejście. Opisałem je dokładnie tutaj: Pobranie danych za pomocę procedury składowanej w Entity Framework Core 5.

Co więcej, możesz obsługiwać dodawanie lub aktualizowanie procedur składowanych za pomocą migracji EF Core, co oznacza, że wszystkie wymagane prace można wykonać za pomocą EF Core.

Cały wymieniony tutaj kod można znaleźć na moim GitHubie, możesz z nim eksperymentować do woli.

Pozdrowienia!

Scalanie migracji w Entity Framework Core 5

Podczas pracy z szybko rozwijającym się projektem zmiany zachodzą szybko nie tylko w kodzie projektu, ale także w schemacie bazy danych. Dzieje się tak zwłaszcza podczas pracy nad mikroserwisem od samego początku, kiedy często zmienia się jego przeznaczenie.

Jak działają migracje w EF Core 5

W migracjach Entity Framework Core 5 dodajemy migrację jako zmiany pomiędzy naszą klasą DbContext a istniejącą [nazwa DbContext] ModelSnapshot. Podczas generowania nowej migracji narzędzie CLI wygeneruje tylko różnice między tymi dwoma bytami i umieści je w dwóch metodach: Up i Down. W pierwszej nastąpi zmiana dotycząca zastosowania migracji, aw drugiej usunięcia migracji.

Po zastosowaniu migracji jej nazwa jest zapisywana w tabeli __EFMigrationsHistory.

Scalanie wielu migracji

Powiedzmy, że po wielokrotnej zmianie schematu na wczesnych etapach nasz projekt jest teraz stabilny. Mamy kilka migracji, które można by połączyć w jedną, która raz stworzyłaby model, bez wielu małych aktualizacji.

Scalanie kiedy możemy wszystko usunąć

Najłatwiejszym sposobem scalenia wszystkich migracji byłoby usunięcie wszystkiego! A dokładnie mam na myśli taki proces:

  • usuń katalog Migrations ze wszystkimi migracjami
  • wyczyść tabelę __EFMigrationHistory
  • usuń wszystkie tabele i inne obiekty bazy danych, które zostały dodane podczas migracji
  • utwórz nową migrację ze wszystkimi zmianami

Jest to drastyczny sposób scalania migracji, ponieważ utracimy wszystkie dane. Jest to jednak bardzo proste i może w niektórych przypadkach spełniać swoją rolę.

Scalanie, kiedy chcemy zachować dane

Kiedy chcemy zachować dane, nie możemy usunąć wszystkich już utworzonych obiektów bazy danych, ale możemy scalić pliki migracji w naszym kodzie. Zobaczmy, jak można to zrobić.

  • Usuń wszystkie skrypty migracji z folderu Migrations
  • Dodaj nową migrację za pomocą polecenia dotnet ef migrations add MergedMigration
  • Skopiuj cały plik i wyczyść obie metody Up i Down
  • Zaktualizuj bazę danych i zastosuj migrację MergedMigration za pomocą polecenia dotnet ef database update
  • Następnie zamień zawartość pliku MergedMigration na wcześniej wygenerowany kod

W rezultacie będziesz mieć tylko jeden plik migracji. W moim przykładzie tabela __EFMigrationHistory wygląda następująco.

A teraz w Visual Studio widzę tylko jedną migrację.

Zawiera ona zmiany ze wszystkich moich poprzednich migracji, które zostały scalone.

Zadziałało!

Wskazówka! Możesz również nazwać scaloną migrację tak jak pierwszą, która została już zastosowana, aby nie trzeba było aktualizować bazy danych i dodawać jej do tabeli __EFMigrationHistory.

Nie zadziała za każdym razem

Migracje możemy łatwo łączyć, gdy są stosowane tylko do kontrolowanej przez nas bazy danych. Ponadto ten proces nie będzie działać w środowiskach, w których nie zastosowano wszystkich scalonych migracji. Proces jest łatwy, ale są pewne rzeczy, które należy zwrócić uwagę.

Z drugiej strony, czy musimy zachować wszystkie migracje, nawet jeśli wiemy, że nigdy więcej ich nie uruchomimy? Nie sądzę. W tym miejscu byłoby wspaniale połączyć stare migracje, ale zostawić te najnowsze. Można to osiągnąć w bardzo podobny sposób.

  • Przywróć ostatnie N migracji lokalnie, jedna po drugiej i przenieś je gdzieś
  • Przywróć stan projektu w miejscu pasującym do migracji (git checkout w odpowiednim miejscu w historii)
  • Scal wszystkie istniejące migracje
  • Przywróć stan projekt do najnowszej wersji
  • Dodawaj po kolei zapisane najnowsze migracje

W takim przypadku zachowamy najnowsze migracje i utworzymy dużą migrację początkową, która byłaby zgodna z Twoim projektem. Jeśli wystąpi przypadek, w którym wszystkie migracje będą musiały zostać zastosowane do bazy danych, schemat bazy danych nie zostanie uszkodzony.

Podsumowanie

Scalanie migracji w Entity Framework Core 5 jest możliwe i mogę powiedzieć, że jest to zaskakująco łatwe. Obejmuje jednak proces automatycznego generowania i musisz sprawdzić, czy migracja scalona działa dokładnie tak samo, jak wszystkie migracje stosowane pojedynczo. Co więcej, istnieje więcej niż jeden sposób łączenia migracji i musisz wybrać ten, który jest dla Ciebie najbardziej odpowiedni.

Cały kod zamieszczony tutaj jest dostępny na moim GitHubie, więc możesz go pobrać i bawić się nim. Spójrz również na ten post, jak go uruchomić: PrimeHotel – jak uruchomić projekt.

Dzięki za czytanie i do zobaczenia ponownie 🙂

Merging migrations in Entity Framework Core 5

When working with a fast-evolving project changes happen rapidly not only to the project’s code but also to the database schema. It happens especially when working on a micro-service from the start when its purpose shifts.

How EF Core 5 migrations work

In Entity Framework Core 5 migrations we are adding a migration as a delta changes between our DbContext class and existing [DbContext name]ModelSnapshot. When generating new migration a CLI Tool will generate only the differences between those two and put them in two methods: Up and Down. In the first one, there will be a change to apply the migration and in the second one, to remove the migration.

After the migration is applied, its name is noted in the __EFMigrationsHistory table.

Merging multiple migrations 

Let’s say that after changing a schema multiple times in the early stages our project is now stable. We have a bunch of migrations that could be merged into one, that would create a model once, without many small updates. 

When we can remove everything

The easiest way to merge all migrations would be removing everything! What I mean is:

  • remove Migrations directory with all migrations
  • clear __EFMigrationHistory table
  • remove all tables and other database objects that were added via migrations
  • create new migration with all changes

This is a drastic way of merging migrations because we will lose all the data. However, it’s super simple and it might work in some cases.

When we need to preserve data

This means that we cannot remove all already created database objects, but we can merge migration files in our code. Let’s see how that can be done.

  1. Delete all migration scripts from Migrations folder
  2. Add a new migration with command dotnet ef migrations add MergedMigration
  3. Copy the entire file and clear both Up and Down methods
  4. Update the database and apply MergedMigration migration with command dotnet ef database update
  5. After that, replace the content of the MergedMigration file with earlier generated code

As a result, you will have only one migration file. In my example the __EFMigrationHistory table looks like this.

And now in the Visual Studio, I can see only on migration.

That contains changes from all my previous migrations merged together.

It worked!

Tip! You can also name you merged migration as the first one, that was already applied so that you wouldn’t have to update the database and add it to the __EFMigrationHistory table. 

It will not work in every case

We can easily merge migrations when they are applied only to the database that we control. I addition, it will not work for environments that don’t have all merged migrations applied. The process is easy, but there are certain things that need to be taken into account.

On the other hand, do we need to keep all migrations, even when we know that we won’t run them ever again? I don’t think so. At this point, it would be great to merge old migrations but leave the newest ones. It could be accomplished with a very similar process.

  1. Revert last N migrations locally, one by one, and move them somewhere
  2. Check out the project in the place matching the migrations
  3. Merge all existing migrations
  4. Check out the project in the newest state
  5. Add saved newest migrations, one by one

In this case, we will keep the newest migrations and create a big initial migration, that would be consistent with your project. If there will be a case, where all migrations would need to be applied to a database, the database schema wouldn’t be broken.

Summary

Merging migrations in Entity Framework Core 5 is possible and I can say it’s surprisingly easy. However, it involves an automatic generation process and you need to check if merged migration does exactly the same thing as all migrations applied one by one. Moreover, there is more than one way to merge migrations and you need to choose the one that is best for you.

All code posted here is available at my GitHub, so you can download it and play with it. Take a look also at this post on how to run it: PrimeHotel – how to run this project.

Thanks for reading and hopefully see you again 🙂

Dodanie migracji w Entity Framework Core 5 do projektu w .NET 5

Migracje bazy danych pomagają programiście w utrzymywaniu aktualności schematu bazy danych z kodem. Jest to podstawowy mechanizm, który utrzymuje zmiany w kodzie i stosuje je w bazie danych. Migracje Entity Framework Core 5 są przeznaczone do śledzenia klasy DbContext i generowania migracji podczas jej aktualizacji.

Instalowanie narzędzi

Aby dodać migracje EF Core, musisz mieć już skonfigurowane Entity Framework Core w projekcie. Możesz sprawdzić, jak przejść przez ten proces w tym poście: PrimeHotel – dodanie Entity Framework Core 5 w .NET 5

Najłatwiejszym sposobem dodawania migracji i zarządzania nimi jest użycie narzędzi .NET Core CLI, które powinieneś mieć już zainstalowane. Wpisz poniższe polecenie, aby to sprawdzić:

dotnet tool install --global dotnet-ef

Możesz także zaktualizować narzędzie po zainstalowaniu używając komendy:

Dodanie migracji

Dodanie pierwszej migracji nie różni się zbytnio od dodawania kolejnych. Musisz otworzyć okno terminala w lokalizacji projektu i wykonać polecenie:

dotnet ef migrations add InitialCreate

Kiedy to polecenie zostanie wykonane pomyślnie, wygeneruje katalog Migrations. Plik InitialCreate to indywidualna migracja w celu dopasowania do DbContext. PrimeDbContextModelSnapshot reprezentuje bieżący stan modelu. Jest dodawany do projektu podczas tworzenia pierwszej migracji i aktualizowany przy każdej kolejnej migracji. Umożliwia platformie migracji obliczenie zmian wymaganych w celu zaktualizowania bazy danych do modelu.

W pliku InitialCreate znajdziesz dwie metody: w Up i Down. Będą one reprezentować zmiany, kiedy migracja zostanie zastosowana i kiedy zostanie wycofana.

Wygenerowana migracja pozostanie taka, jaka jest. Nie jest to plik generowany automatycznie, który zostanie zaktualizowany w dalszej części procesu. Ta migracja została wygenerowana, abyś mógł rzucić okiem i sprawdzić, czy robi to, co powinna. Migrację możesz modyfikować zgodnie ze swoimi potrzebami, zatem nic nie stoi na przeszkodzie, aby wprowadzić własne ulepszenia.

Dodanie drugiej i kolejnych migracji nie będzie się właściwie niczym różniło od powyższego procesu. Wystarczy użyć polecenia dotnet migrations add <name> i zostanie wygenerowany odpowiedni plik.

Uruchamianie migracji ręcznie

W tym momencie możesz uruchomić migracje Entity Framework Core 5 i zaktualizować schemat bazy danych. Możesz to zrobić za pomocą następującego polecenia:

dotnet ef database update

Migracje bazy danych zostaną zastosowane, a wszystkie wykonane migracje zostaną odnotowane w tabeli __EFMigrationsHistory. Oto listing tej tabeli po kilku migracjach.

Uruchamianie migracji automatycznie

Byłoby wspaniale, gdyby nasze zmiany zostały sprawdzone i zastosowane przy każdym uruchomieniu projektu. Zobaczmy, jak możemy to osiągnąć. Przede wszystkim przejdźmy do pliku Startup.cs i utwórzmy metodę.

    private void UpgradeDatabase(IApplicationBuilder app)
    {
        using (var serviceScope = app.ApplicationServices.CreateScope())
        {
            var context = serviceScope.ServiceProvider.GetService<PrimeDbContext>();
            if (context != null && context.Database != null)
            {
                context.Database.Migrate();
            }
        }
    }

Ta metoda używa wbudowanego mechanizmu Dependency Injection, aby pobrać wystąpienie naszego PrimeDbContext i użyć go do uruchomienia migracji bazy danych. Tylko te, które nie zostały jeszcze zastosowane, zostaną uruchomione.

Następnie, w metodzie Configure, dodaj na końcu.

    UpgradeDatabase(app);

Dzięki tej konfiguracji mechanizmu aplikacja zaktualizuje używaną bazę danych, niezależnie od tego, czy jest uruchamiana lokalnie, czy też jest wdrażana i uruchamiana na serwerze produkcyjnym.

Podsumowanie

Migracje bazy danych ułatwiają aktualizowanie schematu bazy danych zgodnie ze zmianami kodu. Dodanie migracji Entity Framework Core 5 jest naturalnym krokiem, gdy masz Entity Framework Core. Wszystkie operacje można wykonać za pomocą narzędzi .NET Core CLI i bardzo prostych poleceń. Pamiętaj, że zawsze możesz edytować migracje przed ich zastosowaniem.

Cały kod opublikowany w tym poście jest dostępny na moim GitHub, więc możesz go dowolnie ściągać i modyfikować. Zerknij także na post jak uruchomić projekt PrimeHotel: PrimeHotel – jak uruchomić projekt

Dzięki za przeczytanie i powodzenia! 🙂

Adding Entity Framework Core 5 migrations to .NET 5 project

Database migrations help a developer to keep database schema up-to-date with the code. It is a core mechanism, that keeps changes in code and applies them in the database. Entity Framework Core 5 migrations are designed to keep track of DbContext class and generate migrations when you update it.

Installing the tools

To add EF Core migrations, you need to have Entity Framework Core already set up in your project. You can check how to go through that process in this post: PrimeHotel – adding Entity Framework Core 5 in .NET

The easiest way to add and manage migrations is to use .NET Core CLI tools, which you should have already installed. Type this command to check it out:

dotnet tool install --global dotnet-ef

You can also update the tool, once installed:

Adding a migration

Adding first migration doesn’t differ much from adding the next ones. You need to open a terminal window in the location of the project and execute the command:

dotnet ef migrations add InitialCreate

When this command executes successfully, it will generate a Migrations directory. InitialCreate file represents individual migration to match the DbContext. PrimeDbContextModelSnapshot represents the current state of the model. It is added to the project when the first migration is created and updated with each subsequent migration. It enables the migrations framework to calculate the changes required to bring the database up to date with the model.

In the InitialCreate file you will find two methods: Up and Down. Those will represent the changes when migration will be applied and when it would be rolled back.

Generated migration will stay the way it is. It’s not an auto-generated file that will be updated later in the process. This migration was generated for you to have a look and check if it does what it should. You can modify the migration according to your needs, nothing stops you from making some improvements.

Adding second and next migrations is a very similar process to the one presented above. You just need to use the command dotnet migrations add <name> add next migration will be generated.

Applying migrations manually

At this point, you can run your Entity Framework Core 5 migrations and update the database schema. You can do this via the following command:

dotnet ef database update

Database migrations will be applied and all executed migrations will be noted in the __EFMigrationsHistory. Here is the listing of this table after a couple of migrations.

Applying migrations automatically

It would be great if our changes were checked and applied on every project run. Let’s see how we can accomplish that. First of all, let’s go to Startup.cs file and create a method. 

    private void UpgradeDatabase(IApplicationBuilder app)
    {
        using (var serviceScope = app.ApplicationServices.CreateScope())
        {
            var context = serviceScope.ServiceProvider.GetService<PrimeDbContext>();
            if (context != null && context.Database != null)
            {
                context.Database.Migrate();
            }
        }
    }

This method will use built-in Dependency Injection mechanism to fetch an instance of our PrimeDbContext and use it to run database migrations. Only ones that were not applied yet will be run.

Now, in the Configure method add a line at the bottom.

    UpgradeDatabase(app);

With this mechanism set-up, the application will update the database it’s using, whether it is run locally, or deployed and run on a production server. 

Summary

Database migrations will help you keep database schema updated accordingly to the code changes. Adding an Entity Framework Core 5 migrations is a natural step when you have Entity Framework Core in place. All operations can be accomplished with .NET Core CLI tools and very simple commands. Remember that you can always edit migrations before applying them.

All code posted here is available at my GitHub, so you can download it freely. Take a look also at this post on how to run it: PrimeHotel – how to run this project.

Thanks for reading and good luck 🙂