
Let’s have a look at how to introduce Entity Framework Core 5 in ASP.NET Core project in .NET 5. We will start from an empty database, where we have a clean slate and can add tables the way we want.
In this post we will work with the PrimeHotel project, that was created for learning purposes. It’s all available at my GitHub, so you can download it freely. Take a look also at this post on how to run it: PrimeHotel – how to run this project.
What is Entity Framework Core
Entity Framework Core 5 is a lightweight, extensible, open-source, and cross-platform version of the popular Entity Framework data access technology. EF Core is an object-relational mapper (O/RM), enables developers to work with a database using .NET objects, and eliminating the need for most of the data-access code they usually need to write. This means no more SQLs. It proves to be great for most of the scenarios, however, when you need to work with big amounts of data, you might be better off with writing SQLs.
Adding an Entity Framework Core
Adding EF Core to an ASP.NET Core project is super easy. Start with installing NuGet packages:
- Microsoft.EntityFrameworkCore
- Microsoft.EntityFrameworkCore.Design
- Microsoft.EntityFrameworkCore.SqlServer
Once it’s all done, add a PrimeDbContext in the Models folder, that would look like this:
    public class PrimeDbContext : DbContext
    {
        public PrimeDbContext(DbContextOptions<PrimeDbContext> options)
            : base(options)
        {
        }

        public virtual DbSet<Room> Rooms { get; set; }
    }
Now we need to add a Room class, that would represent an entity of a room, from Rooms table.
    public class Room
    {
        public int Id { get; set; }

        public int Number { get; set; }

        public string Description { get; set; }

        public DateTime LastBooked { get; set; }

        public int Level { get; set; }

        public RoomType RoomType { get; set; }

        public int NumberOfPlacesToSleep { get; set; }
    }

    public enum RoomType
    {
        Standard,
        Suite
    }
Now let’s handle the configuration part. Let’s use an empty database, that is hosted by us locally. The easiest approach is to install SQL Server Express edition and setup it locally. However, you can set up your database server in the docker container. Check my post on how to do it: Set up a SQL Server in a docker container.
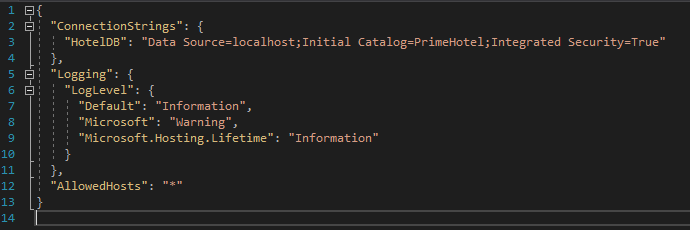
In appsettings.json file we need to set our connection string. It should look similar to this:
Now let’s go to the Startup.cs file, where we need to configure EF Core to use our connection string. In ConfigureServices method, add this line:
    // Entity Framework
    services.AddDbContext<PrimeDbContext>(options =>
        options.UseSqlServer(Configuration.GetConnectionString("HotelDB")));
Notice that I used a HotelDB name, that is a name of my connection string in the appsettings.json file.
We have most of the crucial things done, but we need something, that would create tables in DB from our PrimeDbContext. So far we got only one, but it’s the right time to introduce migration mechanisms.
Adding EF Core migrations
Migrations in the EF Core database allow you to make changes to the database so that it is in line with the code of the application that uses it. This is a very important mechanism because changes in the structure of the database are introduced quite often, even by many programmers, so we need a universal mechanism to track and introduce these changes.
Adding first migration doesn’t differ much from adding the next ones. You need to open a terminal window in the location of the project and execute the command:
dotnet ef migrations add InitialCreate
When this command executes successfully, it will generate a migration file, where you can check what changes will be applied.

In this file you will find two methods: Up and Down. Those will represent the changes when migration will be applied and when it would be rolled back.
    public partial class InitialCreate : Migration
    {
        protected override void Up(MigrationBuilder migrationBuilder)
        {
            migrationBuilder.CreateTable(
                name: "Rooms",
                columns: table => new
                {
                    Id = table.Column<int>(nullable: false)
                        .Annotation("SqlServer:Identity", "1, 1"),
                    Number = table.Column<int>(nullable: false),
                    Description = table.Column<string>(nullable: true),
                    LastBooked = table.Column<DateTime>(nullable: false),
                    Level = table.Column<int>(nullable: false),
                    RoomType = table.Column<int>(nullable: false),
                    NumberOfPlacesToSleep = table.Column<int>(nullable: false)
                },
                constraints: table =>
                {
                    table.PrimaryKey("PK_Rooms", x => x.Id);
                });
        }

        protected override void Down(MigrationBuilder migrationBuilder)
        {
            migrationBuilder.DropTable(
                name: "Rooms");
        }
    }
The last thing left to do is to trigger updating the database. It would be great if our changes were checked and applied on every project run. Let’s see how we can accomplish that. First of all, let’s go to Startup.cs file and create a method.
    private void UpgradeDatabase(IApplicationBuilder app)
    {
        using (var serviceScope = app.ApplicationServices.CreateScope())
        {
            var context = serviceScope.ServiceProvider.GetService<PrimeDbContext>();
            if (context != null && context.Database != null)
            {
                context.Database.Migrate();
            }
        }
    }
This method will use built-in Dependency Injection mechanism to fetch an instance of our PrimeDbContext and use it to run database migrations. Only ones that were not applied yet will be run.
Now, in the Configure method add a line at the bottom.
UpgradeDatabase(app);
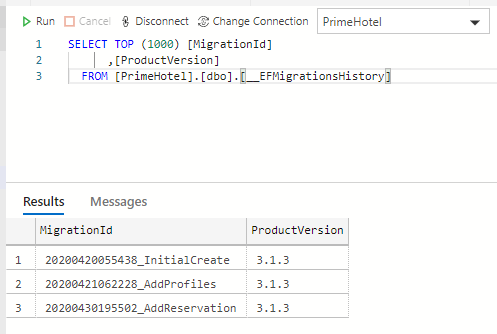
If we take a look into the database, we will see what migrations were applied. __EFMigrationsHistory table is created automatically by Entity Framework Core.
Using EF Core 5
Once we have everything in place, we have a proper configuration and database migrations, we can start benefit from having an O/RM mechanism.
All operations on tables in EF Core needs to go through PrimeDbContext. Using it is super simple, once we registered it in Startup.cs class, it will be available in any class for us to use. Take a look at this example of simple CRUD operations in the RoomController.
    [ApiController]
    [Route("[controller]")]
    public class RoomController : ControllerBase
    {
        private readonly PrimeDbContext primeDbContext;

        public RoomController(PrimeDbContext _primeDbContext)
        {
            primeDbContext = _primeDbContext;
        }

        [HttpGet]
        public async Task<IEnumerable<Room>> Get()
        {
            return await primeDbContext.Rooms.ToListAsync();
        }

        [HttpGet("{id}")]
        public async Task<IActionResult> Get(int id)
        {
            var room = await primeDbContext.Rooms.FindAsync(id);
            if (room == null)
            {
                return NotFound();
            }

            return Ok(room);
        }

        [HttpPost]
        public async Task<IActionResult> Post([FromBody] Room room)
        {
            var createdRoom = await primeDbContext.Rooms.AddAsync(room);
            await primeDbContext.SaveChangesAsync();

            return Ok(createdRoom.Entity);
        }

        [HttpPut]
        public async Task<IActionResult> Put([FromBody] Room room)
        {
            var existingRoom = await primeDbContext.Rooms.FindAsync(room.Id);
            if (existingRoom == null)
            {
                return NotFound();
            }

            existingRoom.Number = room.Number;
            existingRoom.Description = room.Description;
            existingRoom.LastBooked = room.LastBooked;
            existingRoom.Level = room.Level;
            existingRoom.RoomType = room.RoomType;
            existingRoom.NumberOfPlacesToSleep = room.NumberOfPlacesToSleep;

            var updatedRoom = primeDbContext.Update(existingRoom);
            await primeDbContext.SaveChangesAsync();
            return Ok(updatedRoom.Entity);
        }

        [HttpDelete("{id}")]
        public async Task<IActionResult> Delete(int id)
        {
            var existingRoom = await primeDbContext.Rooms.FindAsync(id);
            if (existingRoom == null)
            {
                return NotFound();
            }

            var removedRoom = primeDbContext.Rooms.Remove(existingRoom);
            await primeDbContext.SaveChangesAsync();

            return Ok(removedRoom.Entity);
        }
    }
Notice that in EF Core there is an asynchronous version of every method. Taking advantage of this is a good idea. This way your code will be faster and could be run more efficiently with many other requests in parallel.
Important things to have in mind:
- we can query entities collections the way we want with LINQ using
Where,Selectand other methods and that will generate SQL out of all those conditions - If you’re just querying entities, you can use
AsNoTracking()to improve performance - A call to the database will be performed when the code we write needs the results. This is for example where we use
ToListAsync - All changes that we make needs to be saved with
SaveChangesAsyncto be applied
Those are only a few points to have in mind, but there us much more that is going underneath to be aware of. However, this is good for a start, and it more than enough to play with Entity Framework Core on your own.
Summary
Nice and clean! Entity Framework Core is perfect for almost every simple database usage. I’m sure you’ll find it useful and intuitive.
All code posted here is available at my GitHub, so you can download it freely. Take a look also at this post on how to run it: PrimeHotel – how to run this project.
Thanks for reading, let me know if you liked this post 🙂