Monthly Archives: January 2019

Analyze code with NDepend

Recently I got my hands on NDepend, a static code analysis tool for .Net framework. Because it can work as a plugin for Visual Studio, it offers great integration with code and rapid results. So what it can do? Let’s see!

Getting started

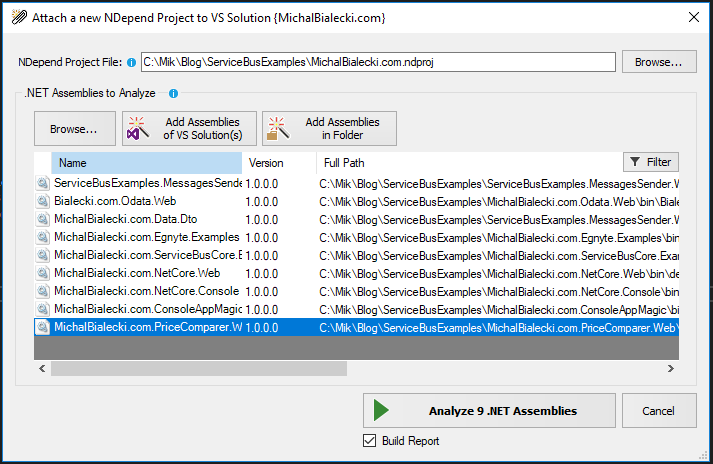
To start working with NDepend you need to download it and install for your Visual Studio. It’s not a free tool, but you can choose to start a 14-day trial period. Then you need to attach a new NDepend project.

And choose assemblies to analyze.

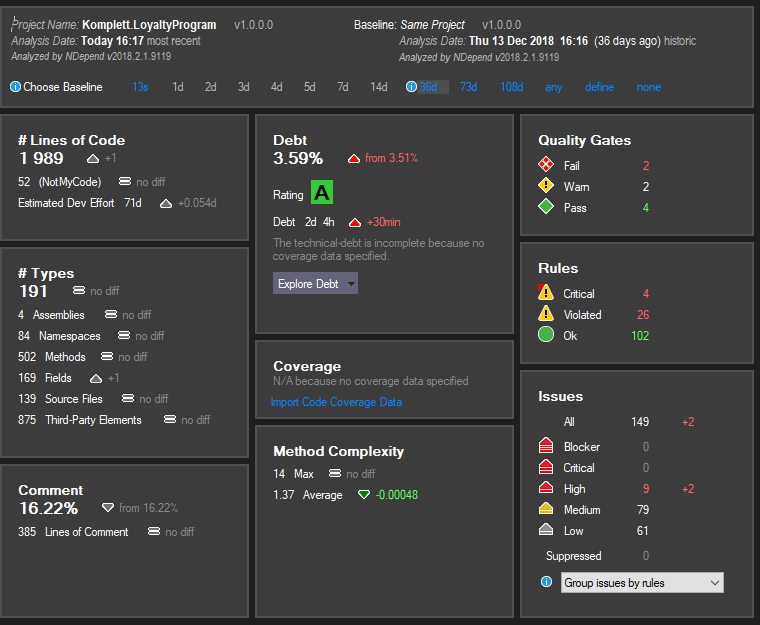
Then wait a few seconds… and voila! You can see a dashboard with results or full HTML report.

What does it mean?

NDepend analyses code in many ways, checking if it is written in a correct way. In the top, you can see that it compared code to the one from 36 days and shows how it has changed. Let’s have a look at some of the results:

  • Lines of Code – this is a number of logical lines of code, so code that contains some logic. Quoting the website: “Interfaces, abstract methods, and enumerations have a LOC equals to 0. Only concrete code that is effectively executed is considered when computing LOC”
  • Debt – an estimation of the effort needed to fix issues. A debt-ratio is obtained by comparing the debt with an estimation of the effort needed for the development of the analyzed code, hence the percentage. Those are numbers that you can use to compare different versions of your app and also plan refactorings
  • Types – apart from LOC, shows how big is your project and how big is the recent change
  • Comment – comments code coverage
  • Quality gates – overall check that should suggest that this code is good enough to proceed with it (for example to merge it)
  • Rules – shows what rules are violated and their level
  • Issues – problems with your code, that needs an attention

To clear this our – you might have 149 issues, that categorize into 30 failing rules and that can result in two main quality gates failure.

It’s getting more interesting if you analyze your project on a day to day basis and you start to notice some trends and effects of recent changes. This is an insight that you cannot measure even if you’re very well accustomed to the project. Let’s look at the analysis for a small micro-service over its whole life – a few months. You could see the dashboard already, so here are some charts.

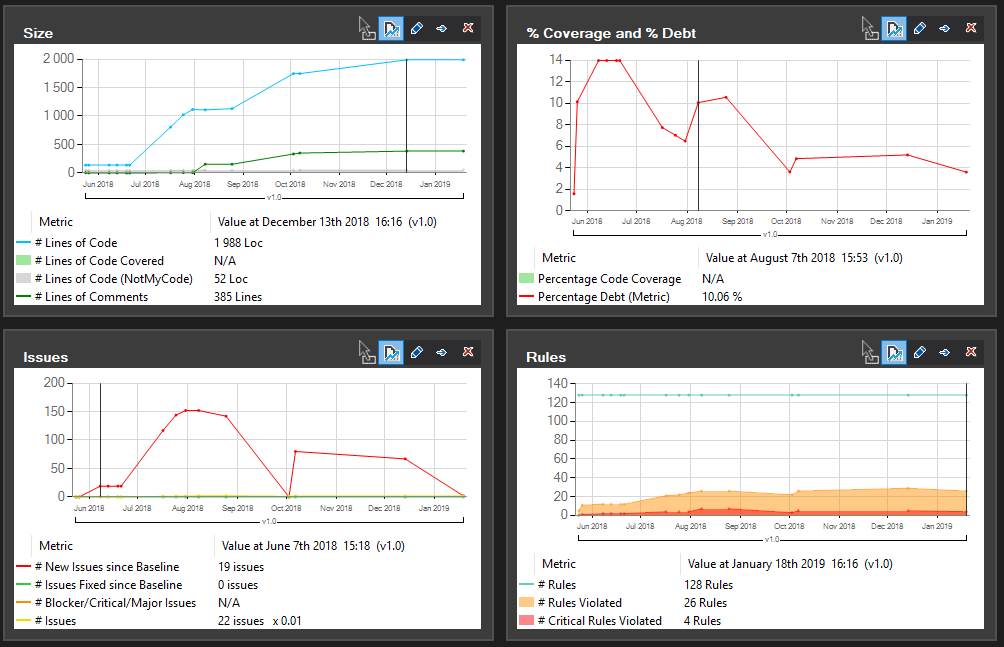
You can see how the project is getting bigger and how the number of issues is rising and then dropping. This is a normal phase of software development, where you code first and fix bugs later. You can also see that we started to write comments after a few months of project development.

The report

Along with the analysis, NDepend created a full HTML report that presents event more data.

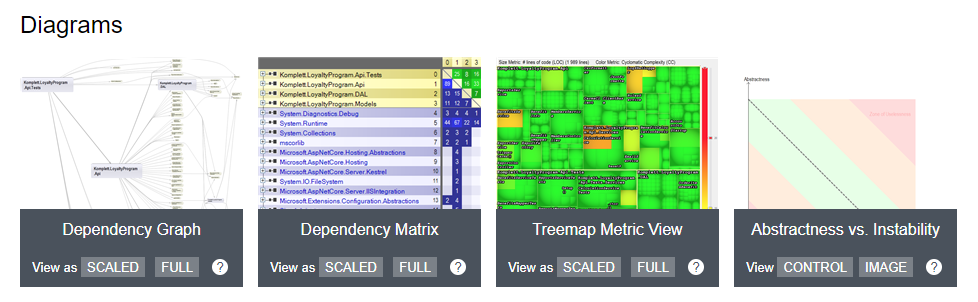
There are some useful diagrams:

  • Dependency Graph – shows you how your assemblies are connected to each other
  • Dependency Matrix – sums up all dependencies and you can easily see which assemblies have way too much responsibility
  • Treemap Metric View – shows in a colorful way what namespaces have issues
  • Abstractness vs. Instability – points what assembly in your solution might need an attention

The report also lists rules that are violated by your app.

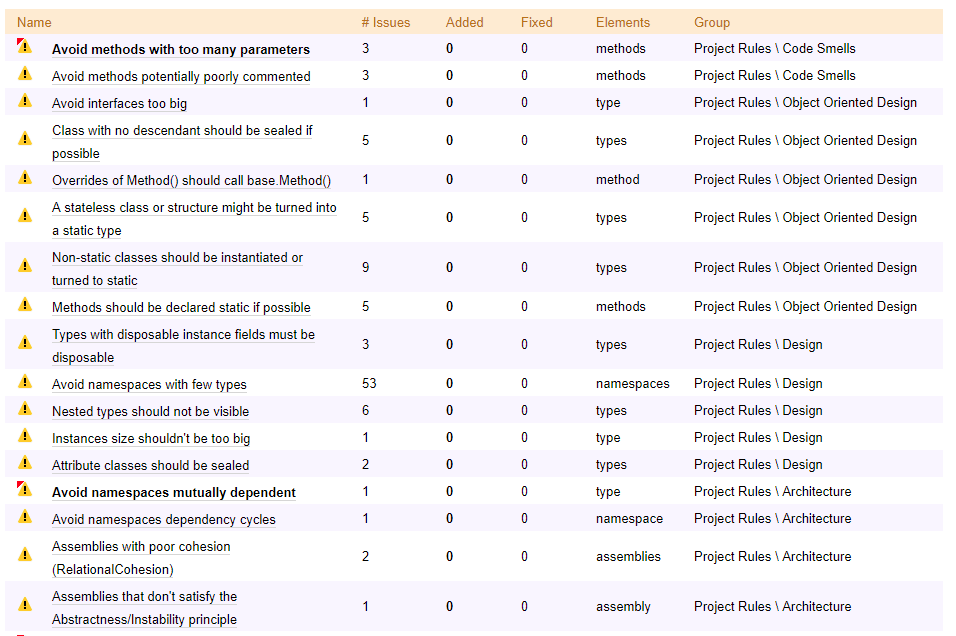
There are many rules that check our code. From Object-Oriented Programming and potential code smells to best practices in design and architecture. In Visual Studio you can see that same report as well and you can easily navigate to code that has problems. Let’s click on the first one: avoid methods with too many parameters.

Then we can go inside by double clicking to see places in the code that applies.

In this example, the constructor has too many parameters – 10 in this example. This might mean, that those classes have too much responsibility and might need refactoring. Also writing tests for it might be challenging.

What is cool about NDepend is that every rule can be customized and edited, cause it is written in C#. We can have a quick look at this rule and check how many parameters in a method is good enough.

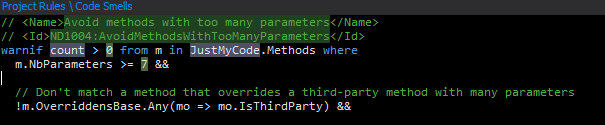
So 7 is the number here 🙂 Methods with 6 parameters are ok.

What is it for?

I showed you that this tool can analyze code and show some advanced metrics, but what I can use it for in my project?

  • Finds code smells – it’s ideal for identifying technological debt, that needs fixing. When planning a technical sprint, where you only polish the code, this tool will be perfect to spot any flaws
  • It’s quick – you can easily analyze a new project and check if it is written following good practices
  • Shows progress – you can track how you codebase quality changes while you’re changing the code

That last point surprised me. Some time ago I was making a quite big refactoring in a legacy project. I was convinced that deleting a lot of difficult code and introducing simpler, shorter classes will dramatically improve codebase quality. In fact, technological debt grew a little bit, because I didn’t follow all good practices. While old code seemed as unlogical and hard to debug, the new one is just easier to understand, because I wrote it.

It shocked me

I used NDepend on a project I’m proud of, which I was involved in from the beginning and I used a lot of time to make it as close to perfection as it was possible in a reasonable time. As a group of senior developers, we almost always find something during a code review, that could be done better or just can be discussed. I was sure that code is really good. How shocked I was when I found out, that NDepend didn’t fully agree. The project did get an A rating, but there were still a few things that could have been done better. And this is its real value.

Would I recommend it?

I need to admit, that I got an NDepend license for free to test it out. If it wasn’t for Patrick Smacchia from NDepend, I wouldn’t discover that anytime soon. And I would never learn, that no matter how good you get in your work, you always can do better.

I recommend you to try NDepend yourself and brace yourself… you might be surprised 🙂

Why sharing your DTOs as dedicated nuget package is a bad idea

I’m working in a solution, that has many micro-services and some of them share the same DTOs. Let’s say I have a Product dto, that is assembled and processed through 6 micro-services and all of them has the same contract. In my mind an idea emerged:

Can I have a place to keep this contract and share across my projects?

And the other thoughts came to my mind:

It can be distributed as a NuGet package!
I’ll update it once and the rest is just using it.
It will always be correct, no more typos in contracts that lead to bugs.

And boy I was lucky not to do so.

After some time I had to extend my contract – that was fine. But while services where evolving over time, Product started to mean different things in those services. In one it was just Product, that represents everything, in others it was Product coming from that specific data source. There were CustomProduct, LeasingProduct and ExtendedProduct as well. And I’m not mentioning DigitalProduct, BonusProduct, DbProduct, ProductDto, etc.

The thing is that a group of services might use the same data, but it doesn’t mean that they are in the same domain.

What is wrong with sharing a contract between different domains?

  • Classes and fields mean different things in a different domain. So the name Product for everything isn’t perfect. Maybe in some domain, more specific name will be more accurate
  • Updating contract with non-breaking changes is fine, but introducing breaking change will always require supervision. When it’s a nuget package, it’s just easy to update package without thinking about consequences
  • When we receive a contract and we do not need all of it, we can just specify fields we actually need. This way receiving and deserializing an object is a bit faster
  • When extending a shared contract as NuGet package we immediately see in a receiver that something changed and we need to update it and do some work on our side, where normally we wouldn’t care to update contract, as long as we need it

When having a contract in a NuGet package can be beneficial? For example when we need exactly this contract to communicate with something. For example, a popular service can share it’s client and DTOs as a NuGet package to ease integration with it.

And what do you think? Is is a good thing, or a bad thing?

Receive Service Bus messages in Service Fabric

This is one of the proof of concent that I did at work. The idea was to add another Service Bus application to an existing solution, instead of starting a whole new micro-service. It was a lot faster just to add another .net core console application, but setting up Service Fabric cluster always brings some unexpected experiences.

What are my requirements:

  • everything has to be written in .Net Core
  • reading Service Bus messages is placed in a new console application
  • logging has to be configured
  • dependency injection needs to be configured
  • reading Service Bus messages needs to be registered in stateless service

Let’s get to work!

The entry point in console application

Console application are a bit specific. In most cases, we write console applications that are small and doesn’t require dependency injection or logging, apart from that to the console. But here I want to build a professional console application, that is not run once, but is a decent part of a bigger thing that we would need to maintain in the future.

The specific thing about console applications is that they have Main method and this method is run instantly after the execution and everything that you’d like to do, has to be there. That means, that both configuration and execution of an app needs to be in this one method. Let’s see how the code looks like:

    public class Program
    {
        private const string ServiceName = "MichalBialecki.com.SF.ServiceBusExample.MessageProcessorType";

        private static IConfigurationRoot Configuration;

        public static async Task Main(string[] args)
        {
            var builder = new ConfigurationBuilder()
                .SetBasePath(Directory.GetCurrentDirectory())
                .AddJsonFile("appsettings.json", optional: true, reloadOnChange: true);
            Configuration = builder.Build();

            try
            {
                await ServiceRuntime.RegisterServiceAsync(ServiceName, CreateService);

                ServiceEventSource.Current.ServiceTypeRegistered(Process.GetCurrentProcess().Id, typeof(ServiceBusStatelessService).Name);
                
                Thread.Sleep(Timeout.Infinite);
            }
            catch (Exception e)
            {
                ServiceEventSource.Current.ServiceHostInitializationFailed(e.ToString());
                throw;
            }
        }

        private static ServiceBusStatelessService CreateService(StatelessServiceContext context)
        {
            ContainerConfig.Init(context, Configuration);
            return ContainerConfig.GetInstance<ServiceBusStatelessService>();
        }
    }

Logging

In order to have logging provided by the framework, we need to install nuget packages:

  • Microsoft.Extensions.Logging
  • Microsoft.Extensions.Logging.Abstractions
  • Microsoft.Extensions.Configuration.Json

The all configuration stuff is done in the beginning:

var builder = new ConfigurationBuilder()
    .SetBasePath(Directory.GetCurrentDirectory())
    .AddJsonFile("appsettings.json", optional: true, reloadOnChange: true);
Configuration = builder.Build();

In this example logging is simple, but if you’d like to configure log4net, just add this code when configuring IoC (I’ll show that later):

var loggerFactory = new LoggerFactory();
loggerFactory.AddLog4Net(skipDiagnosticLogs: false);

Appsettings.json file:

{
  "Logging": {
    "IncludeScopes": false,
    "LogLevel": {
      "Default": "Warning",
      "System": "Warning",
      "Microsoft": "Warning"
    }
  },
  "ConnectionStrings": {
    "ServiceBusConnectionString": "[your Service Bus connection]"
  },
  "Settings": {
    "TopicName": "balanceupdates",
    "SubscriptionName": "SFSubscription"
  }
}

Registering a stateless service

In order to register a service we need to run this line:

await ServiceRuntime.RegisterServiceAsync(ServiceName, CreateService);

You might wonder what is CreateService method, it looks like this:

private static ServiceBusStatelessService CreateService(StatelessServiceContext context)
{
    ContainerConfig.Init(context, Configuration);
    return ContainerConfig.GetInstance<ServiceBusStatelessService>();
}

Here is a place where I configure IoC container. It has to be done here, cause only when registering a Service Fabric service, we have an instance of StatelessServiceContext, that we need later.

Configuring IoC container

In order to have container implementation provided by the framework, just install Microsoft.Extensions.DependencyInjection nuget package. ContainerConfig class, in this case, looks like this:

    public static class ContainerConfig
    {
        private static ServiceProvider ServiceProvider;

        public static void Init(
            StatelessServiceContext context,
            IConfigurationRoot configuration)
        {
            ServiceProvider = new ServiceCollection()
                .AddLogging()
                .AddSingleton(context)
                .AddSingleton<ServiceBusStatelessService>()
                .AddSingleton<IServiceBusCommunicationListener, ServiceBusCommunicationListener>()
                .AddSingleton<IConfigurationRoot>(configuration)
                .BuildServiceProvider();
        }

        public static TService GetInstance<TService>() where TService : class
        {
            return ServiceProvider.GetService<TService>();
        }
    }

Adding a stateless service

In Program class I registered ServiceBusStatelessService class, that looks like this:

    public class ServiceBusStatelessService : StatelessService
    {
        private readonly IServiceBusCommunicationListener _serviceBusCommunicationListener;

        public ServiceBusStatelessService(StatelessServiceContext serviceContext, IServiceBusCommunicationListener serviceBusCommunicationListener)
            : base(serviceContext)
        {
            _serviceBusCommunicationListener = serviceBusCommunicationListener;
        }

        protected override IEnumerable<ServiceInstanceListener> CreateServiceInstanceListeners()
        {
            yield return new ServiceInstanceListener(context => _serviceBusCommunicationListener);
        }
    }

ServiceBusStatelessService inherits from StatelessService and provides an instance of Service Bus listener. It looks like this:

    public class ServiceBusCommunicationListener : IServiceBusCommunicationListener
    {
        private readonly IConfigurationRoot _configurationRoot;
        private readonly ILogger _logger;

        private SubscriptionClient subscriptionClient;
        
        public ServiceBusCommunicationListener(IConfigurationRoot configurationRoot, ILoggerFactory loggerFactory)
        {
            _logger = loggerFactory.CreateLogger(nameof(ServiceBusCommunicationListener));
            _configurationRoot = configurationRoot;
        }

        public Task<string> OpenAsync(CancellationToken cancellationToken)
        {
            var sbConnectionString = _configurationRoot.GetConnectionString("ServiceBusConnectionString");
            var topicName = _configurationRoot.GetValue<string>("Settings:TopicName");
            var subscriptionName = _configurationRoot.GetValue<string>("Settings:SubscriptionName");

            subscriptionClient = new SubscriptionClient(sbConnectionString, topicName, subscriptionName);
            subscriptionClient.RegisterMessageHandler(
                async (message, token) =>
                {
                    var messageJson = Encoding.UTF8.GetString(message.Body);
                    // process here

                    Console.WriteLine($"Received message: {messageJson}");

                    await subscriptionClient.CompleteAsync(message.SystemProperties.LockToken);
                },
                new MessageHandlerOptions(LogException)
                    { MaxConcurrentCalls = 1, AutoComplete = false });

            return Task.FromResult(string.Empty);
        }
        
        public Task CloseAsync(CancellationToken cancellationToken)
        {
            Stop();

            return Task.CompletedTask;
        }

        public void Abort()
        {
            Stop();
        }

        private void Stop()
        {
            subscriptionClient?.CloseAsync().GetAwaiter().GetResult();
        }

        private Task LogException(ExceptionReceivedEventArgs args)
        {
            _logger.LogError(args.Exception, args.Exception.Message);

            return Task.CompletedTask;
        }
    }

Notice, that all the work is done in OpenAsync method, that is run only once. In here I just register standard message handler, that reads from a Service Bus Subscription.

Configure Service Fabric cluster

All Service Fabric configuration is done in xml files. This can cause a huge headache when trying to debug and find errors, cause the only place you can find fairly useful information is console window.

It starts with adding a reference in SF project to a console application.

Next this is to have right name in console application ServiceManifest.xml

<?xml version="1.0" encoding="utf-8"?>
<ServiceManifest Name="MichalBialecki.com.SF.ServiceBusExample.MessageProcessorPkg"
                 Version="1.0.0"
                 xmlns="http://schemas.microsoft.com/2011/01/fabric"
                 xmlns:xsd="http://www.w3.org/2001/XMLSchema"
                 xmlns:xsi="http://www.w3.org/2001/XMLSchema-instance">
  <ServiceTypes>
    <!-- This is the name of your ServiceType. 
         This name must match the string used in the RegisterServiceAsync call in Program.cs. -->
    <StatelessServiceType ServiceTypeName="MichalBialecki.com.SF.ServiceBusExample.MessageProcessorType" />
  </ServiceTypes>

  <!-- Code package is your service executable. -->
  <CodePackage Name="Code" Version="1.0.0">
    <EntryPoint>
      <ExeHost>
        <Program>MichalBialecki.com.SF.ServiceBusExample.MessageProcessor.exe</Program>
        <WorkingFolder>CodePackage</WorkingFolder>
      </ExeHost>
    </EntryPoint>
  </CodePackage>
</ServiceManifest>

Notice that ServiceTypeName has the same value as provided when registering a service in Program class.

Next place to set-up things is ApplicationManifest.xml in SF project.

<?xml version="1.0" encoding="utf-8"?>
<ApplicationManifest xmlns:xsd="http://www.w3.org/2001/XMLSchema" xmlns:xsi="http://www.w3.org/2001/XMLSchema-instance" ApplicationTypeName="MichalBialecki.com.SF.ServiceBusExampleType" ApplicationTypeVersion="1.0.0" xmlns="http://schemas.microsoft.com/2011/01/fabric">
  <Parameters>
    <Parameter Name="InstanceCount" DefaultValue="1" />
  </Parameters>
  <!-- Import the ServiceManifest from the ServicePackage. The ServiceManifestName and ServiceManifestVersion 
       should match the Name and Version attributes of the ServiceManifest element defined in the 
       ServiceManifest.xml file. -->
  <ServiceManifestImport>
    <ServiceManifestRef ServiceManifestName="MichalBialecki.com.SF.ServiceBusExample.MessageProcessorPkg" ServiceManifestVersion="1.0.0" />
    <ConfigOverrides />
  </ServiceManifestImport>
  <DefaultServices>
    <!-- The section below creates instances of service types, when an instance of this 
         application type is created. You can also create one or more instances of service type using the 
         ServiceFabric PowerShell module.
         
         The attribute ServiceTypeName below must match the name defined in the imported ServiceManifest.xml file. -->
    <Service Name="MichalBialecki.com.SF.ServiceBusExample.MessageProcessor" ServicePackageActivationMode="ExclusiveProcess">
      <StatelessService ServiceTypeName="MichalBialecki.com.SF.ServiceBusExample.MessageProcessorType" InstanceCount="[InstanceCount]">
        <SingletonPartition />
      </StatelessService>
    </Service>
  </DefaultServices>
</ApplicationManifest>

There are a few things you need to remember:

  • ServiceManifestName has the same value as ServiceManifest in ServiceManifest.xml in console app
  • ServiceTypeName type is the same as ServiceTypeName in ServiceManifest.xml in console app
  • MichalBialecki.com.SF.ServiceBusExample.MessageProcessor service has to be configured as StatelessService

Here is a proof that it really works:

That’s it, it should work. And remember that when it doesn’t, starting the whole thing again and build every small code change isn’t crazy idea 🙂


 All code posted here you can find on my GitHub: https://github.com/mikuam/service-fabric-service-bus-example


Writing unit tests with NUnit and NSubstitute

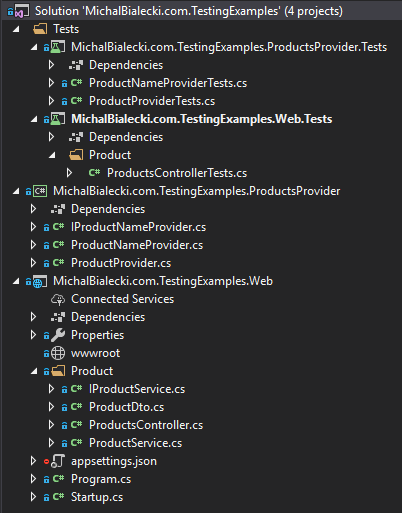
Imagine you are a Junior .Net Developer and you just started your development career. You got your first job and you are given a task – write unit tests!

Nothing to worry about, since you got me. I’ll show you how things are done and what are the best practices to follow.

Introduction

Writing unit tests is crucial to develop high-quality software and maintain it according to business requirements. Tests are the tool for developer to quickly check a small portion of code and ensure that it does what it should. In many cases tests can be unnecessary, requiring maintenance, without any gained value. However, writing tests is a standard and art that every developer should master.

Note, that writing unit tests is easy only when the code to test is written in a correct way. When methods are short, do a single thing and don’t have many dependencies, they are easy to test.

To write unit tests in this post I’ll use NUnit and NSubstitute. Those are two very popular nuget packages, that you can easily find. All code will be written in .Net Core.

Following the AAA pattern

The AAA (Arrange, Act, Assert) unit test writing pattern divides every test into 3 parts:

  • Arrange – in this part, you prepare data and mocks for a test scenario
  • Act – executing a single action that we want to test
  • Assert – checking whether expectations are met and mocks were triggered

Let’s have a look at a simple code, that we will test:

    public class ProductNameProvider : IProductNameProvider
    {
        public string GetProductName(string id)
        {
            return "Product " + id;
        }
    }

And a simple test would look like this:

    [TestFixture]
    public class ProductNameProviderTests
    {
        [Test]
        public void GetProductName_GivenProductId_ReturnsProductName()
        {
            // Arrange
            var productId = "1";
            var productNameProvider = new ProductNameProvider();

            // Act
            var result = productNameProvider.GetProductName(productId);

            // Assert
            Assert.AreEqual("Product " + productId, result);
        }
    }

This is a simple test, that checks whether the result is correct. There is a TestFixture attribute, that indicates, that this class contains a group of tests. a Test attribute marks a single test scenario.

  • in Arrange part we prepare productNameProvider and parameters
  • in Act there is only a single line where we execute GetProductName, which is a testing method
  • in Assert we use Assert.AreEqual to check the result. Every test needs to have at least one assertion. If any of the assertions fails, the whole test will fail

Test edge-cases

What you could see in an example above is a happy-path test. It tests only an obvious scenario. You should test code when a given parameter is not quite what you expect. The idea of that kind of tests is perfectly described in this tweet:

Let’s see an example with a REST API controller method. First, let’s see code that we would test:

    [Route("api/[controller]")]
    [ApiController]
    public class ProductsController : ControllerBase
    {
        private readonly IProductService _productService;
        private readonly ILogger _logger;

        public ProductsController(IProductService productService, ILoggerFactory loggerFactory)
        {
            _productService = productService;
            _logger = loggerFactory.CreateLogger(nameof(ProductsController));
        }

        [HttpPost]
        public string Post([FromBody] ProductDto product)
        {
            _logger.Log(LogLevel.Information, $"Adding a products with an id {product.ProductId}");

            var productGuid = _productService.SaveProduct(product);

            return productGuid;
        }
    }

This is a standard Post method, that adds a product. There are some edge-cases though, that we should test, but first let’s see how happy-path test would look like.

    [TestFixture]
    public class ProductsControllerTests
    {
        private IProductService _productService;
        private ILogger _logger;

        private ProductsController _productsController;

        [SetUp]
        public void SetUp()
        {
            _productService = Substitute.For<IProductService>();
            _logger = Substitute.For<ILogger>();
            var loggerFactory = Substitute.For<ILoggerFactory>();
            loggerFactory.CreateLogger(Arg.Any<string>()).Returns(_logger);

            _productsController = new ProductsController(_productService, loggerFactory);
        }

        [Test]
        public void Post_GivenCorrectProduct_ReturnsProductGuid()
        {
            // Arrange
            var guid = "af95003e-b31c-4904-bfe8-c315c1d2b805";
            var product = new ProductDto { ProductId = "1", ProductName = "Oven", QuantityAvailable = 3 };
            _productService.SaveProduct(product).Returns(guid);

            // Act
            var result = _productsController.Post(product);

            // Assert
            Assert.AreEqual(result, guid);
            _productService.Received(1).SaveProduct(product);
            _logger
                .Received(1)
                .Log(LogLevel.Information, 0, Arg.Is<FormattedLogValues>(v => v.First().Value.ToString().Contains(product.ProductId)), Arg.Any<Exception>(), Arg.Any<Func<object, Exception, string>>());
        }
    }

Notice  that I added:

[SetUp]
public void SetUp()

SetUp method will be run before every test and can contain code that we would need to execute for every test. In my case, it is creating mocks and setting up some mocks as well. For example, I set up a logger in order to be able to test it later. I also specify, that my ILogger mock will be returned whenever I create a logger.

loggerFactory.CreateLogger(Arg.Any<string>()).Returns(_logger);

I could do that in Arrange part of the test, but I would need to do it for every test. In Arrange I set up a _productService mock that returns guid:

_productService.SaveProduct(product).Returns(guid);

And later in Assert, I check, that this method was in fact called. I also check the result of an Acting part.

Assert.AreEqual(result, guid);
_productService.Received(1).SaveProduct(product);

Now, let’s see how we can test an edge case, when a developer using this API, will not provide a value.

    [Test]
    public void Post_GivenNullProduct_ThrowsNullReferenceException()
    {
        // Act &  Assert
        Assert.Throws<NullReferenceException>(() => _productsController.Post(null));
    }

In one line we both act and assert. We can also check exception fields in next checks:

    [Test]
    public void Post_GivenNullProduct_ThrowsNullReferenceExceptionWithMessage()
    {
        // Act &  Assert
        var exception = Assert.Throws<NullReferenceException>(() => _productsController.Post(null));
        Assert.AreEqual("Object reference not set to an instance of an object.", exception.Message);
    }

The important part is to set Returns values for mocks in Arrange and check mocks in Assert with Received.

Test Driven Development

To be fair with you I need to admit that this controller method ist’s written in the best way. It should be async, have parameters validation and try-catch block. We could turn our process around a bit and write tests first, that would ensure how the method should behave. This concept is called Test Driven Development – TDD. It requires from developer to write tests first and sets acceptance criteria for code that needs to be implemented.

This isn’t the easiest approach. It also expects that we know all interfaces and contracts in advance. In my opinion, it’s not useful in real-life work, maybe with one exception. The only scenario I’d like to have tests first would be a refactoring of an old code, where we write one part of it anew. In this scenario, I would copy or write tests to ensure that new code works exactly the same as the old one.

Naming things

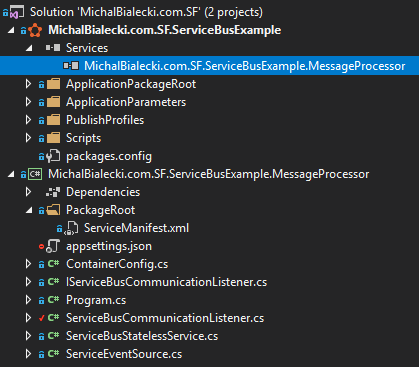
Important thing is to follow patterns that are visible in your project and stick to it. Naming things correctly might sound obvious and silly, but it’s crucial for code organization and it’s visibility.


First, let’s have a look at the project structure. Notice that all test projects are in Tests directory and names of those projects are same as projects they test plus “Tests”. Directories that tests are in are corresponding to those that we test, so that directory structure in both projects is the same. Test classes names are also the same.


Next thing is naming test scenarios. Have a look test results in Resharper window:

In this project, every class has its corresponding test class. Each test scenario is named in such pattern: [method name]_[input]_[expected result]. Only looking at the test structure I already know what method is tested and what this test scenario is about. Remember that the test scenario should be small and should test a separate thing if that’s possible. It doesn’t mean that when you test a mapper, you should have a separate scenario for every property mapped, but you might consider dividing those tests to have: happy-path test and all the edge cases.


That’s it! You are ready for work, so go and write your own tests:)


 All code posted here you can find on my GitHub: https://github.com/mikuam/unit-testing-examples

You can play with a code a bit, write more classes and tests. If you like this topic or you’d like to have some practical test assignment prepared to test yourself, please let me know:)