Tag Archives: ef core 5

Adding Entity Framework Core 5 migrations to .NET 5 project

Database migrations help a developer to keep database schema up-to-date with the code. It is a core mechanism, that keeps changes in code and applies them in the database. Entity Framework Core 5 migrations are designed to keep track of DbContext class and generate migrations when you update it.

Installing the tools

To add EF Core migrations, you need to have Entity Framework Core already set up in your project. You can check how to go through that process in this post: PrimeHotel – adding Entity Framework Core 5 in .NET

The easiest way to add and manage migrations is to use .NET Core CLI tools, which you should have already installed. Type this command to check it out:

dotnet tool install --global dotnet-ef

You can also update the tool, once installed:

Adding a migration

Adding first migration doesn’t differ much from adding the next ones. You need to open a terminal window in the location of the project and execute the command:

dotnet ef migrations add InitialCreate

When this command executes successfully, it will generate a Migrations directory. InitialCreate file represents individual migration to match the DbContext. PrimeDbContextModelSnapshot represents the current state of the model. It is added to the project when the first migration is created and updated with each subsequent migration. It enables the migrations framework to calculate the changes required to bring the database up to date with the model.

In the InitialCreate file you will find two methods: Up and Down. Those will represent the changes when migration will be applied and when it would be rolled back.

Generated migration will stay the way it is. It’s not an auto-generated file that will be updated later in the process. This migration was generated for you to have a look and check if it does what it should. You can modify the migration according to your needs, nothing stops you from making some improvements.

Adding second and next migrations is a very similar process to the one presented above. You just need to use the command dotnet migrations add <name> add next migration will be generated.

Applying migrations manually

At this point, you can run your Entity Framework Core 5 migrations and update the database schema. You can do this via the following command:

dotnet ef database update

Database migrations will be applied and all executed migrations will be noted in the __EFMigrationsHistory. Here is the listing of this table after a couple of migrations.

Applying migrations automatically

It would be great if our changes were checked and applied on every project run. Let’s see how we can accomplish that. First of all, let’s go to Startup.cs file and create a method. 

    private void UpgradeDatabase(IApplicationBuilder app)
    {
        using (var serviceScope = app.ApplicationServices.CreateScope())
        {
            var context = serviceScope.ServiceProvider.GetService<PrimeDbContext>();
            if (context != null && context.Database != null)
            {
                context.Database.Migrate();
            }
        }
    }

This method will use built-in Dependency Injection mechanism to fetch an instance of our PrimeDbContext and use it to run database migrations. Only ones that were not applied yet will be run.

Now, in the Configure method add a line at the bottom.

    UpgradeDatabase(app);

With this mechanism set-up, the application will update the database it’s using, whether it is run locally, or deployed and run on a production server. 

Summary

Database migrations will help you keep database schema updated accordingly to the code changes. Adding an Entity Framework Core 5 migrations is a natural step when you have Entity Framework Core in place. All operations can be accomplished with .NET Core CLI tools and very simple commands. Remember that you can always edit migrations before applying them.

All code posted here is available at my GitHub, so you can download it freely. Take a look also at this post on how to run it: PrimeHotel – how to run this project.

Thanks for reading and good luck 🙂

Adding an Entity Framework Core 5 to an existing database

Entity Framework Core 5 is a light and easy to use ORM, that let you use the database without writing any SQL commands. Built-in mechanisms will translate your LINQ queries on your entity classes to SQL queries and return mapped objects.

Here is an article about adding EF Core with migrations to an empty database: PrimeHotel – adding Entity Framework Core 5 in .NET

Adding an Entity Framework Core 5 is super simple if you have an empty database, but is it that easy when working with a database that has some data inside? Do we need to map it all, or can we just work with a part of the database that interests us? Let’s start from the beginning.

Let’s see what we need

To work with EF Core 5 we need to install NuGet packages:

  • Microsoft.EntityFrameworkCore
  • Microsoft.EntityFrameworkCore.Design
  • Microsoft.EntityFrameworkCore.SqlServer

The last one reveals that we will work with the MS SQL Server database. Now let’s connect to our database and see how it looks like.

I’m using an Azure Data Studio, which is a lightweight and fast tool that can perform most of the basic operations of databases. It’s much faster than SQL Server Management Studio and now for most of my work, I just use the first one.

We will add EF Core for aspnetcore database, which looks like this.

We need a DbContext

The next thing we need to do is to create our DbContext. We could create it by hand and type everything manually. However, .NET Core has tools to scaffold that and generate it for us.

The process is called reverse engineering and it is scaffolding entity type classes and a DbContext class based on a database schema. To perform this operation we will use the .NET CLI tool, that you would have to install if you haven’t done it already. Type this command to check it out:

dotnet tool install --global dotnet-ef

You can also update the tool, once installed:

The scaffolding process needs a connection string to pass. We could pass it in our command, but we can also accomplish this task in a more elegant way by passing only its name.

Let’s go to the appsettings.json file and set up a connection string for our new database.

I’ve added a connection string with the name aspnetcore in ConnectionStrings section. 

The command that we are going to use is very simple, run it in your project directory:

dotnet ef dbcontext scaffold Name=aspnetcore Microsoft.EntityFrameworkCore.SqlServer

This command will add aspnetcoreDbContext and all entities representing your database.

However, it would be nice to have some more control over the process.

Customize the process to your needs

Thankfully, there are more parameters that we can use. Let’s take a look at some of them:

  • --table can be used to include specific tables
  • --use-database-names option will preserve the original database names as much as possible. However, invalid .NET identifiers will still be fixed
  • --context can be used to give generated DbContext your own name
  • --context-dir can be used to scaffold the DbContext class to a specific directory
  • --output-dir can be used to scaffold entity classes to a specific directory
  • --force will override the existing DbContext class and entity classes

I’m going to modify my command, so it will look like this:

dotnet ef dbcontext scaffold Name=aspnetcore --table Profiles --table Events
  --context AspNetCoreDbContext --context-dir AspNetCoreModels 
  --output-dir AspNetCoreModels Microsoft.EntityFrameworkCore.SqlServer

Let’s see what classes were generated.

Notice that only tables Events and Profiles were generated, DbContext class is named AspNetCoreCotext and all was generated in AspNetCoreModels directory. Awesome! 

The limitations

Reverse engineering does a tremendous job of scaffolding entity classes so that we don’t need to write it on our own. However, there are some limitations to this process:

  • not everything about the model is presented in the database schema. For example inheritance hierarchies, owned types and table splitting will not be reverse-engineered
  • also, EF Core documentation claims, that there are some column types that will not be included in the model
  • nullable types will not be mapped as nullable. For example, string columns that can be null, will not be scaffolded as string? type. You will have to edit it yourself

More of that you can read in this Microsoft article.

Updating the model

Whenever something changes in the database, you would need to update your model. Most of the changes will be trivial, like adding a column to the table, renaming a table name, or change columns type. Those changes can be quickly applied in the entity classes manually. 

However, if you’re not sure how to map your changes, you can always regenerate the whole DbContext with all entity classes. To do this, use --force parameter in the scaffold command. Note, however, that all changes done manually, will be overwritten. Currently, there is no option to update model from database schema and preserve manual changes.

Updating the database

Scaffolding a DbContext is just a way to generate classes, that match the database. This means that you can add migrations even to an existing database.

First, you would need to add AspNetCoreDbContext to your DI container. Go to the Startup.cs file and in ConfigureServices add the following line.

    services.AddDbContext<AspNetCoreDbContext>(options =>
        options.UseSqlServer(Configuration.GetConnectionString("aspnetcore")));

Now you can add migrations to the second database. It’s a good practice to keep models and migrations separate for every database. Execute this command:

dotnet ef migrations add InitialCreate --context AspNetCoreDbContext --output-dir Migrations/AspNetCore

Here is what was generated:

There’s one thing worth noticing. Entity Framework Core generated initial migration with all changes that are currently in the AspNetCoreDbContext. You might need to clear all changes in that migration because those tables already exist.

Summary

When adding an Entity Framework Core 5 to an existing database, a good idea is to scaffold entity classes and context with a dedicated .NET CLI tool. You have a handful of parameters that you can provide and scaffold exactly what you need and how you need it.

You can add EF Core 5 migrations later on for keeping your database up to date with your code. One thing that you should keep in mind is that updating DbContext from the database again will override all changes that you did manually. Because of this, scaffolding DbContext is more of a one-time thing.

All code posted here was applied to a PrimeHotel project, that is available at my GitHub, so you can download it freely and experiment. Take a look also at this post on how to run it: PrimeHotel – how to run this project.

Hope you liked the post, cheers!


PrimeHotel – adding Entity Framework Core 5 in .NET

Let’s have a look at how to introduce Entity Framework Core 5 in ASP.NET Core project in .NET 5. We will start from an empty database, where we have a clean slate and can add tables the way we want.

In this post we will work with the PrimeHotel project, that was created for learning purposes. It’s all available at my GitHub, so you can download it freely. Take a look also at this post on how to run it: PrimeHotel – how to run this project.

What is Entity Framework Core

Entity Framework Core 5 is a lightweight, extensible, open-source, and cross-platform version of the popular Entity Framework data access technology. EF Core is an object-relational mapper (O/RM), enables developers to work with a database using .NET objects, and eliminating the need for most of the data-access code they usually need to write. This means no more SQLs. It proves to be great for most of the scenarios, however, when you need to work with big amounts of data, you might be better off with writing SQLs.

Adding an Entity Framework Core

Adding EF Core to an ASP.NET Core project is super easy. Start with installing NuGet packages:

  • Microsoft.EntityFrameworkCore
  • Microsoft.EntityFrameworkCore.Design
  • Microsoft.EntityFrameworkCore.SqlServer

Once it’s all done, add a PrimeDbContext in the Models folder, that would look like this:

    public class PrimeDbContext : DbContext
    {
        public PrimeDbContext(DbContextOptions<PrimeDbContext> options)
            : base(options)
        {
        }

        public virtual DbSet<Room> Rooms { get; set; }
    }

Now we need to add a Room class, that would represent an entity of a room, from Rooms table.

    public class Room
    {
        public int Id { get; set; }

        public int Number { get; set; }

        public string Description { get; set; }

        public DateTime LastBooked { get; set; }

        public int Level { get; set; }

        public RoomType RoomType { get; set; }

        public int NumberOfPlacesToSleep { get; set; }
    }

    public enum RoomType
    {
        Standard,
        Suite
    }

Now let’s handle the configuration part. Let’s use an empty database, that is hosted by us locally. The easiest approach is to install SQL Server Express edition and setup it locally. However, you can set up your database server in the docker container. Check my post on how to do it: Set up a SQL Server in a docker container.

In appsettings.json file we need to set our connection string. It should look similar to this:

Now let’s go to the Startup.cs file, where we need to configure EF Core to use our connection string. In ConfigureServices method, add this line:

    // Entity Framework
    services.AddDbContext<PrimeDbContext>(options =>
        options.UseSqlServer(Configuration.GetConnectionString("HotelDB")));

Notice that I used a HotelDB name, that is a name of my connection string in the appsettings.json file.

We have most of the crucial things done, but we need something, that would create tables in DB from our PrimeDbContext. So far we got only one, but it’s the right time to introduce migration mechanisms.

Adding EF Core migrations

Migrations in the EF Core database allow you to make changes to the database so that it is in line with the code of the application that uses it. This is a very important mechanism because changes in the structure of the database are introduced quite often, even by many programmers, so we need a universal mechanism to track and introduce these changes.

Adding first migration doesn’t differ much from adding the next ones. You need to open a terminal window in the location of the project and execute the command:

dotnet ef migrations add InitialCreate

When this command executes successfully, it will generate a migration file, where you can check what changes will be applied.

In this file you will find two methods: Up and Down. Those will represent the changes when migration will be applied and when it would be rolled back.

    public partial class InitialCreate : Migration
    {
        protected override void Up(MigrationBuilder migrationBuilder)
        {
            migrationBuilder.CreateTable(
                name: "Rooms",
                columns: table => new
                {
                    Id = table.Column<int>(nullable: false)
                        .Annotation("SqlServer:Identity", "1, 1"),
                    Number = table.Column<int>(nullable: false),
                    Description = table.Column<string>(nullable: true),
                    LastBooked = table.Column<DateTime>(nullable: false),
                    Level = table.Column<int>(nullable: false),
                    RoomType = table.Column<int>(nullable: false),
                    NumberOfPlacesToSleep = table.Column<int>(nullable: false)
                },
                constraints: table =>
                {
                    table.PrimaryKey("PK_Rooms", x => x.Id);
                });
        }

        protected override void Down(MigrationBuilder migrationBuilder)
        {
            migrationBuilder.DropTable(
                name: "Rooms");
        }
    }

The last thing left to do is to trigger updating the database. It would be great if our changes were checked and applied on every project run. Let’s see how we can accomplish that. First of all, let’s go to Startup.cs file and create a method. 

    private void UpgradeDatabase(IApplicationBuilder app)
    {
        using (var serviceScope = app.ApplicationServices.CreateScope())
        {
            var context = serviceScope.ServiceProvider.GetService<PrimeDbContext>();
            if (context != null && context.Database != null)
            {
                context.Database.Migrate();
            }
        }
    }

This method will use built-in Dependency Injection mechanism to fetch an instance of our PrimeDbContext and use it to run database migrations. Only ones that were not applied yet will be run.

Now, in the Configure method add a line at the bottom.

    UpgradeDatabase(app);

If we take a look into the database, we will see what migrations were applied. __EFMigrationsHistory table is created automatically by Entity Framework Core.

Using EF Core 5

Once we have everything in place, we have a proper configuration and database migrations, we can start benefit from having an O/RM mechanism.

All operations on tables in EF Core needs to go through PrimeDbContext. Using it is super simple, once we registered it in Startup.cs class, it will be available in any class for us to use. Take a look at this example of simple CRUD operations in the RoomController.

    [ApiController]
    [Route("[controller]")]
    public class RoomController : ControllerBase
    {
        private readonly PrimeDbContext primeDbContext;

        public RoomController(PrimeDbContext _primeDbContext)
        {
            primeDbContext = _primeDbContext;
        }

        [HttpGet]
        public async Task<IEnumerable<Room>> Get()
        {
            return await primeDbContext.Rooms.ToListAsync();
        }

        [HttpGet("{id}")]
        public async Task<IActionResult> Get(int id)
        {
            var room = await primeDbContext.Rooms.FindAsync(id);
            if (room == null)
            {
                return NotFound();
            }

            return Ok(room);
        }

        [HttpPost]
        public async Task<IActionResult> Post([FromBody] Room room)
        {
            var createdRoom = await primeDbContext.Rooms.AddAsync(room);
            await primeDbContext.SaveChangesAsync();

            return Ok(createdRoom.Entity);
        }

        [HttpPut]
        public async Task<IActionResult> Put([FromBody] Room room)
        {
            var existingRoom = await primeDbContext.Rooms.FindAsync(room.Id);
            if (existingRoom == null)
            {
                return NotFound();
            }

            existingRoom.Number = room.Number;
            existingRoom.Description = room.Description;
            existingRoom.LastBooked = room.LastBooked;
            existingRoom.Level = room.Level;
            existingRoom.RoomType = room.RoomType;
            existingRoom.NumberOfPlacesToSleep = room.NumberOfPlacesToSleep;

            var updatedRoom = primeDbContext.Update(existingRoom);
            await primeDbContext.SaveChangesAsync();
            return Ok(updatedRoom.Entity);
        }

        [HttpDelete("{id}")]
        public async Task<IActionResult> Delete(int id)
        {
            var existingRoom = await primeDbContext.Rooms.FindAsync(id);
            if (existingRoom == null)
            {
                return NotFound();
            }

            var removedRoom = primeDbContext.Rooms.Remove(existingRoom);
            await primeDbContext.SaveChangesAsync();

            return Ok(removedRoom.Entity);
        }
    }

Notice that in EF Core there is an asynchronous version of every method. Taking advantage of this is a good idea. This way your code will be faster and could be run more efficiently with many other requests in parallel.

Important things to have in mind:

  • we can query entities collections the way we want with LINQ using Where, Select and other methods and that will generate SQL out of all those conditions
  • If you’re just querying entities, you can use AsNoTracking() to improve performance
  • A call to the database will be performed when the code we write needs the results. This is for example where we use ToListAsync
  • All changes that we make needs to be saved with SaveChangesAsync to be applied

Those are only a few points to have in mind, but there us much more that is going underneath to be aware of. However, this is good for a start, and it more than enough to play with Entity Framework Core on your own.

Summary

Nice and clean! Entity Framework Core is perfect for almost every simple database usage. I’m sure you’ll find it useful and intuitive.

All code posted here is available at my GitHub, so you can download it freely. Take a look also at this post on how to run it: PrimeHotel – how to run this project.

Thanks for reading, let me know if you liked this post 🙂

Entity Framework Core 5 vs SQLBulkCopy

Entity Framework Core 5 is a great ORM to use and connect to the database with. It is easy to use and easy to understand. It offers just enough for the most common scenarios. So what about inserting big amounts of data in a one go? Would it be fast enough?

Let’s have a look at the code

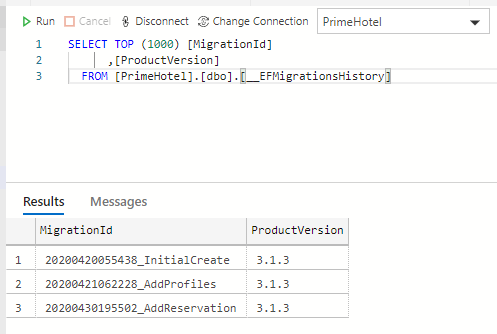
As my example, I’ll take a very simple entity – a Profile and PrimeHotel repository available here at my GitHub

My DbContext is very simple and it looks like this:

    public class PrimeDbContext : DbContext
    {
        public PrimeDbContext(DbContextOptions<PrimeDbContext> options)
            : base(options)
        {
        }

        public virtual DbSet<Room> Rooms { get; set; }

        public virtual DbSet<Profile> Profiles { get; set; }

        public virtual DbSet<Reservation> Reservations { get; set; }
    }

And Profile entity looks like this:

    public class Profile
    {
        public int Id { get; set; }

        public string Ref { get; set; }

        public string Forename { get; set; }

        public string Surname { get; set; }

        public string TelNo { get; set; }

        public string Email { get; set; }

        public DateTime? DateOfBirth { get; set; }
    }

Because I’ll be using WebApi for the ease of demonstration, I’ll create a ProfileController.

    [ApiController]
    [Route("[controller]")]
    public class ProfileController : ControllerBase
    {
        private readonly PrimeDbContext primeDbContext;
        private readonly string connectionString;

        public ProfileController(PrimeDbContext _primeDbContext, IConfiguration _configuration)
        {
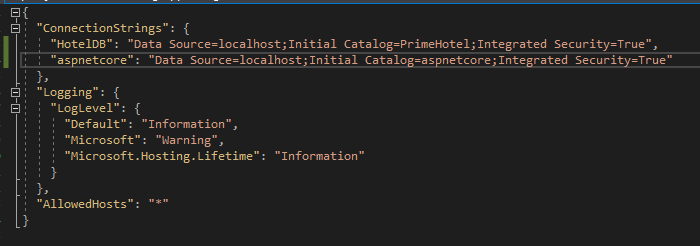
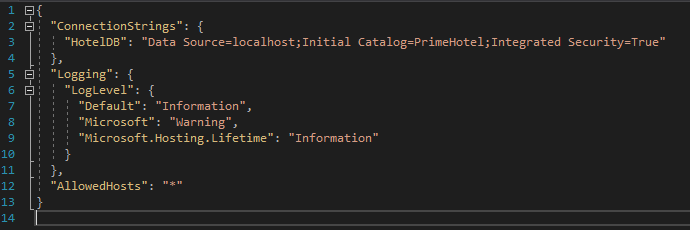
            connectionString = _configuration.GetConnectionString("HotelDB");
            primeDbContext = _primeDbContext;
        }
    }

For now, it’s pretty empty, but now you get the base that we will start with.

Let’s get profiles… lots of them! 

To test an insert of many entities at once we need to generate a lot of testing data. I like to have my test data as close to real values as possible, so to get those, I’ll use a Bogus nugget package.

Bogus is robust and very easy to use fake data generator. It will generate random values, that will fit a given context, like a surname, age, address, e-mail, company name, and so on. There are dozens of options. Go see for yourself in its documentation

Generating any number of profiles will look like this:

    private IEnumerable<Profile> GenerateProfiles(int count)
    {
        var profileGenerator = new Faker<Profile>()
            .RuleFor(p => p.Ref, v => v.Person.UserName)
            .RuleFor(p => p.Forename, v => v.Person.FirstName)
            .RuleFor(p => p.Surname, v => v.Person.LastName)
            .RuleFor(p => p.Email, v => v.Person.Email)
            .RuleFor(p => p.TelNo, v => v.Person.Phone)
            .RuleFor(p => p.DateOfBirth, v => v.Person.DateOfBirth);

        return profileGenerator.Generate(count);
    }

Inserting profiles with Entity Framework Core 5

I don’t want to send all those profiles in a request, because that would be a huge amount of data. Transferring that to a controller and deserialization on the ASP.NET Core 5 side can take a while, and it’s not really the part I want to test. This is why I choose to generate my profiles in the controller method and insert it right after that.

The code for the whole thing is really straightforward:

    [HttpPost("GenerateAndInsert")]
    public async Task<IActionResult> GenerateAndInsert([FromBody] int count = 1000)
    {
        Stopwatch s = new Stopwatch();
        s.Start();

        var profiles = GenerateProfiles(count);
        var gererationTime = s.Elapsed.ToString();
        s.Restart();

        primeDbContext.Profiles.AddRange(profiles);
        var insertedCount = await primeDbContext.SaveChangesAsync();

        return Ok(new {
                inserted = insertedCount,
                generationTime = gererationTime,
                insertTime = s.Elapsed.ToString()
            });
    }

Additionally, I added a Stopwatch to measure how long does it take to generate profiles as well as insert them. In the end, I’m returning an anonymous type to easily return more than one result at a time.

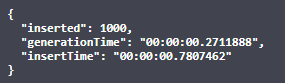
Finally, let’s test it out. For 1000 profiles I got:

But wait, let’s try something bigger, like 100000 entities:


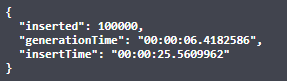
25 seconds? Really? Not that impressive.

What it does underneath? Let’s check with SQL Server Profiler:

exec sp_executesql N'SET NOCOUNT ON;
DECLARE @inserted0 TABLE ([Id] int, [_Position] [int]);
MERGE [Profiles] USING (
VALUES (@p0, @p1, @p2, @p3, @p4, @p5, @p6, 0),
(@p7, @p8, @p9, @p10, @p11, @p12, @p13, 1),
(@p14, @p15, @p16, @p17, @p18, @p19, @p20, 2),
(@p21, @p22, @p23, @p24, @p25, @p26, @p27, 3),
...
) AS i ([DateOfBirth], [Email], [Forename], [Ref], [ReservationId], [Surname], [TelNo], _Position) ON 1=0
WHEN NOT MATCHED THEN
INSERT ([DateOfBirth], [Email], [Forename], [Ref], [ReservationId], [Surname], [TelNo])
VALUES (i.[DateOfBirth], i.[Email], i.[Forename], i.[Ref], i.[ReservationId], i.[Surname], i.[TelNo])
OUTPUT INSERTED.[Id], i._Position
INTO @inserted0;

SELECT [t].[Id] FROM [Profiles] t
INNER JOIN @inserted0 i ON ([t].[Id] = [i].[Id])
ORDER BY [i].[_Position];

',N'@p0 datetime2(7),
@p1 nvarchar(4000),
@p2 nvarchar(4000),
@p3 nvarchar(4000),
@p4 int,
@p5 nvarchar(4000),
...
@p0='1995-02-22 09:40:44.0952799',
@p1=N'Sherri_Orn@gmail.com',
@p2=N'Sherri',
...

SqlBulkCopy to the rescue

SqlBulkCopy is a class that was introduced a while ago, specifically in .Net Framework 2.0 – 18 years ago! SqlBulkCopy will only work to save data in a SQL Server database, but its source can be anything, as long as it’s results can be loaded to DataTable or read by IDataReader.

Let’s have a look at how we can use it in our example.

    [HttpPost("GenerateAndInsertWithSqlCopy")]
    public async Task<IActionResult> GenerateAndInsertWithSqlCopy([FromBody] int count = 1000)
    {
        Stopwatch s = new Stopwatch();
        s.Start();

        var profiles = GenerateProfiles(count);
        var gererationTime = s.Elapsed.ToString();
        s.Restart();

        var dt = new DataTable();
        dt.Columns.Add("Id");
        dt.Columns.Add("Ref");
        dt.Columns.Add("Forename");
        dt.Columns.Add("Surname");
        dt.Columns.Add("Email");
        dt.Columns.Add("TelNo");
        dt.Columns.Add("DateOfBirth");

        foreach (var profile in profiles)
        {
            dt.Rows.Add(string.Empty, profile.Ref, profile.Forename, profile.Surname, profile.Email, profile.TelNo, profile.DateOfBirth);
        }

        using var sqlBulk = new SqlBulkCopy(connectionString);
        sqlBulk.DestinationTableName = "Profiles";
        await sqlBulk.WriteToServerAsync(dt);

        return Ok(new
        {
            inserted = dt.Rows.Count,
            generationTime = gererationTime,
            insertTime = s.Elapsed.ToString()
        });
    }

First, we need to define a DataTable. It needs to represent the Profiles table because this is our destination table that we are going to use.

Then with WriteToServerAsync we are loading profiles to the database. Let’s have a look at how does it looks like in SQL.

select @@trancount; 
SET FMTONLY ON select * from [Profiles] 
SET FMTONLY OFF exec ..sp_tablecollations_100 N'.[Profiles]'

insert bulk [Profiles] (
   [Ref] NVarChar(max) COLLATE SQL_Latin1_General_CP1_CI_AS, 
   [Forename] NVarChar(max) COLLATE SQL_Latin1_General_CP1_CI_AS, 
   [Surname] NVarChar(max) COLLATE SQL_Latin1_General_CP1_CI_AS, 
   [TelNo] NVarChar(max) COLLATE SQL_Latin1_General_CP1_CI_AS, 
   [Email] NVarChar(max) COLLATE SQL_Latin1_General_CP1_CI_AS, 
   [DateOfBirth] DateTime2(7))

How does it work internally? StackOverflow comes with an answer:

SqlBulkCopy does not create a data file. It streams the data table directly from the .Net DataTable object to the server using the available communication protocol (Named Pipes, TCP/IP, etc…) and insert the data to the destination table in bulk using the same technique used by BCP.

Two totally different approaches. What about the performance? Let’s compare those two.

The performance

The outcome of a performance check is not a huge surprise. SqlBulkCopy is meant to insert data fast and it is extremely performant. 

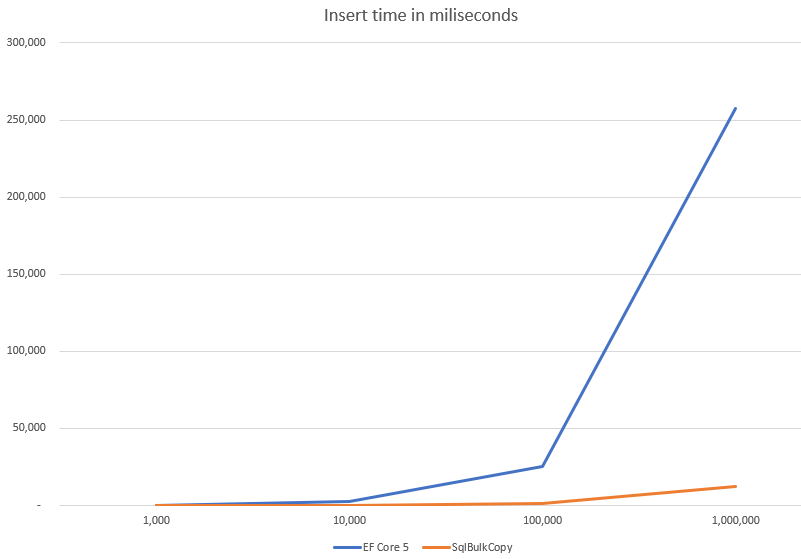
Big differences start to show when you insert more than 10 thousand entities at a time. Over that number, it might be wort to reimplement your code to use SqlBulkCopy instead of Entity Framework Core 5.

What about other operations?

When it comes to handling big amounts of data things are starting to be a little more tricky. You might want to take a look at the database improvements and what data you actually need to operate on. Have in mind that operations on big chunks of data are much faster when done on the database side. 

I had a case once where I needed to perform and update on around a million entities, once a day. I combined a few things and it worked out pretty good.

  • create a temporary table, i.e. T1
  • insert data with SqlBulkCopy
  • perform an update on the database side
  • select any data you might need, i.e. for logging
  • delete a temporary table

I know this is moving business logic inside the database, but some sacrifices are required if this update operation needs to be fast.

All code posted here is available on my GitHub.

Cheers!